

Preface: This doesnt work in randoms very well since theres a good chance your ally wont be thinking of doing this same strategy.
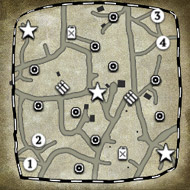
Map Vetoes:
Minsk Pocket
Dusseldorf
Trois Pont
Semoisky Winter
Crossing in the Woods
Vetoes are really personal preference. Learn to adapt to the map as well as the faction.
Commanders:
Special Weapons
Tank Hunters - A good unit to help alleviate the innate faction weakness against light vehicles. Their AT rifles perform similarly like PTRS, and can hit infantry. They also have a very nifty passive where they can detect tanks in fog of war. You can bring up the tactical map to see what exactly the vehicle is. Very good when playing against the Sturmtiger, and having knowledge of enemy positions is always important. Be warned, the AT nade currently doesnt do enough damage to crit a light vehicle on its own, you need to hit the vehicle with something first.
Resupply HT - A mobile Forward Assembly. With this Resupply HT you dont have to tech weapon upgrades or build an assembly for frontline reinforcement, but it does cost 30 fuel. This will delay your Cromwell timings by 1-2 minutes. Choose carefully what you want to spend your fuel on.
Hold the Line - A fairly shitty ability at the moment. The “frontline territories” referenced in the tooltip is actually only territories captured by you, not your ally. The Typhoons come fairly late, but can be devastating if the enemy is for some reason still in the sector. Go into cheat mod and play around with what the ability actually does. It is situationally good, in the case where you want to force retreats in the late game when the enemy is capping sectors.
Concentrated Fire Operation - A late game off-map artillery ability, CFO is basically a super version of Wehrmacht Railway Artillery. It fires more shells and is more accurate from my experience. If you call in CFO right on top (AND I MEAN RIGHT ON TOP) of an OKW truck, it will kill it 95% of the time. You have to get really unlucky for it to not kill the truck, or you may have not actually called it in on top of the truck. Try to save up 250 munitions by the time youre 13 CP so you can just call it in on an enemy Schwerer as soon as possible.
Crocodile - Even though its been nerfed fairly heavily as of recent patches, it is still really scary and in my opinion the best anti-infantry heavy. Wipes anti tank guns fairly easily. An often overlooked part of this call in is the flares you get when you call in the Crocodile. Use it to gain information on the enemy. However, for this strategy the Crocodile will be for most part ignored.
Tactical Support
Designate Command Vehicle - A cornerstone of this strategy, DCV gives significant debuffs to a vehicle in exchange for giving it a beneficial aura and giving access to a FREE recon. This recon also reveals cloaked units such as snipers and Raketens. Use this in conjunction with various offmaps and to gain information on enemy locations. The best unit to give this to is the Univeral Carrier, since its cheap and its combat usage is useless anyways.
Field Recovery Operation - Using this ability to pop flares on ALL wrecks on the map, and it will spawn you 2 Royal Engineers that come with Mine Sweepers and the ability to salvage vehicle wrecks. Salvaging wrecks gives you manpower AND fuel depending on the health of the wreck. The more health it has, the more resources you get. Note that these Engineers cant salvage weapons.
Air Resupply Operation - Drops in several team weapons into a friendly sector. Pretty self explanatory. Try not to use it since you'll want to be saving up munitions for Artillery Cover.
Artillery Cover - The legacy of Stefan Haines, and the greatest gift he has given to the players of UKF. While his other creations have been significantly nerfed, overhauled, or changed in general since he created them; Artillery Cover is the last surviving truly OVERPOWERED ability. For 250 munitions you can designate an area where enemy infantry and vehicles IN LINE OF SIGHT will get pinned and in the case of vehicles recieve turret crits and damaged engines as well as taking some damage. The shells rain down incredibly quickly, and will continue to fall as long as you have sight. Use it in conjunction with the recon plane from DCV for maximum effect. Once you use Artillery Cover, YOU MUST COMMIT TO THE ATTACK. Artillery Cover is the last thing you do before you launch a massive full scale attack on your enemy thats aimed at completely crushing them under the treads of you and your teammates combined Cromwell armada. Also note that friendly vehicles can be critted if they get hit by the shells, but friendly infantry wont be pinned.
Forward Observation Post - Fairly useless. The abilities are rather munitions expensive and you want to save up for as many uses of Artillery Cover as possible.
Overall gameplan:
Turtle until the 11-12 minute mark, which is when you and your teammate will be able to afford a Cromwell. Use the Cromwell together for maximum shock value and to quickly kill and wipe units in their first engagement. Continue to amass Cromwells, and utilize the full extent of your teams offmap abilities to completely crush enemy resistance.
Build Orders:
Starting Section
Section
Section/Vickers (Personal preference. I prefer 3 Sections, my teammate prefers the Vickers)
Tier 2
Sapper
Mortar Emplacement
Sapper/AT Gun/Sniper/Forward Assembly/Caches/Field Recovery Operation
One or none of the following: Bolster Squad Size, Weapon Racks, Resupply HT
Tier 3
Cromwell x 10
Note: Tech up to Tier 2 as soon as you have the fuel. The faster you have Tier 2, the faster you get your Mortar Emplacement
Step by Step:
Early Game: The very first objective is to secure important pieces of green cover and/or structures that are in the areas of high contest. Its better to not capture anything with your starting Section to ensure that you gain control of a garrison, begin building a trench where there is no garrison, or just being behind green cover while capturing a fuel point. The overall objective in the early game after the initial few engagements is to hold 50% of the map in terms of resources. Do not overextend and be forced to retreat, hold what you can and dig in. Push forward when enemy players retreat.
Trenches - For a measly 50 manpower you can create a garrison that only you can use. On certain maps such as Kharkov, this is invaluable because there is very little cover on the map, and its very difficult for players to assault a Section in a trench. Often times I build a trench in the frontlines with my first Section as soon as they hit a frontline territory because it does take awhile to complete.
Mid Game: I consider midgame as soon as you tech into T2. As soon as you hit T2, upgrade your Sections with at least 1 medic, and 1 Artillery Flares.in combat, keep your Sections well healed, and try to minimze model losses as much as possible. The next objective is for both you and your teammate to build Mortar Emplacements. I cannot express how important it is to get the mortar emplacements as fast as possible. Around 5 minutes or so.These will help help you deal with blobs and enemy machine guns that you will likely be having trouble against around this time in the game. The Mortars serve as a bridge into the late game, and to force your enemy to devote resources into destroying them. Positioning and timing of the Mortar Emplacements is absolutely crucial. Try to save up 400 manpower as soon as your first Sapper squad arrives on the field so you can build it quickly. Construct the emplacements fairly close to each other, and also try to position them where they can hit multiple important points. VPs, enemy munitions/fuel, etc. Protecting these mortars are extremely important. The enemy WILL make pushes against them, and you MUST hold them off until you get your first Cromwells.
Late Game: Late game begins around the 11/12 minute mark. Your first Cromwells should have been built by now. Use good communication between you and your teammate to coordinate attacks with Cromwells. Try not to split up, but focus on attacking one opponent. Its very hard for an enemy player to deal with 2 Cromwells at the 12 minute mark. It is of the UTMOST importance that you do not lose your first set of Cromwells. Proceed to obtain more Cromwells as you get fuel, and use the combined might of 4 Cromwells to really bully the opponent and wipe squads that try to harass points. Poke, but do not commit heavily as you may run into mines and other nasty surprises. I cannot stress how important it is for you to keep your Cromwells alive at this stage of the game, unless you know you will get a favorable trade.
Very Late Game: The Axis have probably dug in somewhere, and youre having trouble uprooting them. This is when Artillery Cover and CFO really shine. First, send out Sappers with Minesweepers to clear the avenue in which your tanks will run through. Then use the Command Vehicle Recon to gather information on enemy anti-tank gun positions, and call in CFO on an enemy Schwerer to deal with it, and also call in Artillery Cover on the largest concentration of enemy forces. And then just fucking rush in with your combined might of 6+ Cromwells and proceed to kill everything. Dont forget about your infantry during this push! Have them capture points, recrew weapons that you kill, and in general support your tanks in their push.
Dealing with Panthers: Panthers are no doubt a strong tank. However, if played correctly your Cromwells will signficantly outnumber enemy Panthers. If you dont lose your first Cromwell, its really easy to get 2 more to swarm and kill a Panther. Its likely youll lose one, or maybe even two Cromwells, but at the end of the day I would consider that a good trade because youre preventing a build up of Axis armor, where as you can easily replace your Cromwells due to them being so fucking cheap. In addition, dont forget to talk to your ally when youre diving for enemy armor. Instead of diving with just 2 Cromwells, you could be diving with 4.
A General Note on Mindset:
The first 12 minutes is all about turtling around your mortar pits and relying on Sections in cover to hold the line. However, defensive play leads to grindy games, and grinding against Axis is not fun. Once you have your Cromwells, the initiative is in your hands. The enemy will NOT have a medium tank at this point. If they somehow do, use you and your allies Cromwell to kill it in 2 volleys (Medium tanks die to 4 hits). Keep the initiative. Dont go back to trying to grind out the rest of the match. Dont just poke at the enemy, and then watch as your shots bounce at long range. Sometimes you have to go all in to get the favorable trade, and dont be afraid to do so. In the end game, Artillery Cover changes risky all-ins, to near guaranteed enemy routs. At the same time, dont be stupid and over confident with your ability to overrun the enemy with Cromwells. Smart players will lay mines. Use sweepers to pick them up, and then attack when youre ready.
But Lemon, why not save for Churchills, Comets, Crocodiles?
Because none of those tanks actually do more damage than a Cromwell. They all do 160 damage per hit or less in the case of the Crocodile, but they cost significantly more, and they also come out much later than Cromwells do. This gives the Axis time to lay mines, build more AT, and to get their own critical mass of tanks. Its up to the Brit team to strike first and strike hard with their Cromwells and to prevent that build up of enemy armor.
But Lemon, Cromwells always bounce shots!
Not really true. Sure they do have a decent chance to bounce against heavy armor, but as I noted before, sometimes you have to all in your Cromwells. Rush forward with your armor, block the enemy tanks escape, and gang bang it. Medium and close range hits have a higher chance of penetrating, and rear armor pens are guaranteed. Dont sit at long range and then complain that Cromwells suck. Of course they suck at long range. Theyre not meant to slug it out against Axis tanks that are way better at that.
But Lemon, what about the Luchs!?
The Luchs can definitely be a serious issue. Use AT Sections to help ward them off, and build an AT gun. Laying mines definitely helps, and remember: the goal is to just survive until your Cromwells arrive and then use the shock value of 2 Cromwells to destroy any light vehicles. The ‘hard’ counter to the Luchs is the AEC, but the AEC only delays the Cromwell, so make do with mines, AT guns, and AT Sections. This is where player skill plays an important role.
But Lemon, Sections fucking suck
No they dont. This one is actually a l2p issue. I know some people like to say That I think everything is a l2p issue, but well positioned Sections can deal with pretty much most infantry in the early game. However, losing even one model can be a huge hit, so be careful about how you engage and position. Youll get better with experience, but in general stick to heavy cover and structures (the basics).
But Lemon, leigs and mortar half tracks r fukn me up fam.
In my experience playing the only time I really have trouble against Axis indirect is when my teammate and I build our emplacements far from each other so its possible for Axis indirect to focus down one emplacement at a time. If you both build your emplacements fairly close to each other and at the same time, its hard for the Axis to siege it since youll have 4 mortars shooting back. Remember to brace if you come under particualrly heavy fire, and to have Sappers repair. Communicate with your teammate! Once you get Cromwells, a juicy target is to rush the enemy indirect and decrew, and then either kill the gun or recrew it for yourself. Doing this will give you a significant edge since your mortar emplacements will be pretty much uncontested.
But Lemon, I think mines counter this strategy, and Raketens can cloak!
Get sweepers you shit. Command Vehicle Recon reveals cloaked Raketens.
But Lemon, theres a lot of FUCKING Axis stuff over there!
Use Artillery Cover on it, and watch as they get CC’d. Actually dont just watch FOLLOW THROUGH with your tanks and infantry. Every time you use Artillery Cover you should be doing a massive attack with your Cromwells and infantry.
How many caches should we get?
Try to make at least 2 fuel caches in the mid game to help bolster your teams fuel economy and to prepare for the Cromwell spam. Generally whoever has more manpower should try to build the caches.
God damn that Schwerer is so annoying!
Well good thing you can delete it for 250 munitions
Replays:
vs top 10 Team


vs top 75 Team
Stomp

vs kim jong un arranged team
Watch some of my recent broadcasts, theyve all been of me using this strategy.
http://www.twitch.tv/l3monsqueeze/profile


 cblanco ★