I started to look into creating maps now. Great guides on here. I have a couple of questions, though:
1) I'm using splines a lot. Now, when I have texture splines stacked, is there a way to influence their order? Like, at times it seems like I click on one of them and then something that was on top suddenly is invisible and so on...
2) Where can I set the amount of fog?
3) Regarding cover: Things that modify cover are objects and textures only, right? Like, if I create a step in the terrain elevation, that will not create cover by itself (yeah, it will have some influence on scattering shots, but not cover per se). So, a ditch will not have cover because it is a dent in the terrain, but rather because of the ditch texture put in, right?
I guess that cover from objects is directional while cover from textures is not. So, two units in the same straight ditch will have cover modifiers on them, even though they shot each other along the ditch?
I'm working on a map recreating the situation around the village that I grew up in, Winnekendonk. It was attacked by the British 3rd Division on the 2nd of March, 1945. Some Fallschirmjäger, parts of the 8. Fs.-Jg. Division, tried to delay the advance of the British.
I'm attempting to stay close to how the landscape there really would have looked, but it's kind of tricky mostly for two reasons:
1. Most trees and bushes at that time of year have no leaves yet (they still might have some brown leaves left over, though); on the other hand there was no snow, it was pretty wet and muddy. There are not that man plants that have no leaves but also no ice or snow on them...
2. Almost all buildings in the area are made from bricks, with a few with plaster. There don't seem to be any rural/farmland brick buildings available (although some of the industrial buildings probably work).
I guess there is no way to at least recolor (or retexture) the models in the worldbuilder, or is there?
Starting with the worldbuilder, a few questions...
14 Feb 2017, 09:14 AM
#1

Posts: 1138 | Subs: 2
14 Feb 2017, 14:35 PM
#2


Posts: 1467 | Subs: 4
1.) Control + Page Up / Page Down, will sort them to the top or the bottom of the layer. You can also use the up and down arrow keys to move up and down at 1 increment, but depending on how many you have used, there will be a lot. Also remember that the "On top of Snow" layer is actually separate than the default layer, so those in the on top of snow layer will always be over the default layer.
2.) Atmosphere settings. This will take a while to make a good one that doesn't fuck up lightning though. I can send you some customs, but it would be better to load up the default ones available and mess with them so you can figure out what is going on yourself. Either way if you need help ask, and I'll do my best as this is a pretty hard to learn portion of the worldbuilder.
3.) A ditch will not create cover via terrain manipulation only, same with a hill, just pathing issues if it is above or below a .5m change from the surrounding grid. The textures themselves will assign cover.
Here is a quick list off the top of my head:
All folders with "Crater" in the name will provide medium cover
Both "Ditch folders" will provide cover, the heavy variation is heavy cover, the rest is medium
All textures in "road asphalt" will provide negative cover and a speed bonus to all vehicles that travel over it, this can adversely effect vehicle movement as they will prioritize the quickest route
Now as for your "accuracy" description. You are going to have to use winter variations of trees, there are almost no bushes that will work as you described.
Also when it comes to buildings, you can only use 1 major tileset. AKA industrial, rural, or urban, if you don't this will cause lag.
And the only way to recolor would to be modded objects, yes, so currently it is not possible

14 Feb 2017, 16:35 PM
#3
Posts: 1138 | Subs: 2
Thanks Tric!
Oh, that's a bummer...
Also when it comes to buildings, you can only use 1 major tileset. AKA industrial, rural, or urban, if you don't this will cause lag.
Oh, that's a bummer...
14 Feb 2017, 19:43 PM
#4
Posts: 1138 | Subs: 2
1.) Control + Page Up / Page Down, will sort them to the top or the bottom of the layer. You can also use the up and down arrow keys to move up and down at 1 increment, but depending on how many you have used, there will be a lot.
Uhm, just played around with splats (btw, is there a way to make them appear in their "optimum size" right away so one doesn't need to click on that button?).
While the Control + Page Up thing worked nicely with the texture splines, it doesn't seem to work with splats. Do I fail to smash the right buttons or is there some trick to this?
14 Feb 2017, 21:25 PM
#5
Posts: 1467 | Subs: 4
Uhm, just played around with splats (btw, is there a way to make them appear in their "optimum size" right away so one doesn't need to click on that button?).
While the Control + Page Up thing worked nicely with the texture splines, it doesn't seem to work with splats. Do I fail to smash the right buttons or is there some trick to this?
Should be the same, if you are having issue placing it over a spline, it is most likely because the spline is "over snow"
14 Feb 2017, 21:44 PM
#6


Posts: 2742
When ordering the layer of splats you have to select the splats you want to change the order of.
So if you have a splat of road tracks over a crater, select both the tracks and crater, then use page up/down.
Don't quote me on this but I think it is the last selected splat that gets 'cycled' through the layering.
As far as splats and splines layering over each other, I think you just have to juggle between the two layers ordering. And like tric said, always be aware of the 'over snow' toggle. It can be your best friend and worst enemy at times.
Strategic Territory Points Mod:
http://steamcommunity.com/sharedfiles/filedetails/?id=604491510
Classic resource points!
http://steamcommunity.com/sharedfiles/filedetails/?id=604491510
Classic resource points!
14 Feb 2017, 22:10 PM
#7
Posts: 1467 | Subs: 4
When ordering the layer of splats you have to select the splats you want to change the order of.
So if you have a splat of road tracks over a crater, select both the tracks and crater, then use page up/down.
Don't quote me on this but I think it is the last selected splat that gets 'cycled' through the layering.
As far as splats and splines layering over each other, I think you just have to juggle between the two layers ordering. And like tric said, always be aware of the 'over snow' toggle. It can be your best friend and worst enemy at times.
That is not at all how you layer splats, that is how you layer multiple splats in a quick group. But other than that you are correct.
15 Feb 2017, 00:55 AM
#8
Posts: 2742
Uhm, just played around with splats (btw, is there a way to make them appear in their "optimum size" right away so one doesn't need to click on that button?).
While the Control + Page Up thing worked nicely with the texture splines, it doesn't seem to work with splats. Do I fail to smash the right buttons or is there some trick to this?
I wish. Although I've found that using "shift+rightclick&drag" to be more useful than using 'optimum size'. Remember, optimized size is often relative to what kind of visuals you want. Also, some identical splats have different 'optimum sizes'. So, something to keep in mind when worldbuilding: the differences in texture resolution from splat to splat can be highly imperceptible, especially when you consider things like opacity and that many players aren't playing at 100% video specs.
That is not at all how you layer splats, that is how you layer multiple splats in a quick group. But other than that you are correct.
Okay. I've only ever cared about the layering of splats when there's overlap so I don't see a whole lot of functional difference.
But I can say though that when I have issues, 9 out of 10 times "On Snow" is ticked.

Strategic Territory Points Mod:
http://steamcommunity.com/sharedfiles/filedetails/?id=604491510
Classic resource points!
http://steamcommunity.com/sharedfiles/filedetails/?id=604491510
Classic resource points!
15 Feb 2017, 04:05 AM
#9

 4
4 
Posts: 4301 | Subs: 2
")


Playercard of Bo-Bobby Lion | ||||||||||||||||
|


15 Feb 2017, 16:55 PM
#10
Posts: 1467 | Subs: 4
Okay. I've only ever cared about the layering of splats when there's overlap so I don't see a whole lot of functional difference.
But I can say though that when I have issues, 9 out of 10 times "On Snow" is ticked.
It is mainly for layers crater textures so you can't tell that the same crater is used repeatedly. And for urban settings roads, such as corners or the beginning of side walks along them. Although not largely used, still good to know the difference for later on, can make life a whole lot easier.
Also @siphon Don't forget to actually use the layers yourself. It is almost completely hidden. On the very far left of your screen in the middle of it, click and a new panel will come out allowing you to assign all assets you use to layers. You can use them and call them whatever you want to not get confused, but it really helps in dealing with Road Layouts and things.
I can post up a screen if you need help with finding it, but once you find it you will cry out "WHY IS THAT HIDDEN LIKE THAT?"
lol
15 Feb 2017, 16:57 PM
#11
Posts: 1467 | Subs: 4
I wish. Although I've found that using "shift+rightclick&drag" to be more useful than using 'optimum size'. Remember, optimized size is often relative to what kind of visuals you want. Also, some identical splats have different 'optimum sizes'. So, something to keep in mind when worldbuilding: the differences in texture resolution from splat to splat can be highly imperceptible, especially when you consider things like opacity and that many players aren't playing at 100% video specs.
I wanted to respond to this separately, it is actually better to resize them all yourself. By using more and more splats that are actually the same texture, but with a slight color variation or different optimum size, you end up causing more lag, since it will have to load more than if you would take the texture you want and edit yourself, all though you have to make a bit more effort on your end, it will keep your map running smoother for longer.
15 Feb 2017, 19:12 PM
#12
Posts: 1138 | Subs: 2
Thanks guys!
And yes, it was the "On snow" switch...
And yes, it was the "On snow" switch...
16 Feb 2017, 00:43 AM
#13
Posts: 1467 | Subs: 4
Thanks guys!
And yes, it was the "On snow" switch...
Yah splines tend to "default" to on snow for some unknown reason. lol
18 Feb 2017, 19:18 PM
#14
Posts: 1138 | Subs: 2
Ok, I got a little further now. Far from finished but I thought I could try out some of the things I made versus AI.
Now, when setting up the map I stuck closely to what Unlce Sam's tutorials, including the dashed line around what I thought would be the area in which units can move around:
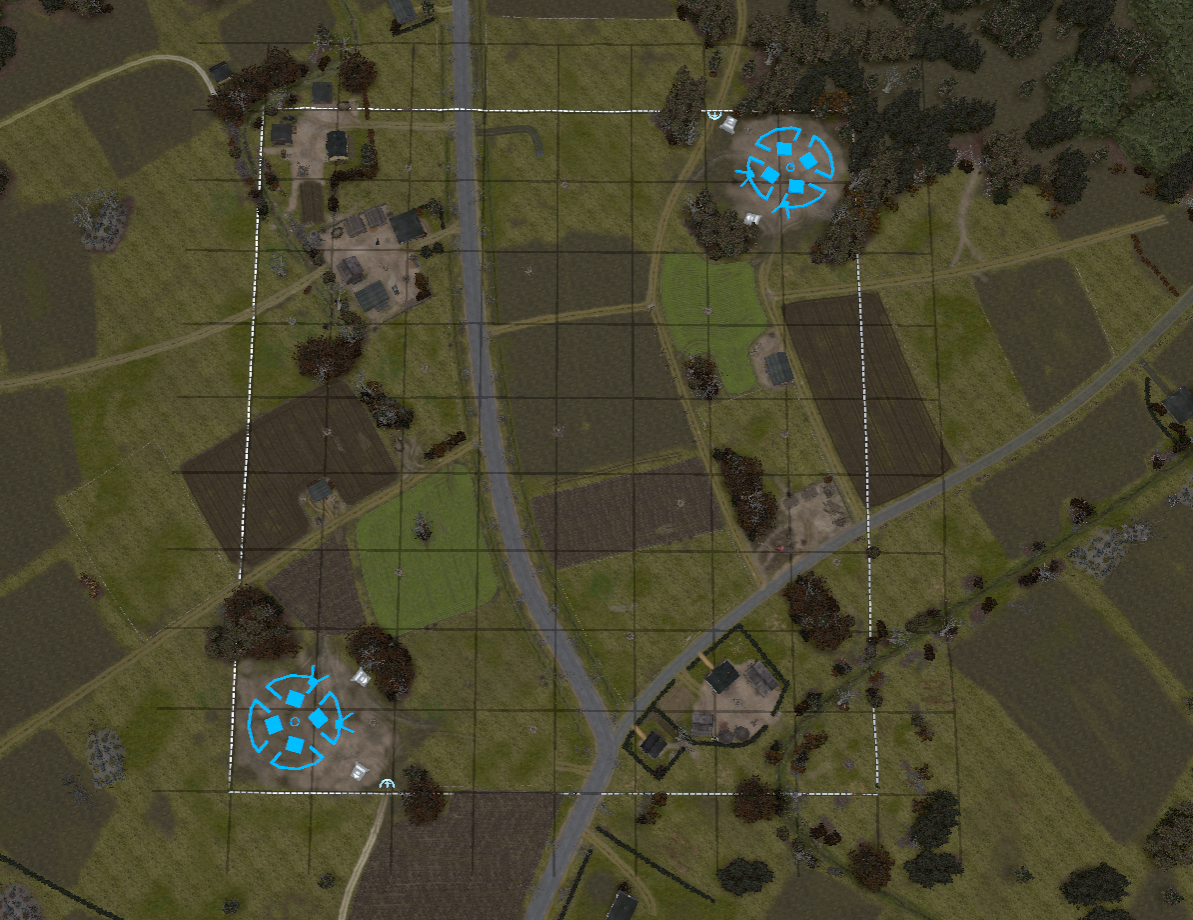
This is my map (yeah, not finished of course) in top view, with the 32 m grid.
I was a bit surprised to find that units could move all the way to the outer edge of the 32x32 grid, so seems like I have to set the allowed area somehow (also makes sense given that there are maps with a clear non-rectangular shape in the map pool.
So, how do I fix this?
Now, when setting up the map I stuck closely to what Unlce Sam's tutorials, including the dashed line around what I thought would be the area in which units can move around:
This is my map (yeah, not finished of course) in top view, with the 32 m grid.
I was a bit surprised to find that units could move all the way to the outer edge of the 32x32 grid, so seems like I have to set the allowed area somehow (also makes sense given that there are maps with a clear non-rectangular shape in the map pool.
So, how do I fix this?
28 Feb 2017, 08:24 AM
#15
Posts: 1467 | Subs: 4
Sorry I wasn't subbed to this and it weasled its way to the bottom of the page so I missed your post 
You have to use the impass editor tool. It is the icon that looks like a traffic light.
If you need more detailed let me know and I'll help more. This is why I wanted to get a new HDD to update the tutorials... FeelsBadMan
(also I subbed to this, and feel free to pm me with other things if I miss something.)
28 Feb 2017, 21:46 PM
#16
Posts: 1138 | Subs: 2
Sorry I wasn't subbed to this and it weasled its way to the bottom of the page so I missed your post
You have to use the impass editor tool. It is the icon that looks like a traffic light.
(also I subbed to this, and feel free to pm me with other things if I miss something.)
No worries, man, thanks for the reply. I found the solution I was looking for. I tried the impass editor tool and while that indeed keeps units from walking into these areas, it's not exactly what I was looking for because it doesn't produce the sort-of-dashed line that surrounds that area on other maps.
However, after some more googling and trial-and-error, I found this thread, so the answer is the "Interactivity stage editor". Not really intuitive, huh?
Another question: I noticed that outside of the playable area everything is just black, no textures or anything. Is it always like that or is that something one can change in e.g. the Atmosphere properties? (no problem if it is always like that, just wondering...)
28 Feb 2017, 23:52 PM
#17
Posts: 1467 | Subs: 4
Oh yes, use the interactivy stage editor to define camera edges, I misunderstood what you were trying to do, at the end of the day you still need to do both however.
Regarding the blackness, paint the OOB (out of bounds) area with the interactivity stage editor and use 50 if memory serves, you can use other parameters, but for the most consistent use 50.
I've seen relic maps use 35 before, but it seems to be a deprecated feature that no longer changes anything.
Regarding the blackness, paint the OOB (out of bounds) area with the interactivity stage editor and use 50 if memory serves, you can use other parameters, but for the most consistent use 50.
I've seen relic maps use 35 before, but it seems to be a deprecated feature that no longer changes anything.
14 Mar 2017, 21:29 PM
#18
Posts: 1138 | Subs: 2
Oh yes, use the interactivy stage editor to define camera edges, I misunderstood what you were trying to do, at the end of the day you still need to do both however.
Regarding the blackness, paint the OOB (out of bounds) area with the interactivity stage editor and use 50 if memory serves, you can use other parameters, but for the most consistent use 50.
I've seen relic maps use 35 before, but it seems to be a deprecated feature that no longer changes anything.
so...
Ok, I think I have a version of the map not that might actually work. I tried it a couple of times vs. AI. Now, if I want to play on it vs. some guys, so I need to upload it to the STEAM workshop? I googled a little, seems like that is more complex to do than I thought...
Is it as complicated? And/or is there an easier way?
14 Mar 2017, 21:48 PM
#19
Posts: 1467 | Subs: 4
Export the package, than through coh 2 workshop page, publish it. You're good to go then.
22 Mar 2017, 08:28 AM
#20
Posts: 1138 | Subs: 2
Ah, yes, that indeed is simple.
I was wondering: Is it possible to rotate objects around another axis (like, not just in the horizontal plane)? I guess, the awkward solution would be create a tilted area and then use autoalign, but is there a magic button that I have to hold or something in order to be able to rotate it directly?
I was wondering: Is it possible to rotate objects around another axis (like, not just in the horizontal plane)? I guess, the awkward solution would be create a tilted area and then use autoalign, but is there a magic button that I have to hold or something in order to be able to rotate it directly?
1 user is browsing this thread:
1 guest
Livestreams
 |
|
|
3 | ||
 |
|
|
1 |
Ladders Top 10


-
#Steam AliasWL%Streak
- 1.816139.854+4
- 2.896303.747+11
- 3.46969.872+4
- 4.24299.710+12
- 5.408214.656+3
- 6.347136.718-1
- 7.371195.655+1
- 8.403289.582+1
- 9.12857.692+8
- 10.21358.786+1
Data provided by
 Relic Entertainment
Replay highlight
VS
-
 cblanco ★
 -
 보드카 중대
-
 VonManteuffel
 -
 Heartless Jäger
Einhoven Country


Honor it
16
Download
2742
Board Info
332 users are online:
1 member and 331 guests
ecomwebapp
ecomwebapp
0 post in the last 24h
0 post in the last week
15 posts in the last month
0 post in the last week
15 posts in the last month
Registered members: 64044
Welcome our newest member, ecomwebapp
Most online: 4501 users on 26 Oct 2025, 01:00 AM
Welcome our newest member, ecomwebapp
Most online: 4501 users on 26 Oct 2025, 01:00 AM