
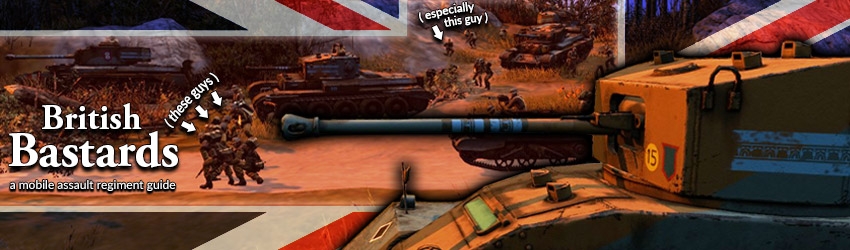
Introduction
Dear Reader!
The aim of this guide will be to better understand basic British army concepts, builds, counterbuilds and, of course, the usage of abilities from this strong commander. This guide is for all players, from complete novices to pr0s. It even has some tips from the top tier environment. I hope you will be better at playing with the Mobile Assault Regiment, or the UKF in general, once you have read this guide.
The aim of this guide will be to better understand basic British army concepts, builds, counterbuilds and, of course, the usage of abilities from this strong commander. This guide is for all players, from complete novices to pr0s. It even has some tips from the top tier environment. I hope you will be better at playing with the Mobile Assault Regiment, or the UKF in general, once you have read this guide.
Commander Abilities Descriptions
0CP - M2 Flamethrower

60  | "Give your engineers some fire to play with, I mean burn down stuff with." |
| !The British M2 flamethrower is comparable to other flamethrowers. It takes one weapon slot (meaning you can only get 1 PIAT/Bren LMG from a weapon rack if you upgrade the Royal Engineers with the flamethrower. It´s mutually-exclusive with the minesweeper and deals the same damage to squads in the cover, like other flamethrowers) |
Many players think the Land Mattress is the highlight of this doctrine, but in my opinion, the M2 flamethrower is the strongest ability in this commander. It gives the Brits the weapon they lack mid-game: a garrison clearing tool.
Do always upgrade your first engineer squad with a flamethrower, so you can force any Axis infantry either to abandon their garrison, or burn to death. Do not forget that you need a minesweeper as well, otherwise you may risk losing tanks to Schu mines and Tellers. One engineer with a minesweeper is mandatory, while other Sappers can equip themselves with flamethrowers.
Always keep your flamethrower Sapper squad behind your main IS army. This is because the engineers are outfought by most Axis squads until they can equip themselves with LMGs and receive their 5th squad member. Another reason to keep the engineers behind your main force, is to draw away HMG fire. Once you see that the enemy is garrisoned in a house, close in with your REs, while the ISs keep firing at the enemy from behind cover. The enemy will have to abandon their garrison, giving you the key building.
Do note that the flamethrower is also effective against squads in cover, due to its area of effect damage, meaning it will harm any clumped enemies at once.
In the late game, I recommend you keep your REs near a Cromwell or Comet, so they may quickly repair it, or spot for mines. The Comet or Cromwell can fire covering smoke for an assault on a garrison. While assaulting, use 'attack ground' (with the engineers) on the building. in order to burn any soldiers inside, without taking punishment yourself.
2CP - Advanced Cover Bonus
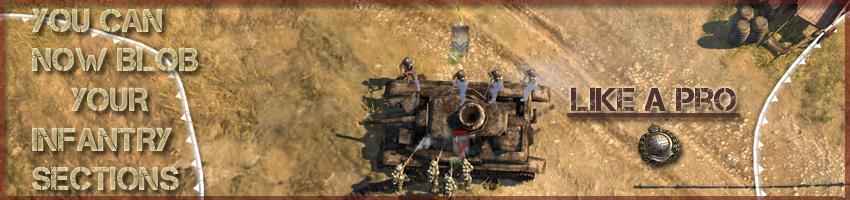
75 | "Blob your infantry sections in the open like a pro." |
| !Active ability. You will still perform better in cover. |
| !-40% cooldown, and -20% reload OUT OF COVER penalties are removed. In cover, with Advanced Cover Combat active, you will receive -30% cooldown and -20% reload as an actual bonus, not a removal of penalties. |
| !Regarding the advanced cover ability and its use for the Tommies: the Tommy Enfield rifles are parametricized in a way such that the cover penalties make minimal difference to the squad's effective DPS. This is because the Enfield rifle cooldown is already very low, and it is dominated by aim time, which cannot be affected by modifiers. (This also means that cooldown veterancy doesn't have much effect on Tommy rifles). Anyway, the advanced cover ability will have a very negligible impact at long range, where you should be fighting, at a somewhat ~10% difference (maybe less) at short range, where Tommies would already be losing anyway. The only net benefit of the ability has to do with Bren guns and PIATs. This is because of the gruelling reload penalties of cover, and the already ridiculously large reload time of Brens (8.5 secs * 1.4 = 11.9). In short, do not use the ability, ever, unless your Infantry Sections are holding weapons. Otherwise, you are basically throwing away munitions. Stick to cover, since cover anyway gives you the -10% received accuracy bonus (which the ability does not give you). PS: Sapper flamethrowers are, still, actually better versions of the M2 flamethrower, with better performance against certain cover types; also, worth 0 slots; also, non-mutually-exclusive with a minesweeper. |
| !From a strategical point of view, this ability is only useful in the late game, when all your IS squads are already upgraded with LMGs and you have spare munitions which you don´t need for tank smoke/mines/abilities. |
3CP - Infiltration Commandos
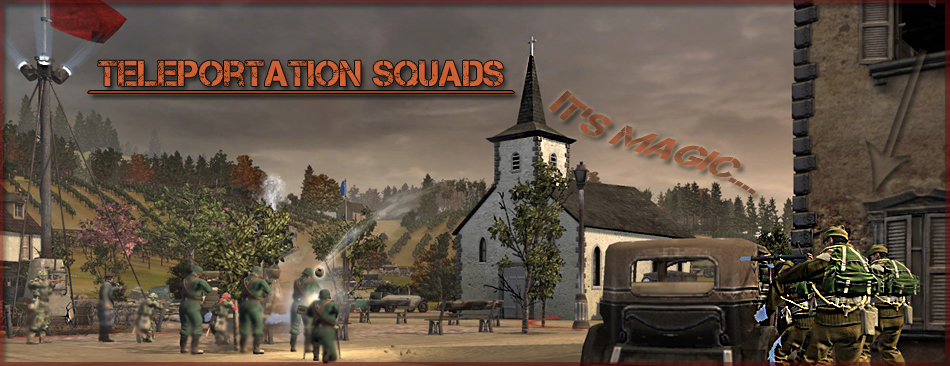
| "Spawn 4-man Commandos to the target building with teleportation. Effective against infantry at short ranges.May stealth in cover."
|


| !Do not spawn them in front of 30 enemy squads. Watch for door-mines. |
| !You may deploy Commandos from IS trenches. On maps which don't have many buildings, or when you want to protect a position, people won't really expect them arriving from them. Kinda cheesy to hide a trench behind enemy lines in order to deploy them. |
A 440 manpower cost for a 4 member niche close range squad (as compared to other close-range infantry) without good veterancy feels like a lot, but this is because their role is not to be a close-range squad: their role is different. They are a squad-wipe unit.
The Gammon bomb is one of strongest grenades in the game, on a par with the Axis bundled grenade. This grenade will kill anything in a huge radius around it. It will also blow away all wooden buildings. It is the perfect ambush tool and the main tool to wipe, or soften squads up for a wipe.
But the infiltrating Commandos' biggest advantage is that they may deploy anywhere on the battlefield, from an ambient building. This opens up so many options:
- You can call in the Commandos to intercept a retreating squad, in order to to wipe them with a gammon bomb;
- Or ambush an enemy sniper as he passes by a garrison;
- Or murder those OKW Le.IGs operators with a well-placed bomb;
- Or...
Later on, you should utilize their stealth to hide them somewhere near a typical retreat patch, waiting for a valuable wounded squad to show up. Since the Commandos' stealth ability is one of the best in game, on par with the Ostheer Sniper's, you can utilize it to move them from cover to cover, in order to hunt down a sniper without being spotted. Using the same tactic, you can hunt down HMGs, lob a gammon bomb at them and then finish them off with a few bullets.
Just keep in mind that Commandos have to be used as a hit-and-run squad behind enemy lines. Camouflage them, wait for an opportunity and then deal a blow. Do not use them as a British version of Soviet Shocktroops. Believe me, it will not work!
How to Kill Retreating Squads
Imagine this: you just forced a weakened Axis squad to retreat. Their retreat path is near to your Commandos. Here is what you need to do.
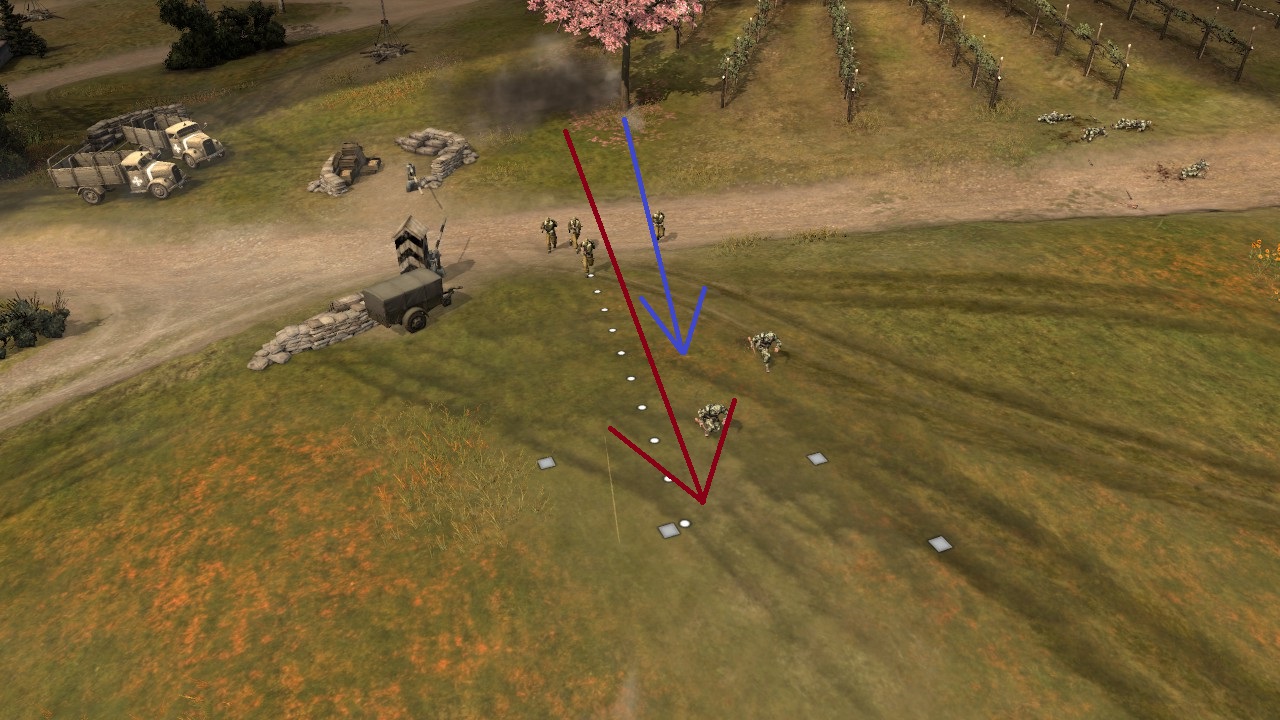
Order your Commandos to pack up and move as close to the retreat path as possible. Give them the free fire order, then wait. Once you see the enemy squad, anticipate their path, try to time it correctly and throw a gammon bomb onto the retreat path. The closer you are before the throw, the sooner the grenade will arrive. Do not move the Commandos, just throw the grenade when you see the enemy, as indicated on the screenshot (throw it in front of you, to minimise any collateral damage: the timer is also set for a frontal throw).
Once the bomb goes off, follow any remaining soldiers with your Commando section, if necessary. If you time your grenade throw properly, then finishing off the last member(s) of an already weakened squad should not be a problem. Once the Commandos have completed their task, they can relax and continue drinking their favorite tea while hiding in the bushes, waiting for their next victims.
Here is a video showing how to use the infiltration Commandos to their fullest. I really recommend you watch this, if you want to see how they should be used. Skip the first minutes,to where I deploy them in a small house near the enemy cut-off house.
6CP - Vehicle Crew Repairs
100 | "Damaged vehicles will stop to repair themselves rapidly. While repairing, these vehicles will be covered by a smoke barrage." |
| ! Do not count on this to save your vehicles. Use it as an emergency last-ditch repair. And be careful when you trigger the ability. ALL your Vehicles will be stuck in situ until they are fully repaired. |
A really strong lategame ability, allowing your tanks to be quickly repaired somewhere while being safely hidden, before they return back to combat much more quickly than their Axis counterparts, usually allowing you to secure more map control before the enemy tanks are repaired. Combine this ability with Sappers for ultra fast repair speed, or use it to save the engineers' time, so they may fight the enemy, clear garrisons or sweep/plant mines instead.
Do not use this ability mid game. You will only lose 100 munitions. Weapon upgrades will help you much more, because you can outfight Axis infantry permanently, instead of having your tank be 20 seconds faster back onto the field. Also, do not count on this ability to save your tanks. The enemy can use 'attack ground' with their tanks and AT guns at no risk to themselves. hitting your tank as if the smoke was not there. Your tanks cannot fight back or move, so they are sitting ducks. If you do not want to lose them, only use the ability behind your lines, or when you are sure the enemy will not be able to kill your tanks while they are being repaired.
8CP - Land Mattress
| "The Land Mattress was based on the 3-inch-diameter (76 mm) tube of the RP-3 or "60lb" rocket used as an air-to-ground weapon with naval 5-inch shells as warheads, and consisted of a 16- or 30-tube launching system mounted on a towed carriage. The Land Mattress is light enough to be moved by its crew and can be used against all targets. Effective against massed infantry and static targets.."
|

| !Like all weapon teams, it is vulnerable to flanking and small arms. Beware of the enemy spawning units from buildings, as they can quickly clear your Land Mattress. For spotting targets, scout and hide Commandos behind enemy lines. |
| !Has slightly better Area of Effect than the Panzerwerfer. |
The Land Mattress is the best British artillery piece. It has a low fuel cost, and the strong barrage makes it a really interesting unit to use. I recommend that you do not spam the Land Mattress, otherwise your frontline will crumble and the enemy will take and use your own Land Mattresses against you. Buy one when you hit 8CP and only ever have a maximum of 2 Land Mattresses at once in a 1v1 match; however, do not purchase a second Land Mattress before a second tank.
I do not recommend you use the phosphorus barrage. It is far less lethal than the normal barrage, because it cannot kill and fires only a single round; it also costs munitions.
Land Mattress Targets
- Team weapons, especially light artillery pieces without retreat (Le.IGs), MGs in already damaged buildings and PaK walls. You want to target these, since they cannot retreat and are rather slow. The result of a barrage is often a dead crew. Be ready to push bigly with tanks and infantry once the Land Mattress fires, in order to create chaos and to claim abandoned weapons for yourself, or destroy them with your tanks and AT guns, using 'Attack move' on them. Having Commandos nearby to kill any retreating units is very effective.
- Retreating squads. This is harder to pull off. You need to have the enemy base in Land Mattress range (nearer = better), without putting the Land Mattress in danger. Then you must force 1-2 squads to retreat. You will need to master the timing, but you will obtain this by practice, practice and practice. Once you feel that the enemy squads are almost in their base (or near Battlegruppe HQ, if they are retreating there), fire a barrage. The result may be dead squads. Your opponent cannot save his squads, since they are uncontrollable during their retreat.
- Damaged tanks under repair. Even if you do not kill the tank, you should kill the pioneers repairing it: they take extra damage when doing so. The enemy will lose manpower and his tank will be out of action longer.
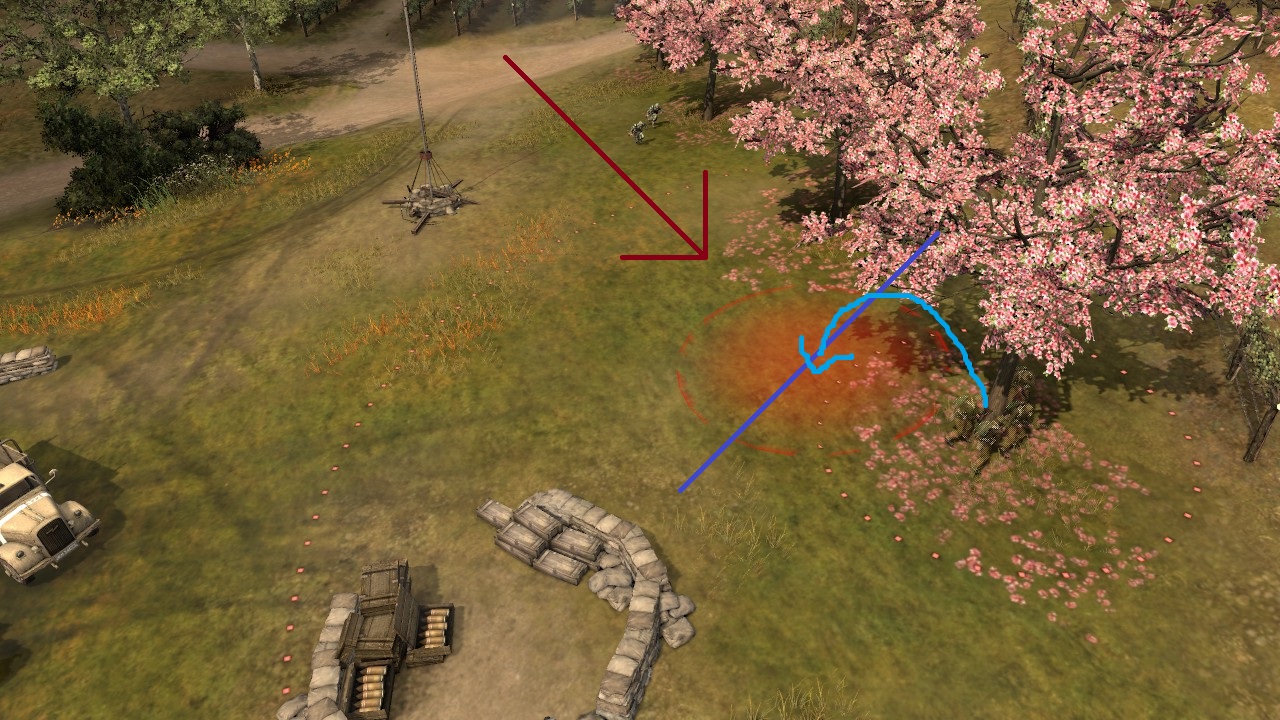
In this screenshot, you can see how the Land Mattress rockets land:
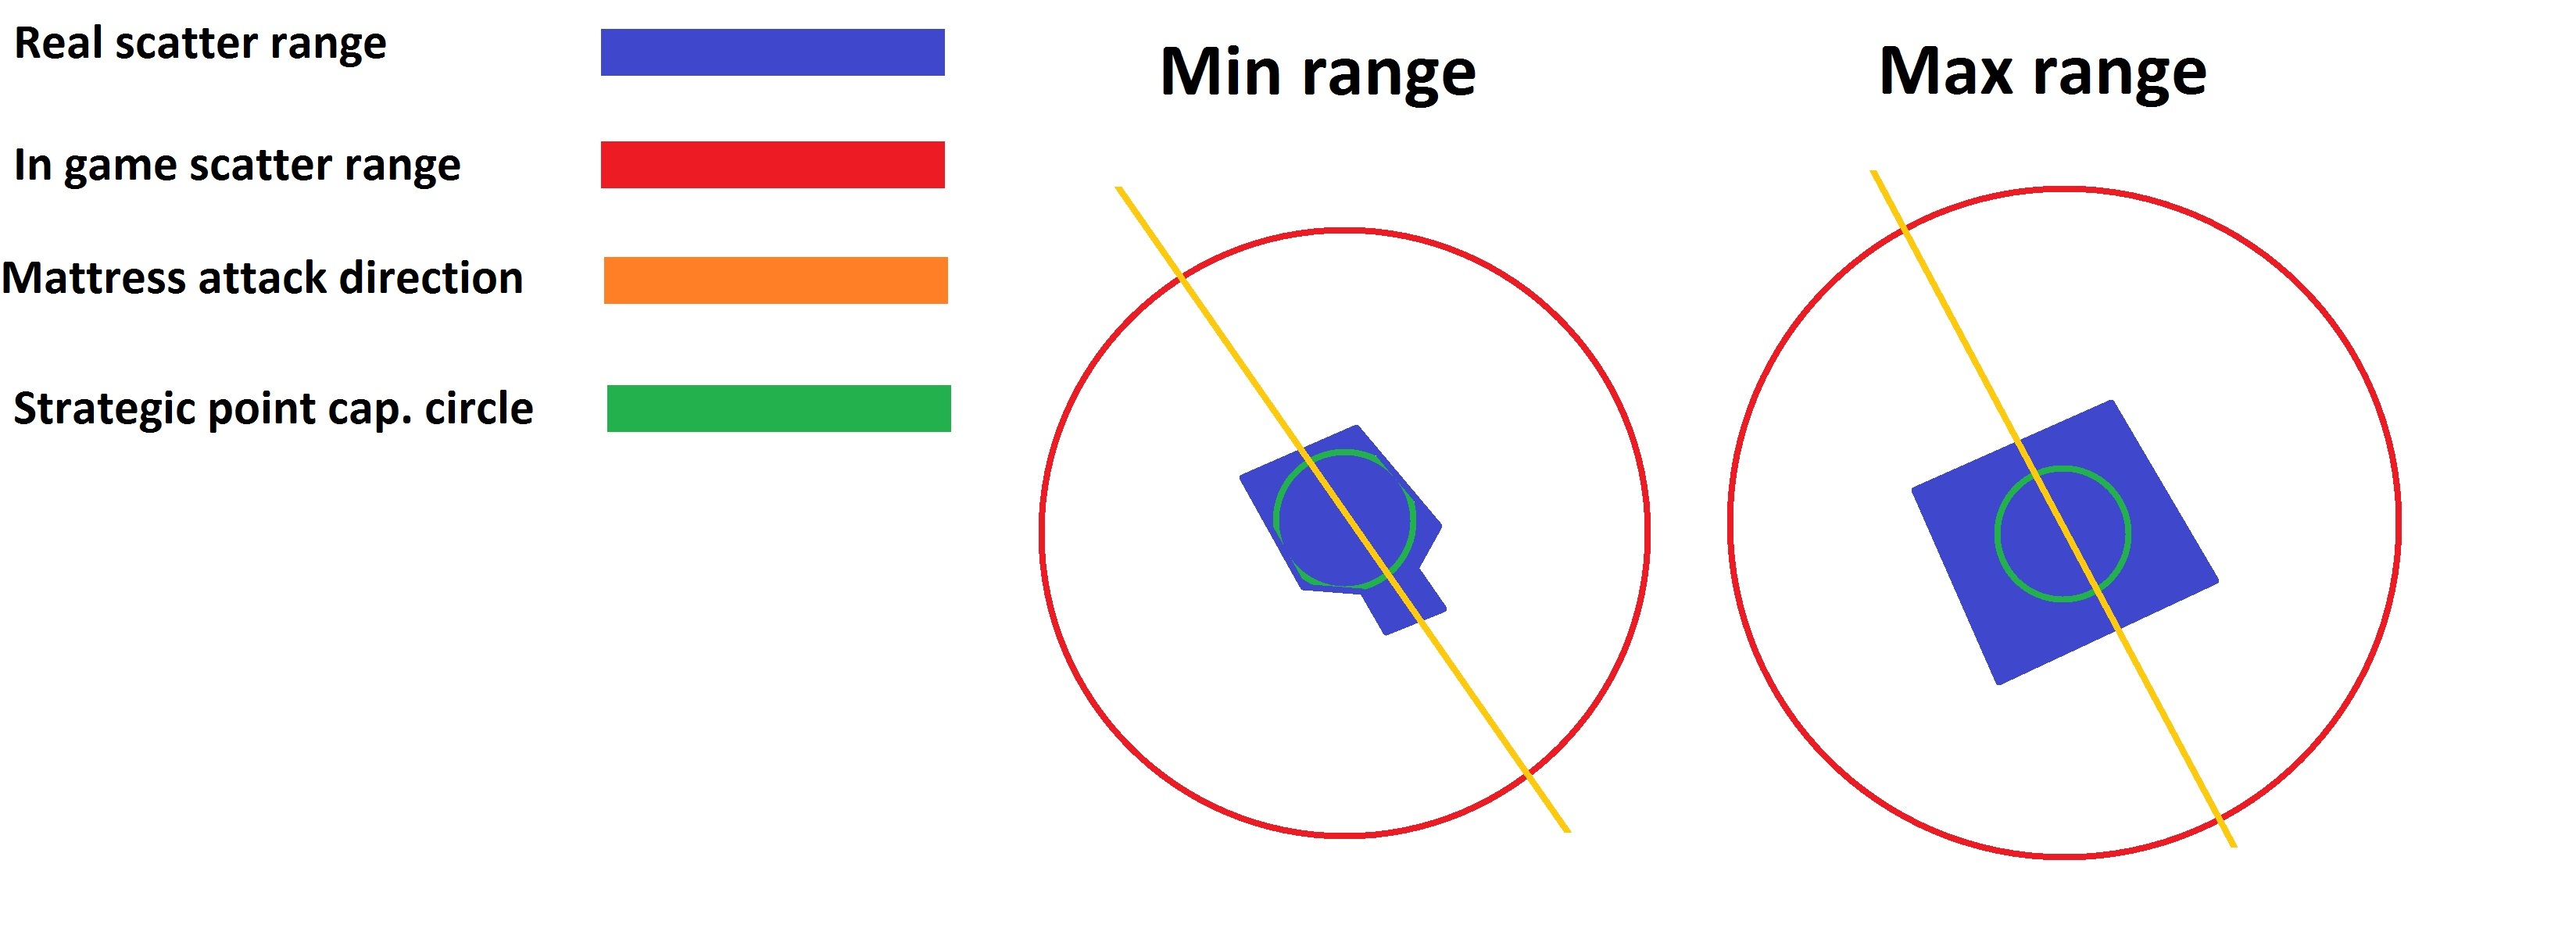
Real scatter range: death zone - where rockets may fall.
Ingame scatter: the red circle you see when firing barrages. Useless actually: the Land Mattress fires rockets in a much smaller area than this circle which you see ingame, meaning the Land Mattress is far more precise.
Land Mattress attack direction: from which angle the rockets are fired.
Strategic point capture circle: The circle seen around every strategic, fuel, munitions and VP point. I added this, so you may realise how big the Land Mattress "waste area" actually is.
Microing the Land Mattress
- Always have a stable and strong front line. Make sure that no Axis tank or infantry may ruin the day of your Land Mattress operators, when you put the device to use.
- Once the Land Mattress reload cooldown is smaller or equal to 20 seconds, move it to the front
- Meanwhile, find a good location from which you may rain death. Use infiltration Commandos to spot for any PaK walls or other team weapons, then prepare your army for an assault. If you want to attack retreating squads, be ready to force 2 squads to retreat.
- Once the Land Mattress arrives on the front line (slightly behind it, so the enemy will not know what you are planning), position it via a right click drag to the location from which you want to fire. Deploy it.
- Fire a normal rocket barrage once ready and then retreat the machine back to safety. e.g. to your base behind the tech buildings. Do not forget to mine the base entrances, in order to prevent Axis tanks from entering.
Early Build Orders
I recommend that you choose this commander from the beginning of the match, so that you may use the M2 flamethrower and infiltration Commandos to their fullest.
I use the same early build order against the Ostheer and OKW. I think it is the best build, because the Vickers HMG is much better in the early game engagements than the IS are. Also later on, 2 HMGs help you hold your ground much better, protecting your
Land Mattresses and six pounders. As the match drags on, you may want to requisition a third IS, but I recommend you to do so after you acquire the 5th squad member upgrade and have spare munitions to buy LMGs, in order to fight of the off Axis squads efficiently.
Early game, you will be playing like the Ostheer. Your Vickers is your main weapon while the IS support by protecting flanks, spotting enemies for your Vickers, rushing important buildings and capping the map, when they are not busy fighting enemy squads.
For the Brits, the most important moment in the whole match is the first engagement. You must always try to win that engagement, because the Brits have a hard time coming back early on. That is why I always rush my first IS to an important house, then switch them with Vickers and afterwards, with 2 IS, start capping my part of the map, while the second Vickers is being deployed. Use the second Vickers to support the 2 IS, covering their progress while the first Vickers is covering an important part of the map from the building.
Once you win the first engagement, you can put pressure on enemy by rushing their cut-off and deploying the HMG in one of their important houses. Always try to have one Vickers in a house as area denial and the second behind your ISs, so it can deploy accordingly to any enemy movements and flanks. The ISs should always be in cover while fighting, for the offensive and defensive bonuses.
Ostheer Early Strategies
Sniper
The Sniper in the early game is a big threat. The problem is that you cannot counter him nor force him to retreat easily, because unlike the Soviets or USF, the UKF army is much slower and worse in assaults. Do not focus on the sniper early on. Instead try to act like he is not there, use sightblockers to avoid his fire and hold your ground. Try to hold key houses as long as possible (The sniper has only 50% chance of hitting against squads in houses) and set an ambush. Have your second HMG positioned behind a sight blocker or behind the ISs, so you do not have to retreat with it prematurely. Once have your first engineer squad, you may try to lure the sniper and flank him.
In the mid game the sniper becomes less of an annoyance. Vet 1 Vickers in a house will outrange him, so he cannot snipe your HMGs in garrisons nor units near them. If there are not enough garrisons, invest in 1-2 trenches to outrange the sniper. Always retreat sooner than you would normally allow. The vet 1 ability of the German sniper will always kill, even on retreat. Keep AT guns behind the front line, so they do not become sniper targets.
Your main counter to the sniper will be the infiltration Commandos. Try to lure the sniper near a garrison (use a sneaky trench if needed) and then unleash the Commandos on him. If you fail to kill him this this way, do not forget you still have a great infiltration squad that can cloak just as well as the sniper. Babysit them and place them near a possible retreat route for the sniper. Then push with the main army, and the Commandos if needed, to force him to retreat. Done correctly, the sniper is dead. He is no match for good Commando players.
Mortar
A mortar is really hard to play against. Actually you cannot do anything against it super early game before your engineers have flamers, because it will be protected by an HMG and also by Grenadiers. You will have a hard time holding your ground, but keep in mind that the enemy have one less squad on the field, allowing you to pick up fights more easily. Always reposition your HMGs and do not let the ISs fight under enemy mortar fire. Give buildings to the enemy if you do not have any other options; you will retake them once you have flamers. Be mobile.
The positive thing with the mortar is that it will be hard-countered at 8 CP with your Land Mattress. Once you have it, the mortar will be a manpower sink.
The 3 CP commandos may make quick work of the mortar as well, either deployed from a building or leapfrogging through cover until they are close enough to throw grenade on the mortar crew, killing it in process. You can try to man it with Commandos after that, if no enemy units are nearby, thereby turning the enemy's biggest weapon against him.
HMG42 spam
A game of patience. The winner will be the player who secures key buildings and positions faster. That player should be you, since you will rush for those buildings and positions. Once in your control, stay put. If you push, the enemy HMGs will suppress you and force you to retreat. Wait for enemy to come, or until a flamer Royal Engineers squad is on the field. Use them to flank and burn enemy HMGs. Or call in infiltration Commandos, which are great against HMGs because of their cloak, grenade and close range weaponry.
The Vickers are better than the HMG42s, damage wise. This means that you will always win a building-to-building fight between a Vickers and HMG42, for example in the middle of Kholodny Ferma or Arnhem Checkpoint.
Keep in mind that the enemy is shooting himself in the foot by going this strategy against you. Once the Land Mattress is in action, his HMG42 spam will have a hard time. So do not worry if you cannot capture most of the map. Keep and hold your side, wait for better tools to come, and you shall be fine.
Always protect your Vickers later on. The enemy, almost certainly, will go Panzergrenadiere. Cover your flanks with ISs and flamer engineers to stop any enemy infantry attack.
OKW Early Strategies
Kubelwagen and Sturmpioneers
The Kubelwagen alone is not a problem: it will cap its part of map but that is all. It cannot outfight your ISs in green cover, nor a Vickers covered by 2 ISs, nor a Vickers in a building. The Kubel may cause problems if it is combined with other squads, for example Sturmpioneers. Skilled players will close in with the Kubelwagen, push your squad out of cover and keep them busy, by pushing them around while the Sturmpioneers close in.
The only way you may counter this strategy is to always keep your ISs and Vickers nearby, so the second IS may focus down Sturmpioneers, while the Vickers deploy before targeting the Sturmpioneers in order to suppress them. The enemy will have to pull back to avoid losing his Kubelwagen. There is no other way to counter this tactic, except by keeping your squads close enough to swiftly respond to an incoming threat, because one IS cannot fight on their own, since the Kubelwagen will be pushing them off.
The enemy will most likely field 3 Volks, but they should not be a problem. Your Vickers will suppress them and the ISs will outfight them, as long as they are at least in equal cover, or when the IS is in yellow cover. Later on, the Volks may become more problematic for your HMGs in garrisons, because of the incendiary grenades.
Map Capture Orders and Vetoes
Map Vetoes
Here is a list of 1v1 maps. Veto these in order to help yourself.
- Semoisky (Winter)
- La Gleize Breakout
- Bryansk Forest
- Caen
- Minsk Pocket
- Halbe
| !Click on the images below for full sized versions. |
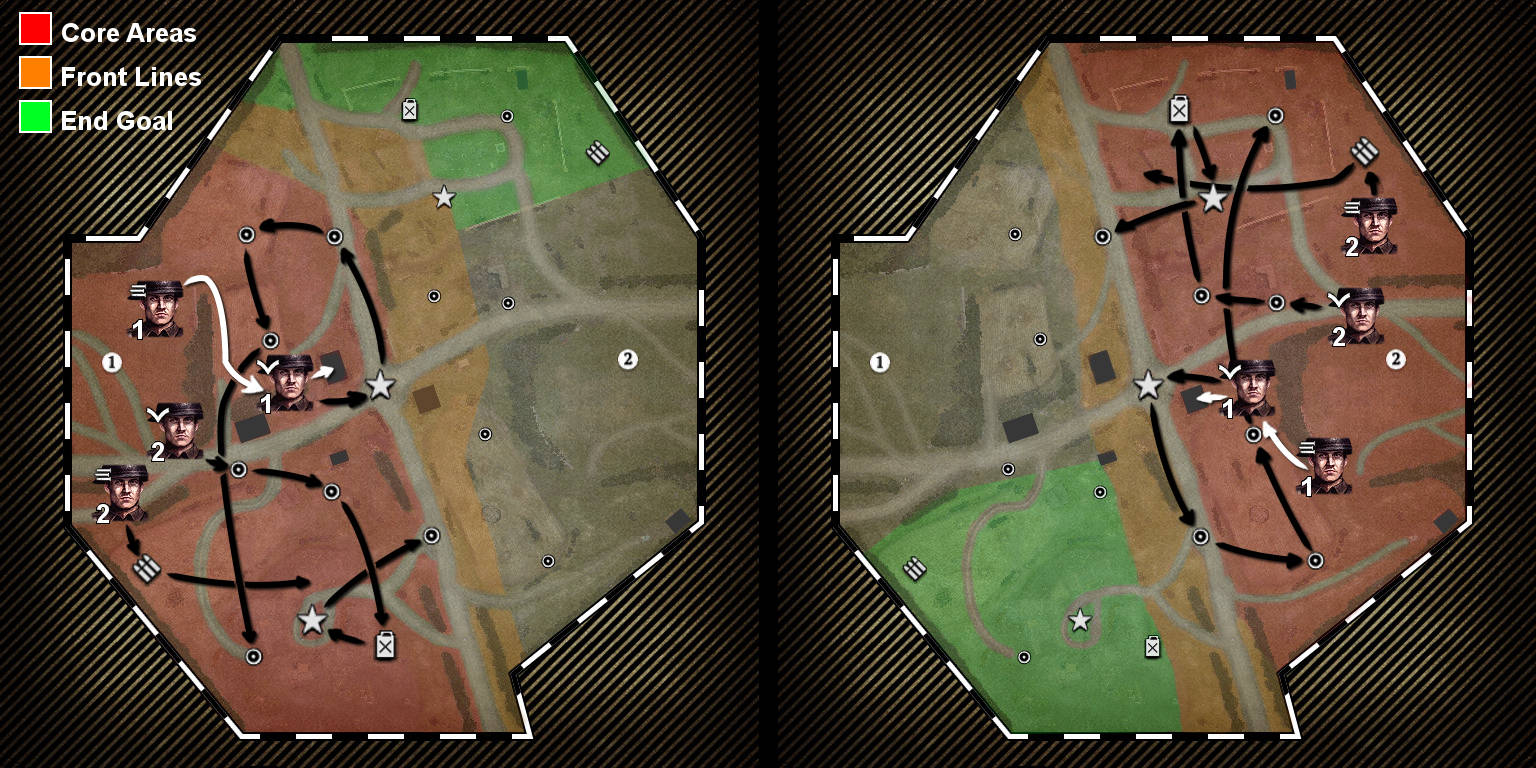
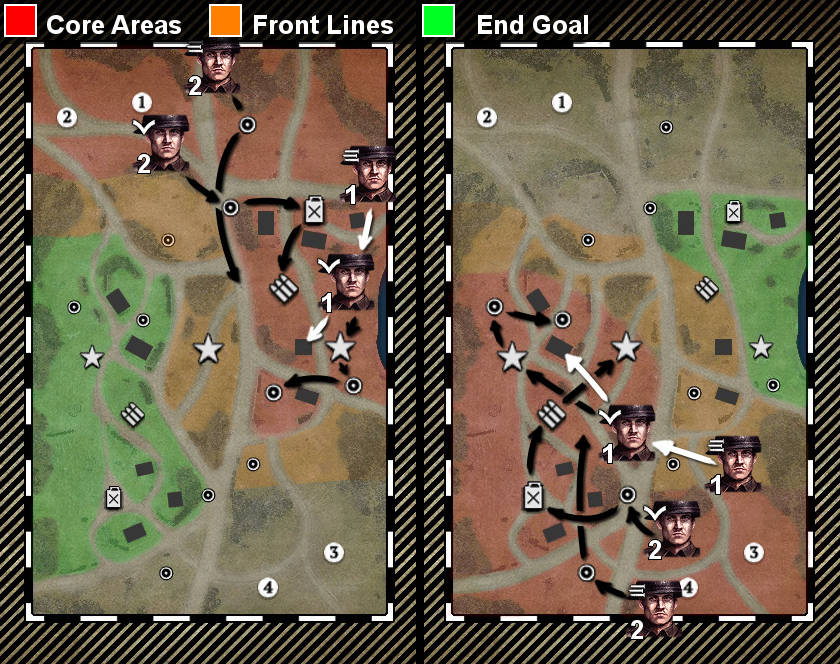
Angoville
Follow the capture orders on the images below. Once you finish capping with your second IS squad, you will have to make a choice: go for the enemy buildings on the right side of the map, or continue capping the left side.
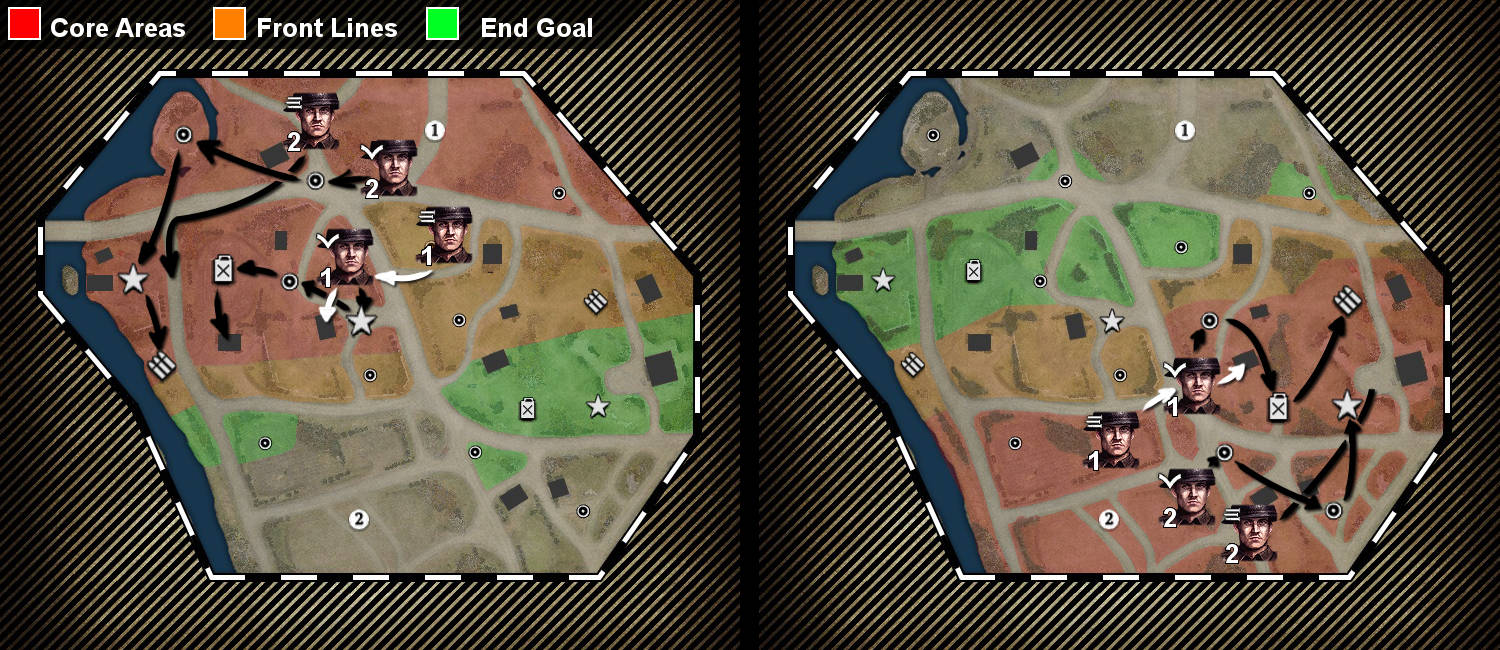
Arnhem Checkpoint
This is a tricky one. Once you finish your initial capping orders, you will have to choose where your second IS will go: either they go capping the strategic point and house near the VP, or else they go to help in middle, by securing a house on the flank. You will have to make the decision based on the enemy's movements. If you see a high concentration in the middle, go there. If you see the enemy heading for your part of the map or if he is not too concentrated in the middle, go for the house.
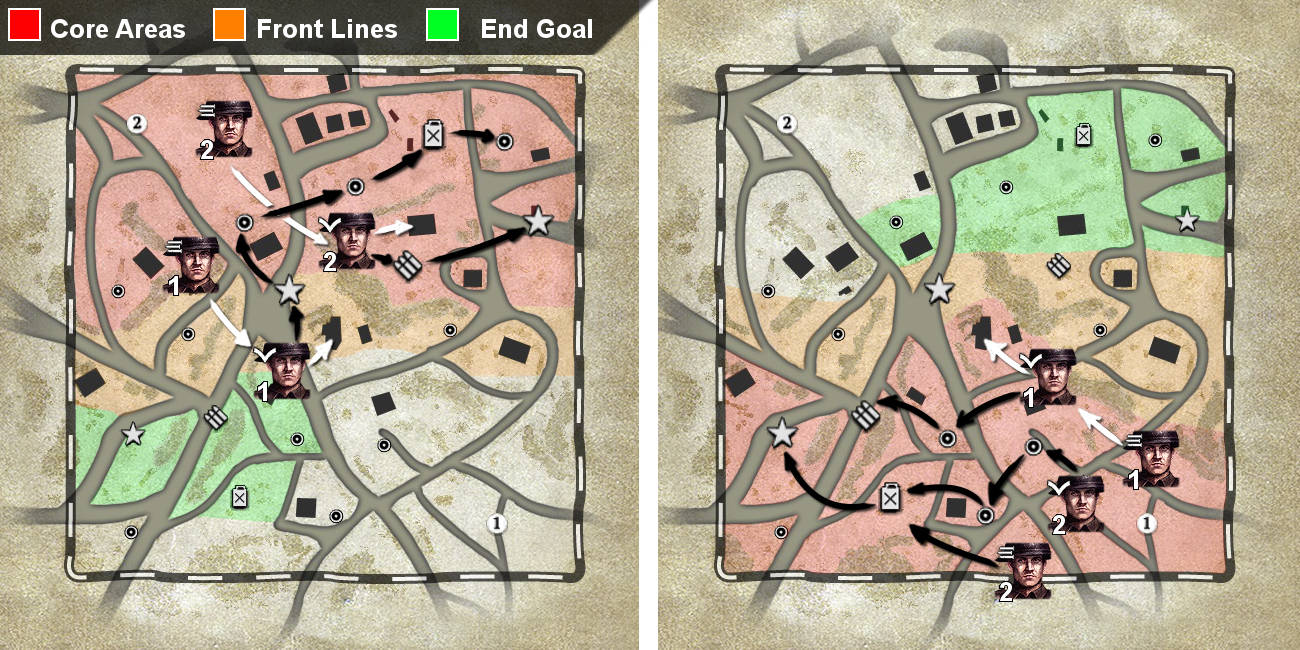
Crossing in the Woods
Just stick to the capping order below. The second HMG should help the IS who need it the most. Once you force the enemy to retreat, go for his cut-off. There, position the second HMG and IS, while the last IS will go and cap his fuel (if everything goes well; if not, prioritise defense, then the enemy cut-off). The first HMG should always be near your fuel, so you can hold it for some time, until help comes. Build green cover near strategic point flags, to obtain an advantage.
Crossroads
Focus on the capping order described below, hold your side with 2 IS and HMG at all costs. The middle should not be problem, because you should have a Vickers there. Once you win the key early game fight, go for his cut-off and cap his fuel if you have a spare squad. If not, then try to hold your part of map. Build green cover when needed, as before.
Faymonville Approach
This map is all about flanks to conquer the fuel while holding the middle, so be prepared for it.
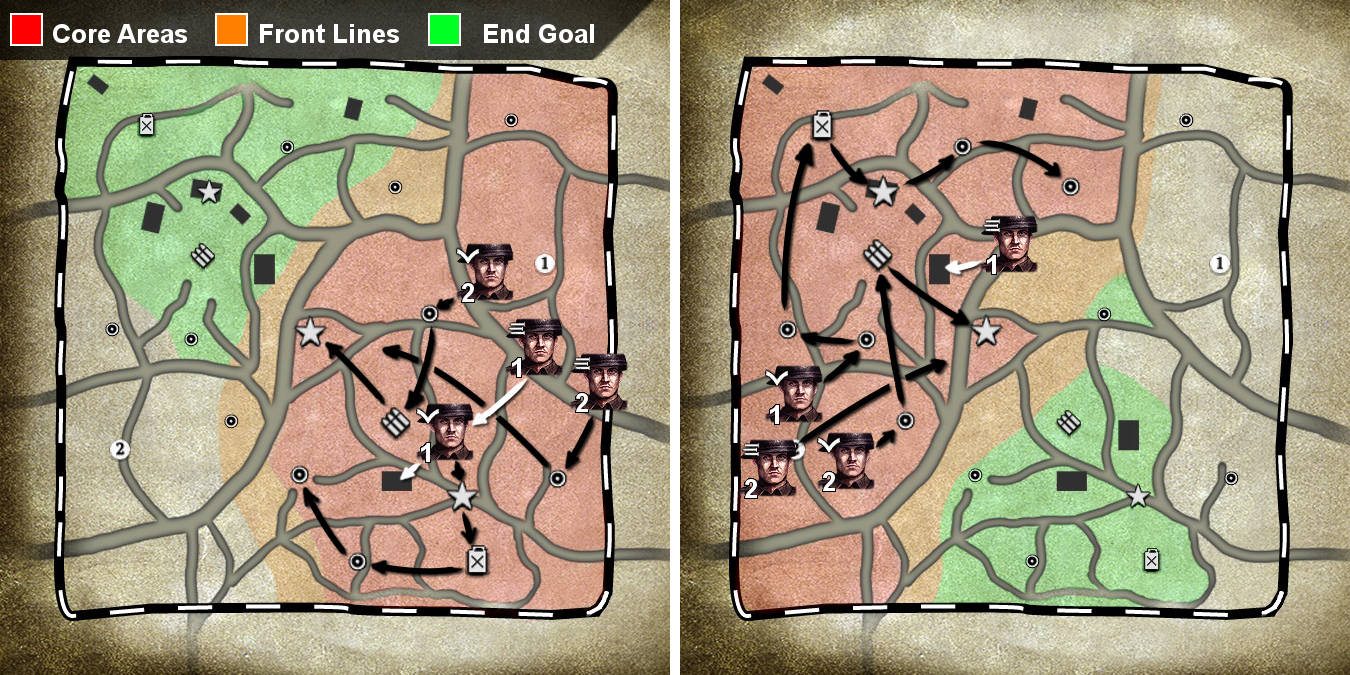
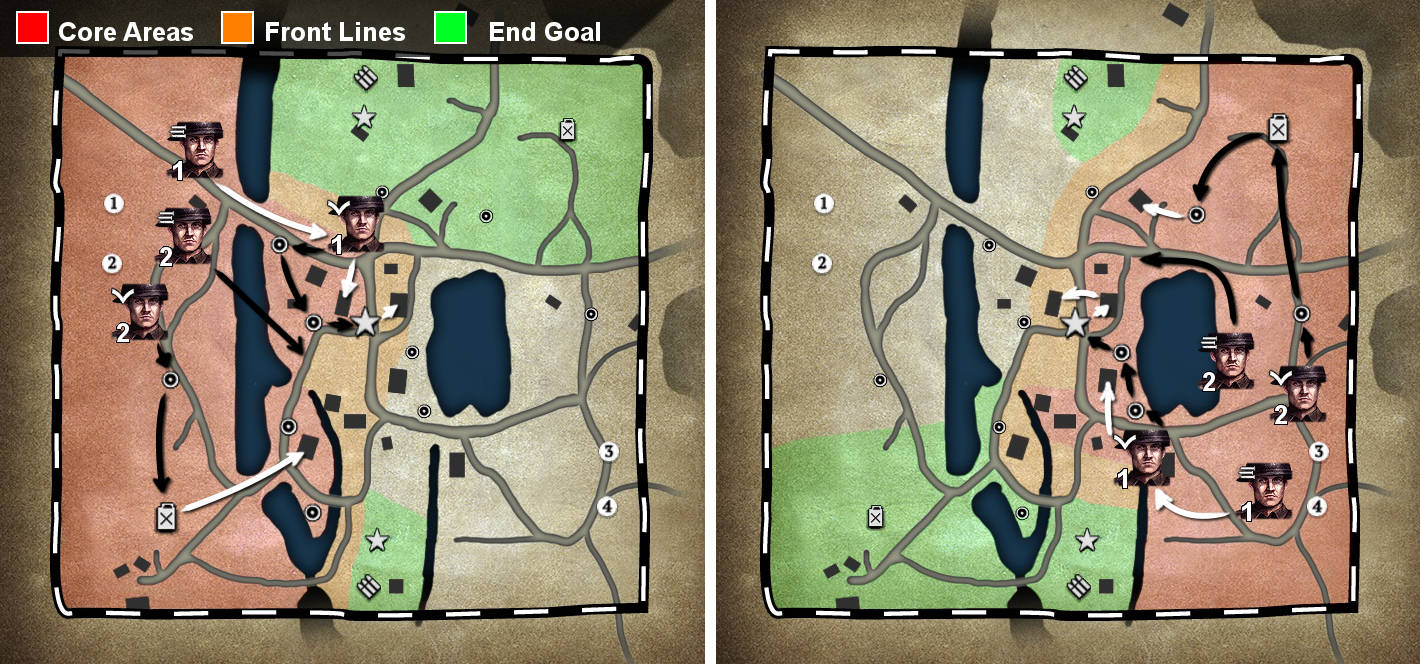
Kholodny Ferma
The church is most the important garrison here, so please follow the capping order and rush it ASAP.
On the northern spawn, you must secure the munitions house later on for your second HMG, then start capping around it. Once the enemy attacks your defensive position, launch a counterassault on his cut-off and seal the deal, while an HMG covers you from the church. Do not worry about the house near your HQ too much: if you lose it, Royal Engineers with a flamer will seize it back.
On the southern spawn, rush the church, then play with 2 ISs and Vickers on your part of the map, while capping it. Once the enemy attacks you, fall back, be ready to deploy the second Vickers in the house near his HQ and seize his cut-off with the ISs. If the enemy does not engage you, be ready to engage him by building sandbags on important positions. Do not attack until you have more squads, otherwise your defense will crumble.
Langreskaya
Cap like described below. The second HMG should be sent to whichever IS needs it the most (to the flank, or to the middle VP). Once you succeed in defeating the first enemy assault, be ready to go for his cut-off. The second HMG should lock down the cut-off once you capture it, while the remaining IS will protect the HMG. This may end the match quickly, because your section of the map will be covered by your first HMG, and his cut-off by your second.
Road to Kharkov
You know the drill. The most important point on this map is the middle. If you win the fight there, you can nail his cut-off, denying the enemy their fuel income. Always keep one Vickers in the house, as highlighted.
Semoisky Summer
This map is all about building control. Be careful.
Mid Game Build Order
^(SITUATIONAL)
General
Our plan for the mid game is to secure as much map control as possible, to bleed VPs off the enemy, and to save fuel. We want to rush a Cromwell, the best British medium tank, to protect our flanks against the infantry, as well as fight Axis vehicles on equal terms. Always try to hold your fuel and the cut-off point, so you may have a Cromwell in record time. If the enemy gives you the option, steal his cut-off and fuel.
Axis players will usually field their light vehicle(s) and/or first elite infantry. OKW players also often field light artillery, to counter your static IS and MG play. Because Axis mid game strategies are rather complex, I will give you advice how to fight against each of them.
What I always recommend is that you obtain an AT gun after your first engineer section. That way you are prepared for an Axis vehicle. Do not worry if your AT gun did not have the chance to fight during the mid game. You can use the IS as a back-capping squad and later on, it will surely help you. Do not go for the weapon racks before the first Cromwell, except when advised. Use your munitions on flamethrowers, mines and a few gammon bombs. Also, teching for the weapon rack would delay the Cromwell's arrival time.
Put a sweeper on one of your engineers after you encounter the first OKW mine, or see Ostheer minefield signs, or when your Cromwell is just about to arrive. You must not change your good short-range squad into a useless squad, combat wise, too early. That would give away power and map control.
Do not forget to upgrade your ISs with medical supplies, so you can heal your infantry and team weapons, either on the field or in the base. Do not upgrade to the pyrotechnics supplies. You already have an anti-building counter in the form of the flamethrower and later on, the Land Mattress.
AEC Armored Car
The Armored Car should be built only against certain strategies like light vehicles, otherwise the Cromwell will arrive later, giving the enemy more time to prepare. I will tell you when to go AEC, do not worry. The AEC works like the Ostheer Puma, but with better mobility and a smaller range, so use it behind your lines, pursuing and fighting off any light vehicle you encounter. Use smoke to evade any trouble.
You may also use the AEC against lone squads. The AEC lmg is quite potent and will force enemy units to react. Or you may use it with your fighting ISs as a counter to enemy cover. 2-3 shots will break heavy cover, giving your squads an easy victory.
You can also play mind games with an AEC: close in to an enemy squad eqipped with panzerfausts (when you know there is no enemy AT gun nearby and you have your own AT gun behind the AEC), then eat the faust and back away. The enemy will only waste munitions. This is a bit risky though, which is why you should only do this on the flanks, or on your part of map, where a Pak is unlikely to be.
Against Ostheer
Elite Infantry
This is the easiest match-up by far. You do not need a second 6 Pounder ATG nor PIATs from the weapon racks to counter Panzergrenadiers. Actually, you do not even have to #ADAPT your build order for this one: 2 IS , 2 Vickers, 2 REs, one 6 Pounder ATG and 1 Commandos into fast Cromwell is fine.
Generally, Axis players tend to spam Panzergrenadiers together with HMG 42s. First they create the MG spam, then they start the Panzegrenadiers as their main line infantry. Against this strategy you will have to be defensive in the mid game, because the HMGs will halt your advance and the Panzergrenadiers will tear you apart. Hold your ground (ISs and Vickers defeat the Panzergrenadiers at long range while behind cover), cover flanks and wait for an enemy mistake. Then try a full scale assault from multiple flanks, countering his HMGs and gaining ground. Later, once you have the Cromwell, you should have no problems with the Panzergrenadiers as the Axis main infantry unit, because the Ostheer player will lack panzerfausts, giving your tanks room to maneuver.
Infiltration Commandos are no match for Panzegrenadiers when you charge them from the front. Instead, hide the Commandos behind enemy lines, attacking HMGs from behind, giving you room to advance, spotting for enemy positions and killing retreating enemy squads. When things look ugly, always retreat the Commandos. The Panzegrenadiers are great against low health retreating squads as well, and are quite capable of effecting squadwipes.
The Ostheer player may go for a 222 or flamer halftrack with this strategy. But your 6 Pounder ATG should be enough to deal with them, just keep it behind your main line and never leave for the battlefield without it. If Panzregrenadiers breach your frontline, retreat the AT gun immediately, you do not want to lose it. Place mines on important positions (like the main road) to slow enemy advances, and possibly to kill vehicles that play overaggressively.
Light vehicles
Ostheer players often field multiple light vehicles, and they often either double 222 or the 252 with the flamethrower upgrade and then a 222. Both of these combinations are deadly if you are not ready to counter them. Your single 6 Pounder ATG, already included in the build order, should give you enough firepower to counter one 222 or one 252.
Because the British lack AT grenades, you are more vulnerable to light vehicles than other factions. There are 3 options as to how you may compensate for this handicap: Deploy an Armoured Car, tech for PIATs or acquire a second 6 Pounder ATG. Each of them has pros and cons.
REMAKE
The AEC and the 6 Pounder ATG:
- Advantages: Hardcounters any vehicle play, making your game much easier
You will be fighting your enemy on your terms – gaining the flanks and better map control in general
You can make more mistakes in your positional play
- Disadvantages: Early minesweeper is a must – you cannot risk losing your AEC to Teller mines
A well hidden pak and faust can ruin your day – if you lose the AEC prematurely, it will be a huge set-back for you.
The Cromwell will arrive later, if you do not capitalize on your mid game advantage
Double 6 Pounder ATGs:
- Advantages: Scales well into the late game
Faster Cromwell – no fuel spent on AEC
Better fighting Infantry Sections – no munition spent on PIATs
- Disadvantages: Risky strategy – if you make one mistake, the 222s can outrun you, you lose the six pounders and the game as well
Good mine placement is a must
There is no way to kill enemy vehicles, unless they make a mistake or rush into an ambush
You will have to concede the enemy their part of a map – you cannot go on the offensive with this strategy
Single 6 pounder ATG and PIATs:
- Advantages: Less risky than the double 6 Pounder strategy, small mistakes do not result in 'GG' for you, because PIATs can protect your 6 Pounder from vehicle rushes
The Cromwell arrives sooner than in the AEC strategy, giving you better mid/late game
The PIAT squad is semi-useful, even in the lategame
- Disadvantages: No way to harass the enemy;you must always keep your PIAT and single 6 Pounder together, meaning enemy light vehicles can wreak havoc on the flanks
Enemy vehicles are literally uncounterable, unless they overextend
You must focus on one part of map and on direct cut-off play
If the enemy goes 3+ light vehicles, I recommend that you go either the AEC plus double AT guns, or double AT guns and double PIATs. Protect your AT guns with PIATs/AEC, slowly push up the map and wait for the enemy to come.
Against OKW
Battlegruppe
A hard match up. Not as dangerous as the Luchs spam but much stronger overall. Against Luchses, you may prepare by investing in AT weaponry. But here, you cannot do anything except avoiding the Le.IG shots until you have the Land Mattress. Once you have it, you will hardcounter the enemy Le.IGs and his strong strategy will fall.
Your biggest weapon against the Le.IGs is aggression and mobility. Remember that the enemy spent 1,000 MP on the Battlegruppe, medics and 2 Le.IGs. Always try to be as mobile as possible to avoid the shells. Only stand still with the ISs, when they are in heavy cover and are fighting (heavy cover negates 50% of incoming artillery damage). Otherwise, move into a better position, while your HMGs suppress the enemy and the engineers flush out any defenders.
Always keep in mind that you are outnumbering your opponent and that the Le.IGs may only hurt 1-2 squads at a time. If your troops are separated, wait for the remaining ones. while avoiding enemy fire. Then make a big push on the enemy fuel or cut-off. Keep one IS and one HMG in reserve, to protect your part of map from harassing squads, or outfight squads that try to flank the first HMG.
Try to rush a Cromwell. If you do well and put enough pressure on your opponent, you should have your Cromwell out much faster than he will have his Panzer 4.
Use Commandos as always, except one thing: deploy them near the enemy Le.IGs, once you make sure there are no enemy forces nearby. Decrew at least one of Le.IG with stens and a gammon bomb, and then try to seize it with your army, which should already be waiting for this opportunity. If you fail, do not worry. The enemy will have to re-man his Le.IG with a squad, then he has to reinforce that squad, giving you more field presence and a chance to capture the map.
You do not have to fear light vehicles when playing in this match-up. The only vehicle he may pull out before the P4 is a Flak Halftrack. The Flak HT is not a problem for your one AT gun, since the vehicle is rather clumsy. It cannot close in, and even 2 AT shells will kill it. He will only be able to use it on the defence. Remember to bring your AT with you on assaults.
Equip your army with a second AT gun later on, to fight off a Panzer 4. 2 AT guns are always better, because they only need 2 rounds each to kill the tank. whereas one ATG needs 4.
Mechanized
A really interesting and rather hard match-up. If you fail to protect yourself from the OKW light vehicles, especially the Luchses, then it´s Good Game for you. On the other hand, if you survive the Luchs(es) without any big losses to your army or map control, then you will have a huge advantage over your opponent, because he spent so much fuel on the Mechanized HQ and Luchs(es).
Puma
The Puma is harmless. Even a single HMG and AT gun can shred it, because the Puma's anti-infantry damage is non-existent. If the enemy went for a Puma as a counter reaction to your AEC, then you probably will not have problems defending the AEC. This is because you will already have two 6 pounder ATGs and/or PIATs on the field. But do note: if the Puma is the enemy 's first vehicle, do not go for an AEC, because the Puma will counter it. Go for a second 6 Pounder ATG instead. It will prepare you for future vehicles.
Almost all the OKW players that go for a Puma first will follow it with Luchses. You will have a lot of time to prepare against this strategy because of that Puma. Once you see him obtaining Luchses, I recommend you to go for the AC. It will protect your 2 AT guns from the Luchs while the 2 AT guns will protect the AC from the Puma. Also, if the enemy makes a single mistake, you may easily punish him with the AC. It takes 2 shots from AT guns and 1 shot from the AC to finish off the Puma or a Luchs.
Do note that enemy may try to lure you. So do sweep for mines and pursue weakened vehicles with your AC and main force, to counter anything unwanted. Use smoke if needed.
Fighting the Luchs
There are many OKW strategies that work with the Luchs, but they may be divided into 2 categories: offensive and defensive.
Defensive Luchs is annoying, but will not give you as many problems as the offensive ones. You have to forget about seizing the flanks until you have a Cromwell or AEC to hunt the Luchs. Always keep a steady battle line, and only put pressure into the middle and around the enemy cut-off, while holding your part of map. Just mine the key roads, keep the AT gun secured and acquire a second one. That way, you will not lose should you make a mistake and the Luchs rushes for your first 6 Pounder. Once you have the Cromwell, you will be fine. The enemy will be miles away from having his first medium tank, considering you were able to hold your part of map against the conservative Luchs.
You may also go an AEC against that single Luchs: it ls not needed, but still a good thing to go for. An AEC will give the Luchs a hard time, as well as give you options to seize his part of the map, hold your own more easily and force him to react. Beware the Puma that will try to counter your AEC. That´s why two 6 Pounders are recommended as well. If you manage to hit the Luchs or a Puma with them, you should have no problem killing it with an AEC.
As always, play conservatively with your AEC, so as to not lose it stupidly and prematurely.
Offensive Luchs(es) is the biggest threat and shock value the OKW may give you throughout the whole match. If you are not prepared for this, you are dead meat. Once you see that first Luchs, quickly purchase a second AT gun and plant mines. Also: unlock the AEC, so that you can build it faster if needed. You never know if he is making a second Luchs or not.
Use your AT guns defensively, behind your lines and be prepared. Mines are important, but do not count on them. Sweepers or luck may be their downfall.
I recommend you to go for the Armored Car once you see a second Luchs. You never know if he is planning a third one. Also, an AEC is the only way for you to maintain some map control, or even counter attack against the OKW army with 2 Luchses. Do not worry about the fuel you lose when going for the AEC. It will be worth it. The enemy spent a lot of fuel on those 2 Luchses as well. Having a Cromwell later is better than never having a Cromwell because the Luchses overcame you. The enemy cannot hardcounter your AEC unless he goes for a Puma, or you make a silly mistake.
Use your AT guns conservatively and pursue any low health Luchses with the AEC. Do not chase full health Luchses though. Enemy Rakettens, mines, fausts or even 2 Luchses flanking a lone AEC may take it down. Try to hold your part of the map, and punish overextended tanks by killing them with the AEC, before creeping forward. Do note that you have the weapon racks - you may upgrade your IS with brens to win infantry fights easier.
Once you have the Cromwell, things will be easy. His 2 Luchses are no match for your Cromwell + AEC combo.
HINT: Consider skipping the Commandos, or use them cautiously when you see a Luchs. Always retreat sooner than you would otherwise. Do not be greedy. Wiping one enemy squad and keeping your Commandos alive, is better than wiping two squads and losing the Commandos.
The Late Game
The late game is the part of the game where the British excel, provided you did well in the early to mid game. It begins when you deploy your first Cromwell. If you have not already done so, purchase the weapon racks. Then go for your first Land Mattress, a second 6 Pounder AT gun and a second tank.
You may call in a third IS squad, if you have enough manpower and munitions to upgrade them. Do not go for a third IS if you cannot give them 2x Bren LMGs. Without the LMGs, they are useless.
Your late game build should consist of:
- 2-3x ISs (with LMGs)
- 2x Royal Engineers (one with a flamer, the other with a sweeper and PIATs)
- 1 infiltration Commando unit
- 2x Vickers HMGs
- 2x 6 Pounder AT guns
- 2x Land Mattress
NOTE: Tanks are almost always better than infantry, but without good infantry support you will lose the map; without engineers you are unable to sweep mines and repair tanks (crew repair is expensive); without ISs you are unable to cap points or win fights on the flanks, and without HMGs you are unable to secure VPs. Only AT guns are replaceable in the late game, for example with Comets or Fireflies. It is better to do so, if you lose the guns and have fuel for tanks.
Early - The Cromwell
Once you start building the Cromwell, prepare all your forces for one big assault. The enemy does not know about your Cromwell and if you play your cards right, you will conquer a large portion of the map. Do a full scale attack on his cut-off or key building, try to force any enemy HMGs to retreat, using the hidden Commandos. Do not worry about your side: the Cromwell may always reposition because of its speed. Once the battle is in full swing and the enemy AT guns are forced back, rush in with the Cromwell and seal the deal. You may cap his portion of the map afterwards.
HINT: Always lead with your infantry in an assault, then bring in the tank so you do not move into an AT gun wall, losing your Cromwell in the process.
NOTE: Do not forget to purchase minesweepers before you push: you do not want to have your day ruined by a lucky teller mine. Always upgrade all your tanks with the "spotter" upgrade. This allows you to see enemy AT guns sooner, thus saving your tank from unwanted carnage.
Now the enemy knows about your Cromwell. They will probably play more cautiously. while stalling for their medium tank. Play safer with the Cromwell and never overextend it. Also, try to spot for AT guns, so as to not directly run into them - and do sweep for mines. If you lose your Cromwell prematurely. you are going to have a hard time.
The biggest advantage of the Cromwell later on is its mobility and AI power. You may easily contest flanks because enemy AT guns cannot be everywhere at once. Do not forget to ram enemy squads, killing them in process, but only if you´re sure that there are no enemy AT guns nearby. Getting engine damaged from a panzerfaust near an AT gun is death sentence.
Always keep your AT guns behind the Cromwell and plant mines on important locations. It´s only matter of time until the enemy gets his medium tank as well and he will try to kill your Cromwell after he lands some AT shots on it. If you have AT guns behind your Cromwell, you need not fear his tank that much because you can always fall back to safety.
The Choice: The Comet or Another Cromwell
Now you will have to make another crucial decision which may decide the match. That is why I am going to help you with this choice. So let uscompare these 2 units. Do note that you want to acquire the weapon racks upgrade and one Land Mattress before your second tank (if you have enough CPs for a Land Mattress). In addition, depending on your choice, tech Bolster Infantry Squads after your second Cromwell, or before your first Comet.
The Cromwell
A second Cromwell gives you a stronger field presence, allowing more map control. I often go a second Cromwell when I feel that I need a second tank right away in case I will be overwhelmed; or, when I know that a second Cromwell will be the killing blow. This is usually when the enemy does not have a tank on the field, or his AT department is lacking (Only 1 AT gun for example). 2 Cromwells together will allow you to attack him from multiple flanks, trapping his AT guns. Of course, your infantry should be there to assist you, as always.
Later on, research Hammer Tactics and build Comets. If you lose a Cromwell, replace it with a Comet. Your super late game composition should be mostly Comets, with the occasional Firefly to fight heavy tanks.
The Comet
I recommend the Comet when you know that the enemy is either going for a heavy tank (Panther, Tiger...) or when you feel that the enemy composition is strong. If the enemy is well-entrenched, then the Comet will be much better, because it can take more punishment than the Cromwell.
Late game, the Comet is always better. It can fight most Axis tanks head on. Also, the white phosphorus shells (the vet 1 ability) allow you to burn enemy infantry and paks, thus forcing them to move, because they cannot aim properly and are burning to death. The munitions cost for phosphorus is minimal, which allows you to spam them.
Later on, build more Comets - do not build Cromwells -- the Comet is better in every aspect. You can requisition a Firefly, if you are having problems with Axis heavy tanks.
Conclusion
Rush a second Cromwell when you think it will decide the match, or give you a huge map advantage. If you think the enemy is stalling for a heavy tank and is well-entrenched, go for the Comet.
Super Late - Fighting Heavies
The game is slowly ending. You already know how to make it to the late game and how you use all your late game units (if you do not know how to use the Comet, use it like the Cromwell, just do not forget the white phosphorus shells). The only thing that can pester you during the late game is the Axis' heaviest tanks, like Tigers. Every other thing can be countered with your army composition, without any additional effort (infantry will be countered by Comets and MGs supported by IS and engineers, and then killed with Mattress barrages or sneaky Commandos). Team weapons will die to Land Mattress fire. once you spot them with the Commandos. Medium tanks and assault guns will fail miserably to your AT guns and Comets.
Only heavy tanks may give you problems. To deal with them, we have the Firefly. The biggest advantages of the Firefly are its range and its Tulip rockets. Range allows you to keep the enemy at bay, firing at their tanks while they cannot fire back. You will kite them as you kite infantry with panzerfausts. After a little while, the enemy will become mad because they cannot use their tanks, while you are using your Comets on the flanks (they are much faster than Tigers) and will dive in. This is the moment when you use the Tulips. Precisely target the Tiger with them, count his moves as well to land both Tulips on him. The first one will blind him, the second will stun. Once it is stunned, finish it off with either 2 AT guns, or an easy flank with your Comets/Cromwells.
You may also use Tulips offensively. Spot the Tiger, prepare the Tulips, calculate where the Tiger will move and fire. Meanwhile, command your Land Mattresses to lay waste to any enemy AT guns and command your infantry to sweep mines and screen for your tanks. Once the AT guns are dealt with and the Tiger is stunned, flank it with Comets/Cromwells and finish it off. Do not forget to use AT guns as well. Make this move only if it will be decisive.
If you see that your enemy is going for a Tiger or King Tiger, requisition a Firefly and upgrade it with Tulips. Do not do so, if he is going for a Jagdtiger or Elephant. The only way to counter them is to ignore them, and always use tanks defensively. They are only good against other tanks, so your infantry will have free reign. The Jagdtiger and Elephant are also too slow to pursue your tanks; As long as you do not overextend, you cannot lose your tanks.
Final Notes
The late game is very complex and if I had to describe you every possible move that may happen, we will have to write another guide solely for that purpose. That is why I want to give you simple, yet very effective hints. #ADAPT. It sounds stupid, but it is true.
Use your brain and try to adapt for any late game battlefield situation. When you are losing, focus more on the defence, gathering your strength for one last assault. When you are winning, give the enemy no pause, and cap as much as possible. When he is fielding tanks, acquire tanks yourself as well. Ii he is fielding heavies, select a Firefly. Use the Land Mattress as described before, to break enemy lines while holding your own. And always sweep for mines and plant them yourself as well: mines win games, (or lose them, if you step on them).
Be cautious! Always scout before you attack with tanks and keep them behind infantry to minimise risks. Use the Comet´s white phosphorus shells to counter paks or infantry. Do not overextend with your tanks. Only dive in when the enemy's defence is crumbling or when it is worth the trade (eg. trading a Comet for a Kingtiger). Retreat sooner when things become hard. It is always better to lose one strategic point than a full vetted infantry section. You will recap it once you return: do not worry!
Conclusion
This commander may be the easiest British commander to master for many. On the other hand, mastering key concepts of this commander will surely help you in the future. Even after multiple nerfs, this commander remains in meta due to its high-risk high-reward potential, and because he has tools that the core British army lacks, such as late game artillery, flamethrowers and a good short range stealth squad.
That is all I wanted to say you in this guide. I hope you understand this commander and the British Forces much better now. Good luck on your journey to becoming a better player!
That is all I wanted to say you in this guide. I hope you understand this commander and the British Forces much better now. Good luck on your journey to becoming a better player!
See you in the heat of battle, mate!
 __deleted__
  Ohme
Ohme  Yukiko
  |GB| The Hooligan486
  MajorBloodnok
  pigsoup
  elchino7
  Mr.Smith