

Introduction
Hi, ladies and gents.
This guide will focus on a 1vs1 strategy utilising the Armor Company of the United States Forces and linear teching. Starting with an introduction of all the doctrinal abilities and their usefulness.
This guide will focus on a 1vs1 strategy utilising the Armor Company of the United States Forces and linear teching. Starting with an introduction of all the doctrinal abilities and their usefulness.
Armor Company
| !"Overwhelm the enemy with elite American armored vehicles and supporting infantry. Assault Engineers may clear fortifications to allow vehicles to advance, while Sherman Bulldozers may be used to create a roadblock or defensive line. The enemy's strong points can be bombarded with 240mm artillery prior to an attack." |
What are you lookin' at, private?
Elite Vehicle Crews Upgrade
| !"Allows Vehicle crews to upgrade to Thompson submachine guns." |

 90
90A very situational upgrade for 90 munitions. It changes your tank crew from a useless combat unit to a squishy close range infantry unit. Not effective on crews that have their own vehicles. Changing them with a Rear Echelon means that you lose the ability to pop the crew out to ability repair any criticals. Also, the tank will lose all its Veterancy, since the Veterancy is on the vehicle crews and not on the vehicles.
So, the upgrade is only usable on crews that have lost their vehicle. But I do not recommend it because that crew will have some Veterancy, and they may switch with a new tank's crew to give that tank a Veterancy boost. In the meantime, you may use vehicle-less crews as back cappers, harassers or repairers. Just keep in mind that they do not have combat abilities, so always retreat them if you see something stronger than pioneers running at them. After a veteran crew has switched with a fresh crew then it might be a good idea to give them the Thompson upgrade, but only if you float munitions, since almost every other upgrade is better than the Thompson upgrade.

Heavy cav has arrived.
They will still be squishy. And they do not receive any combat bonuses at all, which makes them really costly to reinforce at 30 Manpower. So, with the upgrade, I recommend that you use the crew as a flanking squad only, against a heavy machine gun or a long ranged infantry squad. This is because their firepower is great at close ranges, but they lack any armor to protect them. That is why I do not recommend that you use them as shock troops.
This guide will not focus on this upgrade because it under-performs a lot. It is better to place an additional demolition charge than upgrading to the Thompsons on a crew, 90% of time. Therefor, use the crew as just another capping squad.
Assault Engineer Squad
| !"Assault Engineers are tough combat troops whose primary tasks are creating or clearing battlefield obstacles and attacking enemy defensive positions. Effective against infantry at close range. No movement penalties when moving through rough terrain. " |
 280
280 7
7| !Assault Engineers are one of the few American units that are capable of being upgraded with flamethrowers, making them very important and useful on city maps with lots of garrison-able buildings. They may also plant demo charges and repair vehicles. |
| !Use this unit like a multipurpose engineer with combat abilities and anti-garrison capabilities. Never charge with them frontally, it is a big mistake that many players make. Use them as flanking squad. They also have the best mines in game and the strong demolition charge. Utilize those to their fullest. If they are often doing duties (eg. mine placing) behind battlefield lines, then you are using them well. |
This guide will mainly focus on this unit and on the M10. Assault Engineers are versatile battlefield troops. They are rather squishy and their Veterancy does not provide any received accuracy or armor bonuses. Many people use them as a Shock Troop or Sturmpioneer squad, but that is not their intended role, they are far better suited for flanking, garrison clearing, or planting mines and demolition charges. If you charge them against units in heavy cover then you will only lose the engagement and suffer a Manpower bleed.
You look cold, kraut. Here, let me warm you up...
Now, let us go into more detail about the Engineers's abilities.
M5 Mines
They are equipped with the same mines as the Oberkommando West, Soviets, and British are. They are strong and cheap, triggered by both infantry and vehicles. These mines will kill at best 2 infantry models and usually also supress them. They also badly damage tanks and gives them an engine critical
Even if the enemy equips a mine sweeper, you may continue to place mines as they will make him more cautions. He will need to scout first with his mine sweeper squad, and he will not be able to find all mines. So sometimes, when he badly overextends, he will be punished by hitting a good defensive mine.
Always. Always move your engineers after they place a mine. This is because they will stand in an obvious position otherwise, which may be easily spotted by an enemy, making them realize there is a mine there.
Demolition Charge
A player triggered explosive that can be placed anywhere. Good places to lay them are near important houses, on your cut offs, fuel points, or simply any point that your opponent will likely try to capture. For maximum effect, trigger them against veteran, upgraded, or elite infantry.
Do note that engineers will move out of area where they place the demolition charge, so if you are capturing a point, make sure to shift order you engineers to continue their capture, after they have placed their charge.
It can be detonated while an enemy tries to defuse them with a minesweeper. So if you spot a pesky pioneer squad removing one, then you may simply press the button, and boom!
Flamethrower
It deals little damage to units out in the open, but deals great damage to units in heavy cover or houses. Use it as an anti-garrison upgrade, but not as an overall buff to the Engineers's Damage Per Second.
Their Other Abilities
- Repair
- Critical Repair
- Barbed wire and fighting positions
- Cut wire
- Fuel and Munitions caches
M10 Tank Destroyer
| !The M10 'Wolverine' Tank Destroyer's 3 inch main gun has a decent armor penetration and its mobility allows it to flank the most heavily armored enemy vehicles. Effective against tanks and light vehicles. Weak to anti-tank weaponry." |
 300
300 9010
9010Use the bloody Make War Not Love 2 event skin, for medium tanks, to reveal the Wolverine’s true character.

What did you expect? A witty comment? How about you run and ask that Panzergrenadiere over there, sprinting for his dear life.
| !The Wolverine should not engage directly with tanks. Its low armor is made up by its speed, so use it as a Hit and Run vehicle versus enemy tanks, and aim for their rear armor. |
| !A cheap and versatile tank destroyer. It is able to fight German armor cost efficiently due its strong main gun, good hit points pool and great speed. Its high mobility makes it a perfect flanker, or infantry crusher. |
This tank is the hallmark of this doctrine. It comes early, hard counters any other vehicle that comes at the same time (Stug e, Puma, Ostwind), and it is able to fight off any mid game German armor (P4, JP4, Stug, Ostwind). The M10 can trade efficiently against the Oberkommando West's tanks due to its cheapness and the Oberkommand West late game vehicle cost.
It cheapness means that it may be spammed. If you accumulate more than 3 of them then you will be able to take out a single tiger, even if there is two Paks nearby.
And you may always use this tank against other tanks as a flanker. Flank his tanks using the high speed of the M10 to evade most Anti Tank Gun fire, and fire at the enemy’s rear armor. Make sure you are using the Armor Piercing rounds against heavy armor, the ability is unlocked at Veterancy 1.
Against Infantry
Its main gun is weak against infantry, but its speed and mobility makes it a decent infantry crusher: just ram at them and twist. Splat!
After some practice you will be a master at crushing infantry. Your opponents should realize it is wise to retreat whenever they see your tank coming against their infantry. But do not pursue retreating squads as you cannot crush them.
Some units have Anti Tank Grenades or Panzerfausts that can damage your tank. Ram these squads only if you have 100% health. This is because if a Faust or AT Grenade penetrates a tank and if it drops to 75% health or below, its engine will be damaged. Even critical repair may not save the tank, as it is risky to repair in the middle of a battle. Also be aware of any Anti Tank Guns nearby, and only ram infantry equipped with Grenades or Fausts if you are sure that the Anti Tank Guns cannot hit you and bring you to or below 75% health.
Other units may be crushed freely without any fear of any engine damage, because they have no Anti Tank Grenades or Panzerfausts.
Tips for an Easier Life
If a tank has nothing to do, then park it in your base and jump the crew out of it. Give them a break until you need to fight against a tank. This will decrease your population, and thus increase your Manpower income. Also, 1 tank is enough for crushing infantry, so the rest may sit in your base, waiting for an enemy tank.
Use the Repair Critical ability when you get an engine critical, it will allow you drive the tank out of there faster. Just make sure you do not do this in the middle of an Obersoldaten blob or when you are facing a Tiger. They will wipe your crew and capture your tank.
As long as you deny your enemy’s armor with this tank then you will have the upper hand, because American infantry is superior to German infantry, plus you may always crush some Germans if a situation becomes too hard.
Sherman Bulldozer
| !"The M4A3 Sherman Bulldozer tank is equipped with a 105mm howitzer for engaging infantry and structures. Barriers can be created or destroyed with the bulldozer blade. Can engage infantry and structures, weak to enemy armor." |
 380 14014
| !The Bulldozer cannot engage armor effectively, but can provide support to tank destroyers and build barriers to provide cover and prevent enemy armor movement. |
| !Great support tank useful for destroying fortifications, creating heavy cover and guarding a flank. It is not a Sherman, however, which means that it is rather slow and only good when stationary. Use it more as an infantry support tank than a main battle tank. |
It is one of a few American tanks that can take more punishment than a standard Sherman, 720 hit points versus 640. But do not use it as Sherman as it is not a fast tank that can wipe retreating infantry, and it is also much slower with a main gun that is highly inaccurate on the move. It is an infantry support tank. Cover one of your flanks with it, destroy fortifications, take punishment and bombard infantry but keep the tank stationary!
Like any other Sherman, it is equipped with smoke. It can be used to cover retreats, help infantry against heavy machine guns or cover tanks from Anti Tank Gun fire. Just remember that tanks can attack ground through the smoke.
The Bulldozer may create a dirt barrier that blocks tank movement, giving green cover and is hard to destroy. Use it near key points to help your infantry, or on main roads to block Axis tank movement. This tank may also go through hedges.
Never call in more than 1 bulldozer at a time, it is not an anti infantry tank, it is a support tank. If you want more anti infantry tanks then go for the Shermans. They are better at squad wiping with their high explosive shells. You will only need 1 support tank, believe me, more than 1 is never better than a couple of Wolverines or Shermans.
240mm howitzer barrage
| !"Call in a 240mm Howitzer barrage to level the target area." |

 250
250| !This ability is not called an RNG bomb for nothing. Sometimes they hit and wipe half an army, and sometimes they do not. Simply use it for area denial. Never keep your units in the target zone. |
A good way to use this ability is to place it behind an Ostheer pak wall before an infantry assault, so that they will die during the assault or to the ability if they walk into the target zone. Or, use it on the Oberkommando West's HQs that are placed outside their base sector. But mainly, the ability should be used to deny an area, as it has a huge target circle. Enemies will surely learn to fear it or lose parts of their armies.

Poor Vladimir. He got drunk, slept with a few officer wives and urinated on some nearby artillery. How he got to the American camp, through the German lines, is still a mystery. Anyway, the Major was not pleased to find him in his bed.
Also, it fires 5 shells, which is better than the Ostheer Railway Artillery's 3 shells.
Early Game
Your goal in the early game is to rush a M20 before the Oberkommando West gets Panzerfausts and Puma, or before the Ostheer produces a 222 scout car, which may hard counter your M20.
You may achieve this if you:
You may achieve this if you:
- Control our fuel and 60% of the map or more.
- Deny the enemy fuel.
Against the Ostheer
On maps with an important building, the build order is:
Your starting Echelons should go to the key building near the enemy fuel or cut off point. Your 1st Riflemen will go and relieve the Echelons in the house. Now, the Echelons may capture the points that the house covers. Your Riflemen may do the same, just make sure they occupy the house first if an enemy shows up.
The 2nd Echelons may capture your fuel or capture some points on the other side of the map.
Where the 2nd Riflemen may go will depend on the situation. If your enemy ignores your captured building then you may go and help your 2nd Echelons defend your territory. The Riflemen in the house may help defend your territory as well, by flanking the enemy. If your enemy wants his fuel back, then your second Riflemen must go to defend it.
You may be more aggressive when you have 3 Riflemen out. Always keep your Riflemen close to each other, or near Echelons, so they may help each other out if one is suppressed by a heavy machine gun, but remember to space the men out, or all of them will be suppressed. Use the Echelons as scouts so your Riflemen may set up flanks to counter an encountered heavy machine gun, then force it off. Repeat, and you should acquire more map control.
On maps with no key buildings, or where they are too far away from your base, it is recommend to go 3 Riflemen into the Lieutenant. And build a second Echelons after you have BARs and munitions to spend. Do the same if the enemy manages to occupy the buildings faster than you.
Also, if you fail to occupy the building then play more conservatively. Wait until the enemy leaves the building and then punishing them for that. As long as the building is garrisoned your enemy will have one less squad on the field, which means that you should be able to controlt 70% of the map, or more.
They are hard to deal with because you will have no grenades until after you field the M20, so you cannot force the heavy machine guns out of a building, which is why you have to aggressively grab any key buildings with your Echelons. Due to the lack of smoke you have to always play conservatively with you Riflemen. Do not attack into unexplored territory until you have a second Riflemen squad to help the first one and always be ready to flank a heavy machine gun. Also use Rear Echelon as a recon decoy squad and Riflemen as flankers.
Against multiple heavy machine guns you will need smoke, so tech the grenades and smoke upgrade. But you still need to rush the M20 to shut down his heavy machine gun play, less grenadiers means less squads with Panzerfausts on field. You will need to play highly conservatively against multiple heavy machine guns, rush key buildings, hold them with multiple squads and smoke force the machine guns to retreat, and then grab more ground.
Try to capture as many points as you can. Your opponent will have less squads than usual, so you can out capture him and delay the 222. Remember to avoid the snipers. They will bleed you badly. You need to rush the M20 and hope you will be able to hunt them down before the 222 comes.
- Rifleman
- Echelon
- Riflemen x 2
- Lieutenant
- M20
Your starting Echelons should go to the key building near the enemy fuel or cut off point. Your 1st Riflemen will go and relieve the Echelons in the house. Now, the Echelons may capture the points that the house covers. Your Riflemen may do the same, just make sure they occupy the house first if an enemy shows up.
The 2nd Echelons may capture your fuel or capture some points on the other side of the map.
Where the 2nd Riflemen may go will depend on the situation. If your enemy ignores your captured building then you may go and help your 2nd Echelons defend your territory. The Riflemen in the house may help defend your territory as well, by flanking the enemy. If your enemy wants his fuel back, then your second Riflemen must go to defend it.
You may be more aggressive when you have 3 Riflemen out. Always keep your Riflemen close to each other, or near Echelons, so they may help each other out if one is suppressed by a heavy machine gun, but remember to space the men out, or all of them will be suppressed. Use the Echelons as scouts so your Riflemen may set up flanks to counter an encountered heavy machine gun, then force it off. Repeat, and you should acquire more map control.
On maps with no key buildings, or where they are too far away from your base, it is recommend to go 3 Riflemen into the Lieutenant. And build a second Echelons after you have BARs and munitions to spend. Do the same if the enemy manages to occupy the buildings faster than you.
Also, if you fail to occupy the building then play more conservatively. Wait until the enemy leaves the building and then punishing them for that. As long as the building is garrisoned your enemy will have one less squad on the field, which means that you should be able to controlt 70% of the map, or more.
MG42s
They are hard to deal with because you will have no grenades until after you field the M20, so you cannot force the heavy machine guns out of a building, which is why you have to aggressively grab any key buildings with your Echelons. Due to the lack of smoke you have to always play conservatively with you Riflemen. Do not attack into unexplored territory until you have a second Riflemen squad to help the first one and always be ready to flank a heavy machine gun. Also use Rear Echelon as a recon decoy squad and Riflemen as flankers.

Klaus... mein Freund. You really need to find a different way to relieve your stress.
Against multiple heavy machine guns you will need smoke, so tech the grenades and smoke upgrade. But you still need to rush the M20 to shut down his heavy machine gun play, less grenadiers means less squads with Panzerfausts on field. You will need to play highly conservatively against multiple heavy machine guns, rush key buildings, hold them with multiple squads and smoke force the machine guns to retreat, and then grab more ground.
Snipers
Try to capture as many points as you can. Your opponent will have less squads than usual, so you can out capture him and delay the 222. Remember to avoid the snipers. They will bleed you badly. You need to rush the M20 and hope you will be able to hunt them down before the 222 comes.
Against the Oberkommando West
The key against the Oberkommando West is acquire a lot of fuel and a good field presence, because you will need the M20.
Go for the same build order as against the Ostheer, and the same strategy of capturing your fuel while denying your enemy fuel.
You may be more aggressive since your opponents will not have any heavy machine guns, usually. So your 1st Riflemen will help the Echelons secure the house, afterwards the Echelons should back cap and the 2nd Echelon should go to capture your fuel.
Your 2nd Riflemen should go to the enemy, wherever most of them are. You can guess where a squad is heading by their path and where they face. Are they moving to capture a house? Or to capture a point across the map? Either way, use your 3rd Riflemen to find them, and force them off! Then hit their cut off points.
Against Kubelwagons you need to defend your cut offs. This is because the Kubel is a nasty capper. It may easily decap a point and fall back before any of your Riflemen arrive. Once you field the M20, however, you can hunt and destroy it.
Generally, playing against the Oberkommando West is easy due to their lack of heavy machine guns. While playing against them, remember to use cover and focus down Sturmpioneers while flanking any volks, and you should be in a good shape. Plus, guard your cut offs against the Kubelwagon’s advances.
Go for the same build order as against the Ostheer, and the same strategy of capturing your fuel while denying your enemy fuel.
You may be more aggressive since your opponents will not have any heavy machine guns, usually. So your 1st Riflemen will help the Echelons secure the house, afterwards the Echelons should back cap and the 2nd Echelon should go to capture your fuel.
Your 2nd Riflemen should go to the enemy, wherever most of them are. You can guess where a squad is heading by their path and where they face. Are they moving to capture a house? Or to capture a point across the map? Either way, use your 3rd Riflemen to find them, and force them off! Then hit their cut off points.
Kubelwagen
Against Kubelwagons you need to defend your cut offs. This is because the Kubel is a nasty capper. It may easily decap a point and fall back before any of your Riflemen arrive. Once you field the M20, however, you can hunt and destroy it.
Generally, playing against the Oberkommando West is easy due to their lack of heavy machine guns. While playing against them, remember to use cover and focus down Sturmpioneers while flanking any volks, and you should be in a good shape. Plus, guard your cut offs against the Kubelwagon’s advances.
Early Game Capping Orders
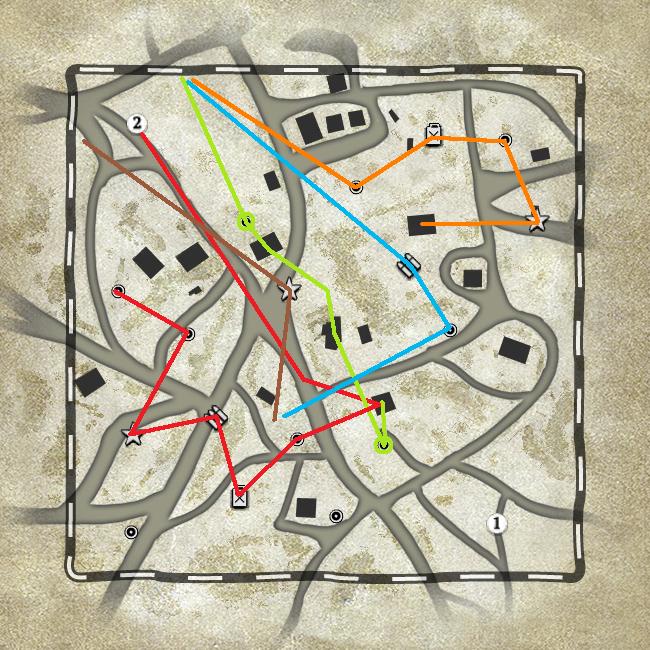
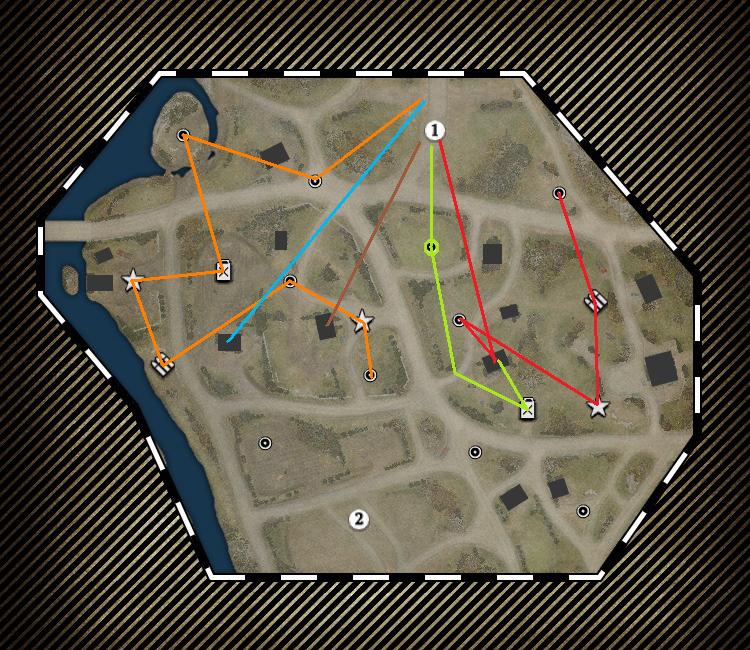
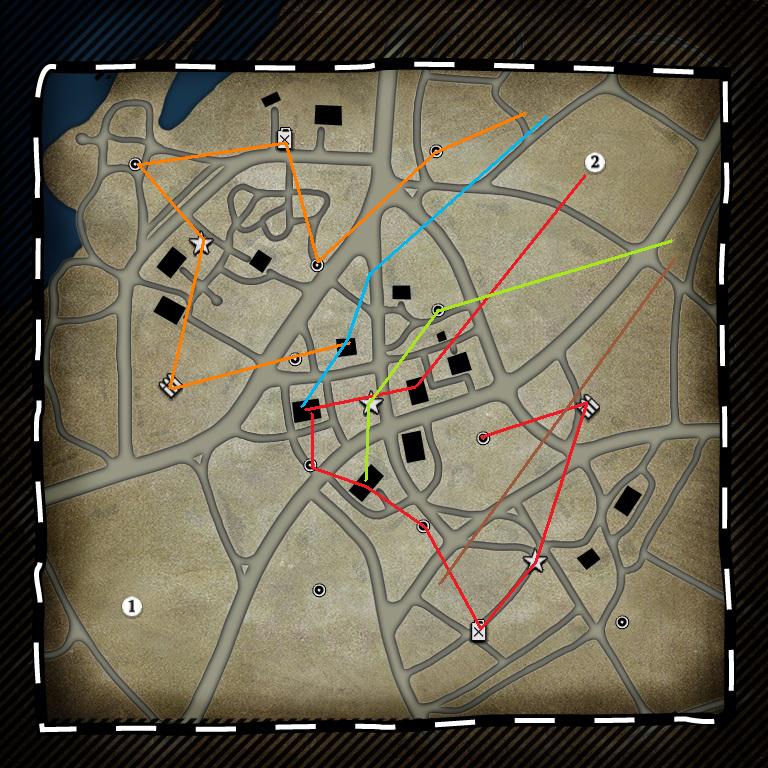
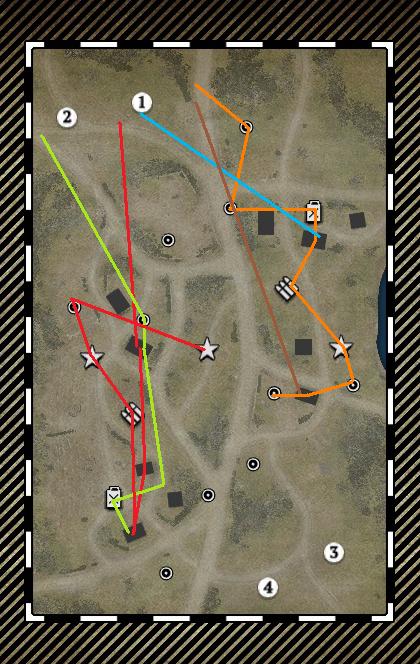
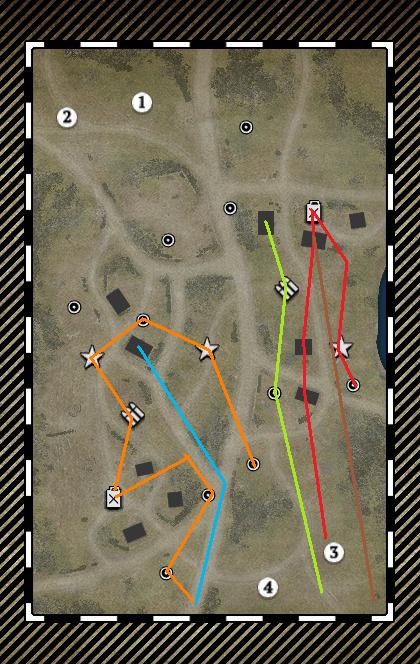
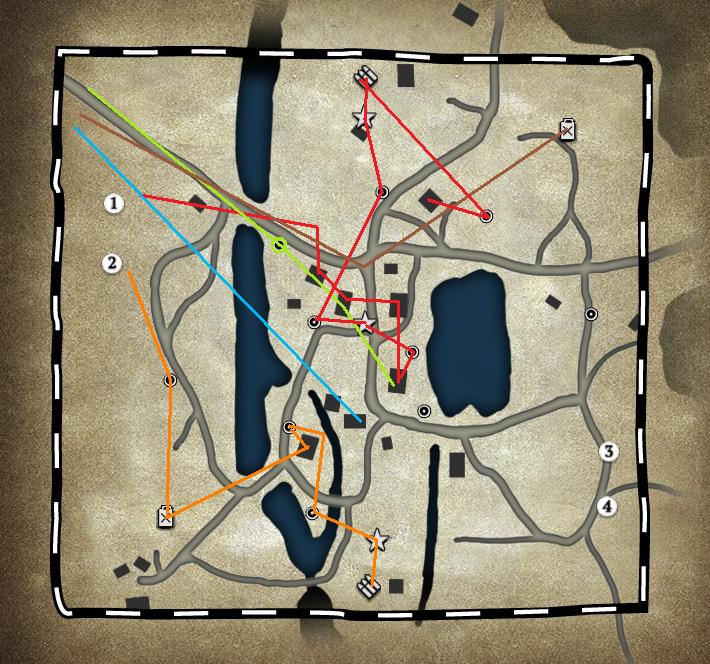
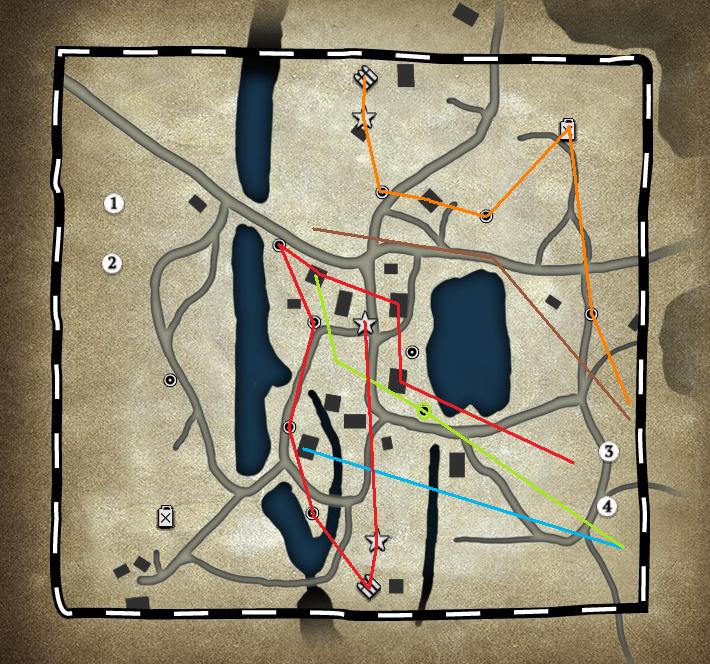
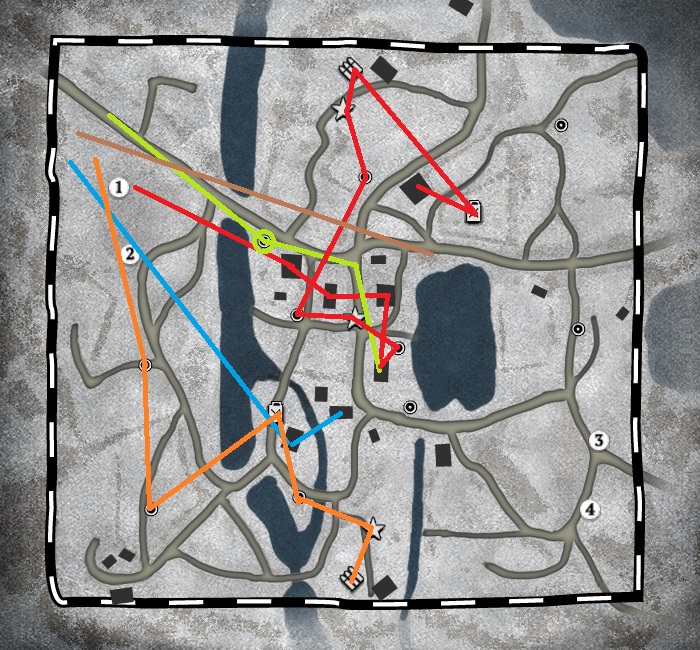
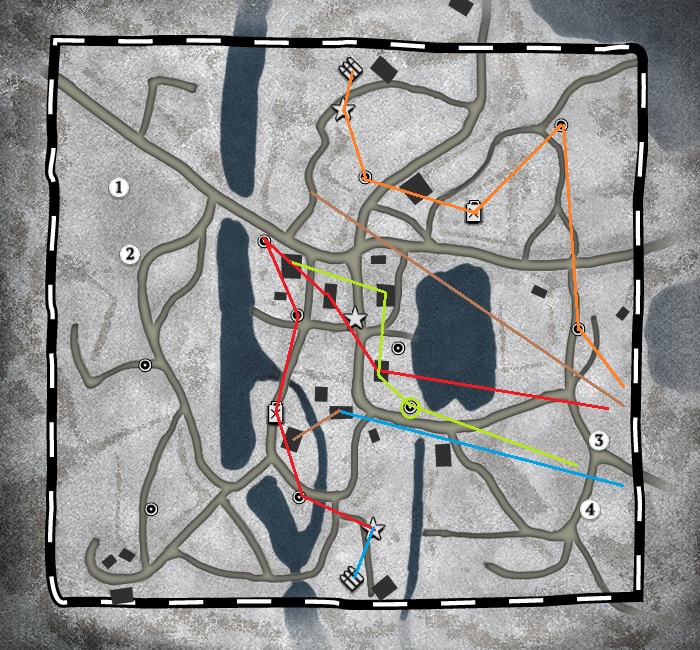
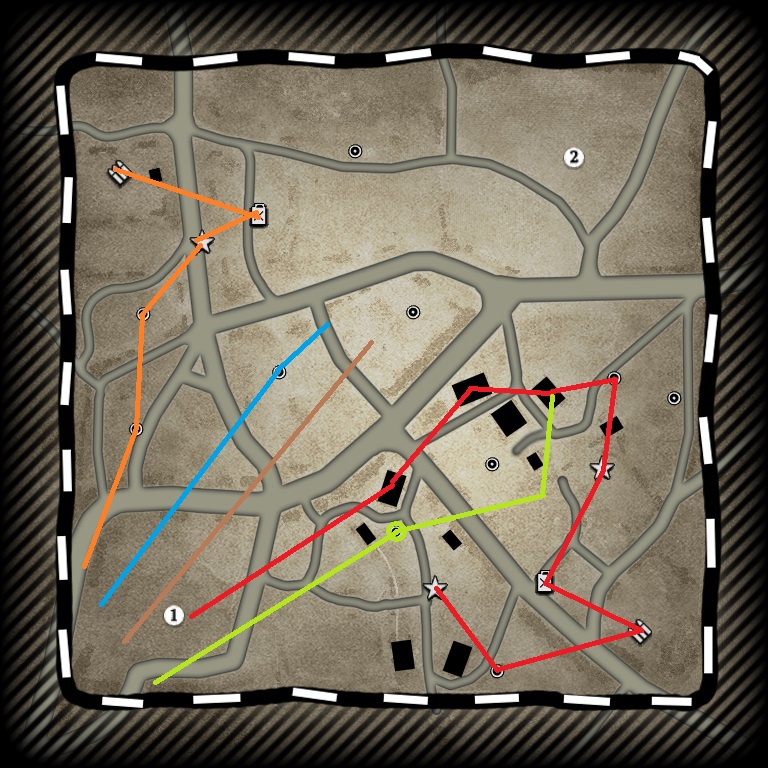
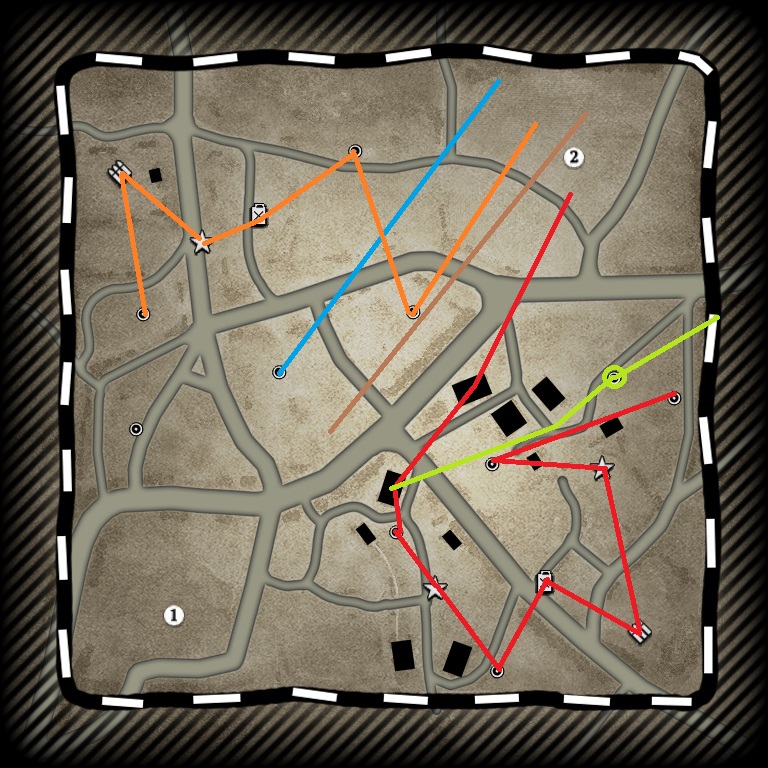
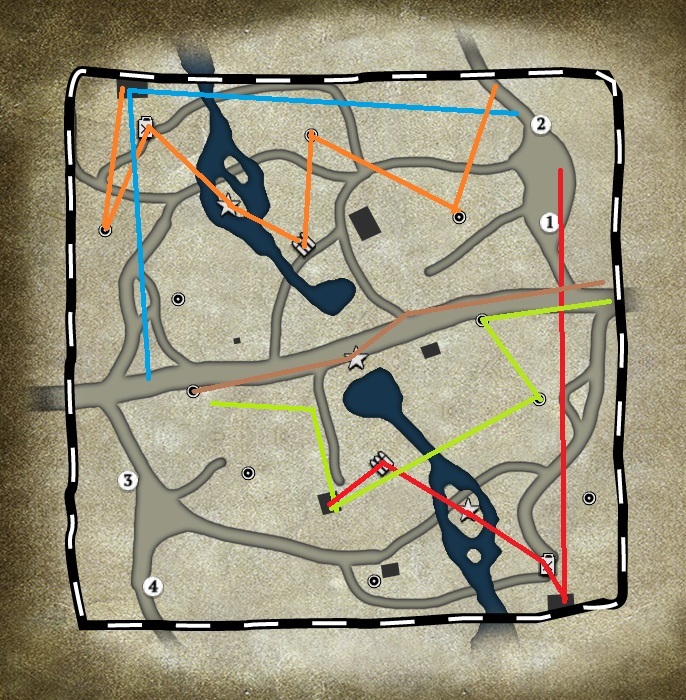
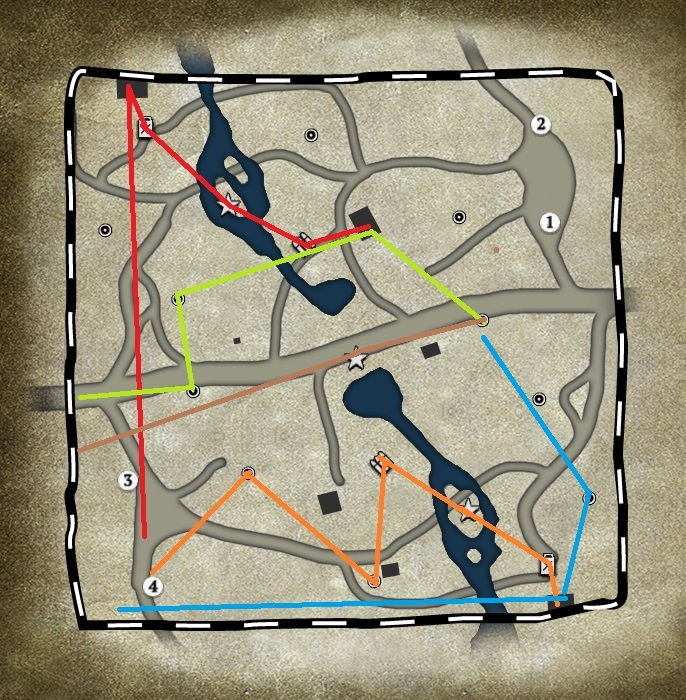
Pop! Waves hand. Hello, the Editor here. You will find the images for the capping orders within the spoiler tags below. Apologies if you find this a hassle, but the other option would be to scroll past 18 images in a row and die of a sensory overload. At least now, you may choose which maps you would like to study, and you can always come back later to study different map. Alrighty then. Pardon me, Mr. Fourth Wall, but I am getting out. Bang! Oh, stop complaining about the shell wounds. You will get used to it!
Kholodny Ferma

Faymonville Approach
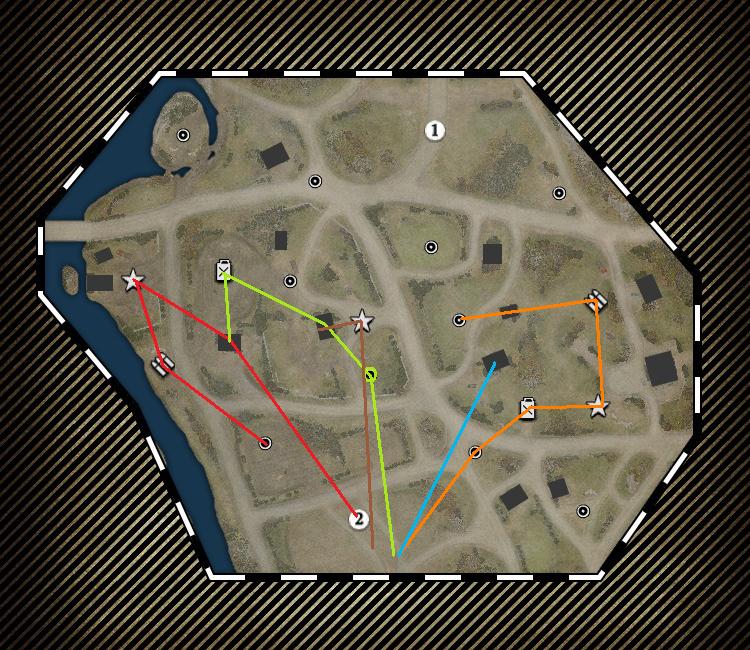
Arnhem Checkpoint
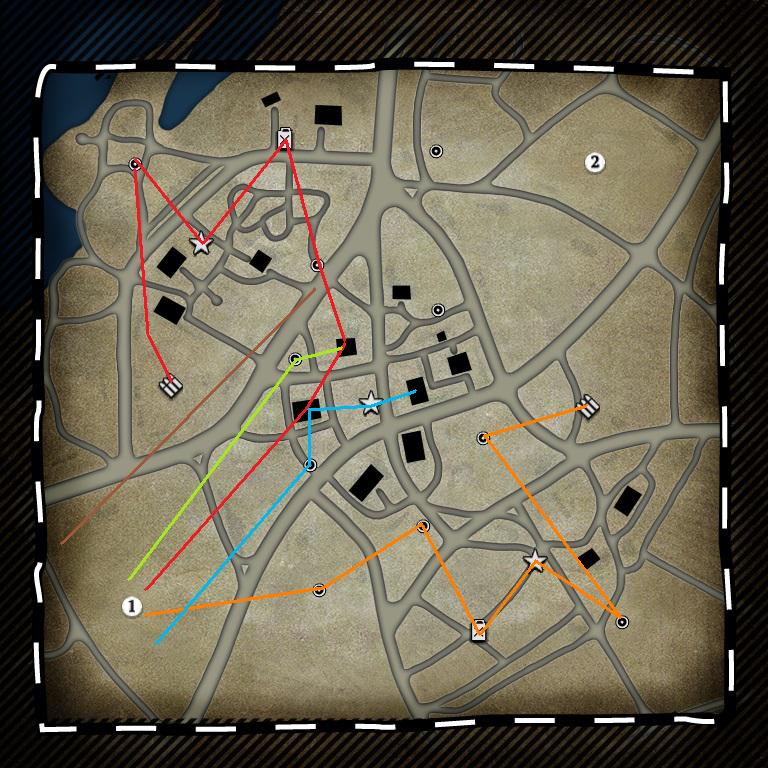
Road to Kharkov
Semoskiy Summer
Semoskiy Winter
Angoville
Crossing in the Woods
Langreskaya
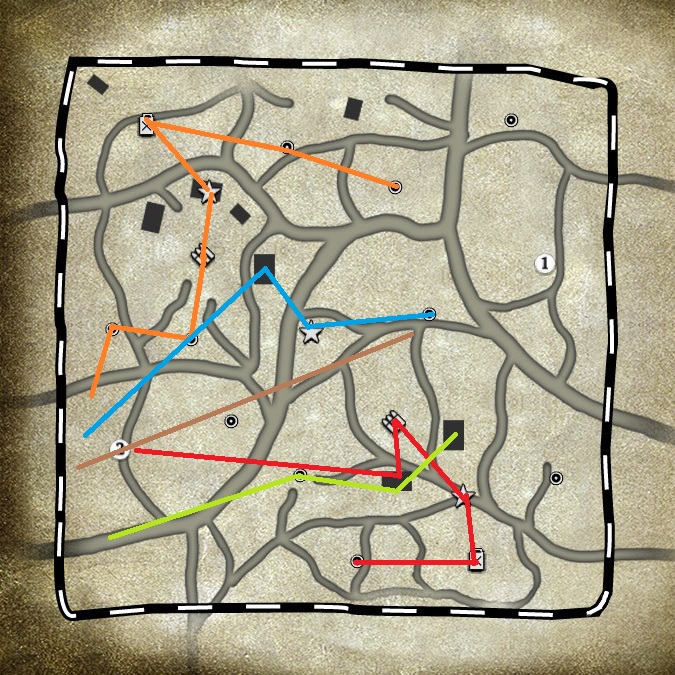
The point of these capping order is capture a key building with your first Echelons, then hold out until the first Riflemen come, and then go to backcap with your the Echelons while the Riflemen secure the house. Once your third Rifleman arrives, you will be ready to assault your opponent’s cut off, while the Echelons hold the building.
Sometimes you will need to adapt to the enemy’s capping order. You may not arrive at the building first and thus you will need to play more defensive. If he plays on one half of the map, you will need to contest that part with your Riflemen while your Echelons capture the other part of the map.
- red - Starting Rear Echelon
- green - First Riflemen
- orange - Second Rear Echelon
- blue - Second Riflemen
- brown - Third Riflemen
Kholodny Ferma
Faymonville Approach
Arnhem Checkpoint
Road to Kharkov
Semoskiy Summer
Semoskiy Winter
Angoville
Crossing in the Woods
Langreskaya
The point of these capping order is capture a key building with your first Echelons, then hold out until the first Riflemen come, and then go to backcap with your the Echelons while the Riflemen secure the house. Once your third Rifleman arrives, you will be ready to assault your opponent’s cut off, while the Echelons hold the building.
Sometimes you will need to adapt to the enemy’s capping order. You may not arrive at the building first and thus you will need to play more defensive. If he plays on one half of the map, you will need to contest that part with your Riflemen while your Echelons capture the other part of the map.
Mid Game
Your main objective in the Mid game is to win before any heavy tanks enter the field, or to snowball into the late game with a winning position. This can be done if you use all your tools properly. Alright, lets move.
Against the Ostheer
- Lieutenant
- M20
- Bazookas and BARs
- Ambulance
- Combat Engineers upgraded with a Flamethrower
- Grenades (optional)
- Captain
- Stuart
M20
The M20 job is to put pressure on the Ostheer and their support weapons. It should, if possible, hunt down any snipers before the 222 arrives. Play as before with your Riflemen and Rear Echelons, and use the M20 to win engagements. But do not over extended with it. It should harass squads and force them off to get more map control. Just keep in mind that there may be Teller Mines on obvious spots. So stay away from the main roads, or upgrade a Echelon with a minesweeper and scout ahead of the M20 to find and remove any mines.
Your M20 will have 1-2 minutes of free reign if your early game went well.
Then the 222 comes
By the time the 222 comes you should have researched BARs and Bazookas. Now you will need to go into your base with your M20, make the crew hop out and grab a bazooka. Repair the M20, move out, and continue to harass. This need to happen before the 222 comes out, or it will be too late.

For Christ's Sake, John! Stop your nonsense about the gospels, flip the bazooka around and shot IT!
Just keep in mind that you cannot allow your enemy to Panzerfaust your M20, for if that happens, you will likely lose your vehicle.
The 222 enters the field. What can happen now may change the outcome of the whole game. Most players recklessly pursue the M20 in order to take it down. All you need to do is to leave the weapon range of your enemy’s infantry, use smoke (222 cannot attack you) hop out the crew and fire a bazooka volley at the 222 before it can do something. This move should kill the 222. And without the 222 you can freely kill the poor Germans with your M20 until they field a Pak.
After 222
Now you need to improve your field presence. Buy an ambulance and parking it in front of your base to heal retreated squads. Also use almost all of your munitions to upgrade your Echelons and Riflemen with BARs. Give everyone one Bar each, and then give them another.
You may need Assault Engineers to clear buildings, so upgrade them with a flamethrower if needed, while saving some munitions for mines, to kill infantry and disable vehicles.
Or you will need grenades because you may have problems with heavy machine guns. Acquire if needed. And definitely purchase them during the late game.
Then you should go for captain. If you think your M20 is going to die, then quickly hop out to save the 2 bazookas the crew has. If the M20 made it into late mid game, then you should change the crew with an unupgraded Echelon. It is best to keep one without bazookas so you do not lose 2 bazookas if you lose your M20.
And you also unlocked the Stuart. You should field one.
The Captain, upgraded with 2 bazookas, and the bazooka vehicle crew is best used against vehicles. Use them to capture territory or cut off harassers, when no vehicles are around,.
Stuart
The Stuart will pressure the enemy more in conjunction with BARs equipped Riflemen and the M20. The only things that may counter it right now are the following: Teller Mines, remember to sweep for mines in front of an advance. Paks, so scout with your infantry and use the Stuart more like a cut off holder, as well as a flank harasser, rather than a main line tank. Lastly, the Puma. If you think he went mobile defense then you must protect your light vehicles with 4 bazookas and place mines on key roads with your engineers or with M20. M20´s AT mine kills Puma in 1 blow .
Puma
To kill the Puma, you will need to set a trap for it. It needs to hit a mine, be hit by an anti tank rifle grenade, or get crew shocked by the Stuart, before you can finish it off with the Stuart, the Captain and the bazooka vehicle crew. Not too hard to pull off, but you will need to use all your tools together to bait out the Puma and into a killzone. The M20 can be the bait.

Scheisse! They hit our engine, Hans. Hans...? Oh, that pudding, jumped out the hatch! Wait for me!
Otherwise, you can use the Stuart like a M20, without much risk, since it is better on the defence. Or you may help the Riflemen on the flanks with it.
You should win by this time. Unless you are having problems with a defensive player, where a Pack Howitzer may help, or things are simply not going well.
If you are still in the game just do what you have done before. Use good Riflemen play, vehicle play, and upgrade your squads with BARs. Also remember to plant demolition charges on the cut offs, as well as laying mines in key areas.
Against the Oberkommando West
- Lieutenant
- M20
- Ambulance
- 2 M20 mines on good spots
- 50.cal
- Captain
- Weapon rack
- Stuart
M20
A fast M20 can do a lot of damage. It may also give you more map control, kill a Kubelwagens, defend cut offs and maybe even win you the game if you do it properly.
If you fail with the M20, however, you will have a really bad time. So keep it alive, scout for Raketenwerfers with your infantry, keep the car away from Panzerfausts, and upgrade one echelon with a sweeper to find some mines that may ruin your day.
The Oberkommando West have 2 ways to counter it: The weaker way is to go for the Flak Halftrack and play defensively. The stronger way is to rush a Luchs.
Flak Halftrack
Flak Halftrack can be countered rather easily. Just field your Anti Air Halftrack. Or bait the Flak Halftrack over a mine. Or grenade it with a Riflemen squad and then finish it with the vehicle crew that has the bazooka. The Flak is rather squishy and dies fast, plus it does not offer the same map control as a Luchs would. So most players will go mechanized HQ into a Luchs.
50.cal HMG
It is a great heavy machine gun against the Oberkommando, because they lack a good way to clear buildings. The exception is the flame grenades. They are, however, expensive and may be countered by good positioning of Riflemen and 50.cals. Especially, if the Oberkommando player tends to blob. Place the 50.cal in a good building and use it as a supplement to your forces. That should give your opponent a headache.
Go for the Captain after you have laid mines for a Luchs and bought a 50.cal. Research the weapon rack as well. You will need the bazookas.
Luchs
It will arrive at about 6-8 minutes into the game. Try to bait the Luchs with your M20 by driving around any mines on the field. This may bait the Luchs to drive over one. If this move is successful it will be an almost certain win. 50% of opponents will rage quit after they lose their Luchs so stupidly.
If this move fails, however, quickly drive your M20 to the Captain and keep them close together. If the Luchs chases, then use the smoke canister to cover the M20, hop out the crew and let loose 4 bazooka shots. This should kill the Luchs in most cases, just remember to move towards it for a second volley, as the first will not kill it.

Arthur didn't know it, but on this day, he was to become a hero of the United States. A very dead hero.
Once the Luchs is dead, you may be aggressive again with the M20, but crew it with a bazooka-less Echelons squad instead of the double Bazooka crew. This way, if you lose your M20, you will not lose your double Bazookas. You may also be aggressive with the Riflemen and 50.cal.
If you play well now, you should be able to win rather easily, even more so if you field a Stuart.
Play defensively if you fail to kill the Luchs. Keep your units close to your Captain and Bazooka Crew, while waiting for a Stuart. Fight around your mines, and lay more if the M20 is alive.
Once you field the Stuart, chase the Luchs, if it still lives, and shell-shock it. Follow up with a bazooka volley. The Luchs should die if you manage to catch it. Use the Stuart like a M20 afterwards.
You should be able to end this game right now with good vehicle and infantry play.
If you do not win straight away then just keep pressuring your opponent, buy engineers, place mines, capture the Victory Points and hold them, place your 50.cal in good positions. You will out-scale his infantry if you purchase BARs and an Ambulance. Your opponent does not have any vehicles now, so you have a big chance to win, even if he does not surrender.
Late Game
You made it into a part of the game feared by many American players. Hopefully, this commander can win you the late game, even if you did not execute the early and mid game properly, or your opponent is really tough. If you had a good mid game then you should have an easy time to win in late game, because you should have more fuel and Victory Points than your opponent.
And remember to replace lost Riflemen squads with Echelons squads upgraded with 2 BARs at this stage of the game. They are cheaper and get the infantry job done just as well as the Riflemen.
Let us move.
And remember to replace lost Riflemen squads with Echelons squads upgraded with 2 BARs at this stage of the game. They are cheaper and get the infantry job done just as well as the Riflemen.
Let us move.
Against the Ostheer
- Major
- Sherman
- 4/5 M10s (total) or 3 M10s plus a Jackson
- Bulldozer
Once you hit 8 Command Points you need to call in 2 M10s in order to shut down the Ostheer tanks that appear in that time (ostwind , p4 , stug e call in). Use them on defence and attack only if opponent overextends.Keep an eye on teller mines and use sweepers to not stupidly lose tanks.
At this time you will also need to upgrade all your squads, except the engineers, with a second BAR or else grenadiers will out-scale you.
Also, tech the grenades. The fight will get tougher and more micro intensive for both sides, which means a bigger chance for squad wipes.
After you upgrade all your squads with BARs, then you may use your munitions freely, for grenades, mines, smoke, demos and maybe a 240mm artillery barrage.
Light vehicles are at this point only good for defending your cut offs because they are easy prey for medium tanks. Only exception is Stuart whitch can shock overextended tank while your M10s flank it
You may also tech the Major, to bring in a late Sherman and boost your Anti Infantry department, as well as helping your M10s in the fight.
In the super late game you may call in a Sherman bulldozer to lock down the Victory Points or to fortify areas for your infantry squads with the dirt barriers, which are super durable.
Also, remember to replace any losses you may suffer.
Against the Oberkommando West
At this moment, the Oberkommando West is stronger than you if you are equally matched. But if you manage decrease his Victory Points a lot or get a fuel lead then you may still win against him rather easily.
Build order is the same as against the Ostheer.
Feel free to change the build order for your battlefield needs or replace some fallen units if you find them useful for your play-style.
The late game is usually a big mess. Medium tanks will appear making light vehicles obsolete and their function will be to hold cut offs. The tanks will rule the battlefield together with infantry support to capture and hold key points.
Once you obtain enough Command Points for the M10s, then you need to call in 2 of them to counter the Oberkommando's medium tank that will soon appear. Do remember to crush infantry with the M10s.
If you have munitions to spare, use them on BARs or to place mines or demos. Also you should research grenades. They are good now, because everything is messy, so players often do not have time to babysit their squads, thus grenades have a higher chance to hit and kill a whole squad.
Research the Major next, after you have your 2 M10s, and go for a late Sherman to support your infantry. It may also hold flanks. I think the Sherman is good with the High Explosive rounds on the defence, against lone capping squads. However, the Armor Piercing rounds should be used on the offence, as an enemy tank may appear.
Also, use the Sherman together with the M10s to counter the Oberkommando’s Panther tank. The Sherman, to some extent, is good against tanks.
You may punish your opponent if he places his HQ too far away from his base, by giving the HQ a 240 mm barrage. Your barrage should leave it undefended and it should also take some damage from it. During the barrage, use your pack of M10s to destroy the HQ from afar.
Build order is the same as against the Ostheer.
Feel free to change the build order for your battlefield needs or replace some fallen units if you find them useful for your play-style.
The late game is usually a big mess. Medium tanks will appear making light vehicles obsolete and their function will be to hold cut offs. The tanks will rule the battlefield together with infantry support to capture and hold key points.
Once you obtain enough Command Points for the M10s, then you need to call in 2 of them to counter the Oberkommando's medium tank that will soon appear. Do remember to crush infantry with the M10s.
If you have munitions to spare, use them on BARs or to place mines or demos. Also you should research grenades. They are good now, because everything is messy, so players often do not have time to babysit their squads, thus grenades have a higher chance to hit and kill a whole squad.
Research the Major next, after you have your 2 M10s, and go for a late Sherman to support your infantry. It may also hold flanks. I think the Sherman is good with the High Explosive rounds on the defence, against lone capping squads. However, the Armor Piercing rounds should be used on the offence, as an enemy tank may appear.
Also, use the Sherman together with the M10s to counter the Oberkommando’s Panther tank. The Sherman, to some extent, is good against tanks.
HQs
You may punish your opponent if he places his HQ too far away from his base, by giving the HQ a 240 mm barrage. Your barrage should leave it undefended and it should also take some damage from it. During the barrage, use your pack of M10s to destroy the HQ from afar.
Against (King) Tigers
At 13 CP a Tiger may be called in if the Ostheer player chooses a Tiger commander or if OKW player manages to set up all his trucks. And you need to prepare for it. Do note that dealing with a King Tiger is the same as dealing with a Tiger.
Mines are your friends as they can cripple the Tiger and allow you to flank it easier.
Your best choices to counter a Tiger are:
A) Use M10s as meat shields or flankers while the Jackson do the damage from afar. The Tiger cannot attack the Jackson because it should be constantly reversing and if he advances with his (King) Tiger too much, you will flank him with the M10s and the Sherman and with help of Jackson kill it.
B) Simply field 5 M10s and attack the (King) Tiger with brute force. Flank it and the (King) Tiger will usually die. You may lose 2-3 M10s in that process, depending on the Anti Tank support near the (King) Tiger. Just keep in mind to attack only with the whole M10 pack, instead of attacking with one M10 at a time. You need to kill the (King) Tiger with this strategy; you cannot afford to play cat and mouse with your opponent.
Either way you go, hop out your crew every time the tank is idle to increase your manpower income.
I think the B strategy is better against the Ostheer because Pak walls may kill your Jackson easily, and the guns also give the Ostheer an edge in a drawn out fight. You need to quickly attack the Tiger and destroy it. It has a big shock value and Paks often do not have time to react to the swarming.
Both strategies are viable against OKW. Raketenwerfers are much worse than Paks and have a smaller range, so you do not have to worry much that you might lose your Jackson to them. I think strategy B is better against a weakened OKW player who only has a King Tiger on the field, because he cannot support the KT without other tanks. Strategy A works better against the OKW player who manages to research both a Panther as well as a King Tiger, because these 2 tanks together can counter any charging M10s.
Also use the 240 mm howitzer barrage to force Anti Tank Guns to retreat or die, and then attack the Tiger if it refuses to move away from the Anti Tank wall.
Mines are your friends as they can cripple the Tiger and allow you to flank it easier.

Guys, I don't think we are doing jack shit to it! King Tiger hatch opens. Meine Herren, are you even trying?
Your best choices to counter a Tiger are:
A) Use M10s as meat shields or flankers while the Jackson do the damage from afar. The Tiger cannot attack the Jackson because it should be constantly reversing and if he advances with his (King) Tiger too much, you will flank him with the M10s and the Sherman and with help of Jackson kill it.
B) Simply field 5 M10s and attack the (King) Tiger with brute force. Flank it and the (King) Tiger will usually die. You may lose 2-3 M10s in that process, depending on the Anti Tank support near the (King) Tiger. Just keep in mind to attack only with the whole M10 pack, instead of attacking with one M10 at a time. You need to kill the (King) Tiger with this strategy; you cannot afford to play cat and mouse with your opponent.
Either way you go, hop out your crew every time the tank is idle to increase your manpower income.
I think the B strategy is better against the Ostheer because Pak walls may kill your Jackson easily, and the guns also give the Ostheer an edge in a drawn out fight. You need to quickly attack the Tiger and destroy it. It has a big shock value and Paks often do not have time to react to the swarming.
Both strategies are viable against OKW. Raketenwerfers are much worse than Paks and have a smaller range, so you do not have to worry much that you might lose your Jackson to them. I think strategy B is better against a weakened OKW player who only has a King Tiger on the field, because he cannot support the KT without other tanks. Strategy A works better against the OKW player who manages to research both a Panther as well as a King Tiger, because these 2 tanks together can counter any charging M10s.
Also use the 240 mm howitzer barrage to force Anti Tank Guns to retreat or die, and then attack the Tiger if it refuses to move away from the Anti Tank wall.
Build Order Recap
This is the general build order, without the adaptations for either the Ostheer or Oberkommando West.
- Echelon -> building
- Rifle
- Echelon
- Rifle
- Rifle
- Lieutenant
- M20
- Ambulance + Weapon Rack + Captain (50.cal optional)
- engineers
- Stuart
- 2 M10
- Major and Sherman
- Jackson or 2 more M10
- Bulldozer
Videos and Replays
A_E cast exclusively for this guide.
Tightrope cast exclusively for this guide.
Great game from Operation Charlie Fox, showing the use of the Armor company.
 Hector
 Potedon3
Final Words
I hope this guide will help you command the United States Forces better and use this commander to its full potential in order to achieve victory.
See you in the heat of battle, soldier!
 slepo1
  MajorBloodnok
  van Voort
  Yukiko