

I am currently working on a medium sized 4v4 map called Eastern Assault. The name sucks but you have to start somewhere. The map will probably never get to automatch, so the name does not matter. Since it has a few features that are not obvious at first glance, I thought it might be interesting to talk about how/why it was layed out. Maybe it will help some new mappers just starting out. Or maybe someone will tell me I am a moron and give me a better layout. Either way, knowledge will be gained for the community.
GOALS
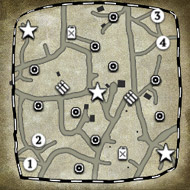
The goal of the map was to make an urban feeling map that plays like a farm/field map. Having one or more dominant buildings was also a goal. The map size was created and points adjusted to make sure the map does not play like two separate 2v2s. To get the best balance you need to mirror a map. This breaks immersion in most cases. For this map, balance was setup in a Yin-Yang pattern where each corner of the map mirrors the opposite side corner.
BASIC 4v4 MAP DESIGN
Most 4v4 maps have a fuel for each side to fight for. The fuels are usually at the middle of the map on the East/West side. Each match starts with a massive battle for the fuels. This middle section (BLUE) is the most important part of the map.
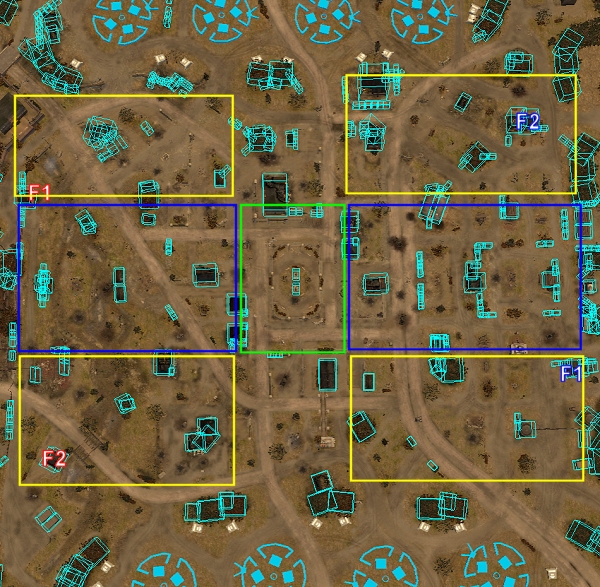
The area outside of the BLUE engagement area needs to be open territory (YELLOW). This is so OKW can setup trucks to fight from. Making this area too close quarters will also make it very hard to fight back into the fuel area if you get pushed out.
Each YELLOW section can also have some fortified area. I like to use buildings. I call these areas FALL-BACK areas. For this map there are houses F1 and F2 for each side. This is an attempt to let an army stay on the battlefield as long as possible. If you get pushed back you have a place to rally and hold so you do not have to mass retreat. For this map the houses are very far back and do not cover enough area to be very effective. They need adjusted.
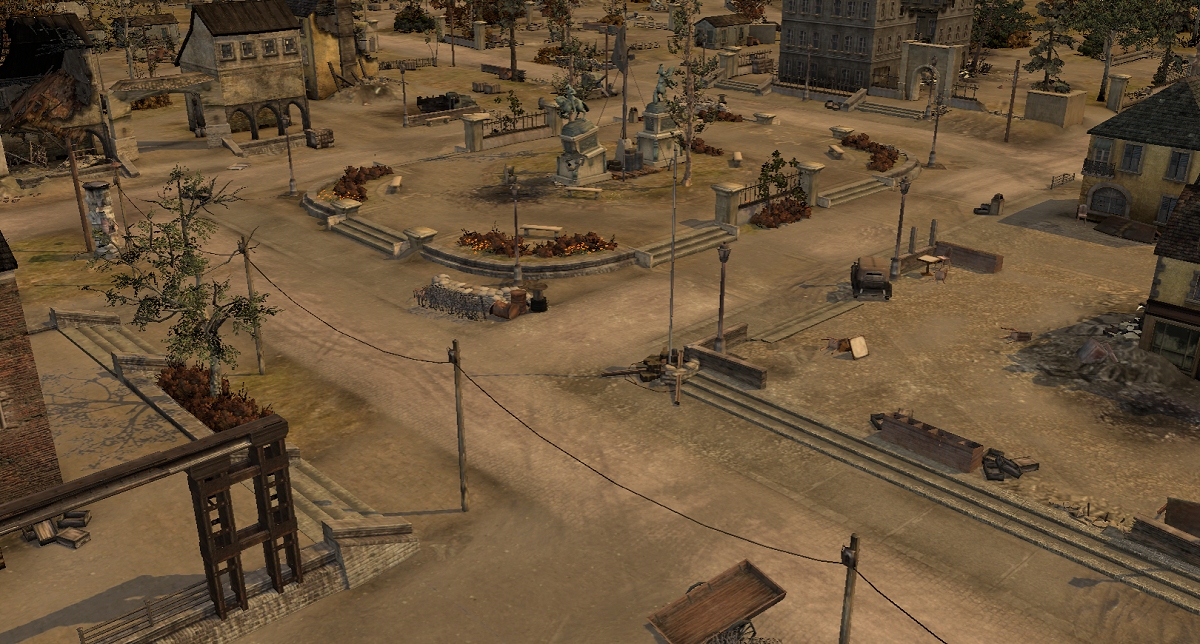
The center VP area (GREEN) needs to be big enough for the late game all-in battles for the last VP. These areas are usually large to fit all of the tanks and team weapons that will get clogged up here. On this map this middle city area is wide open and large with many paths into the area.
Having the area too open will let late game long range units like Elephants and Jadgtigers be too OP. To counteract this the middle has two large statues that block vision and has an elevated middle section to limit tank positioning. The statues are destructible, so they may need to be changed to something more permanent at a later date.
THE BLUE ZONE
The area, that will see 90% of the match, is around the fuels. For some maps the VPs are mostly fought over (Lienne Forest, Vielsalm). The distances for engagements, building coverage, cover, sight blockers, etc all define how this section will play out and which army it will favor.
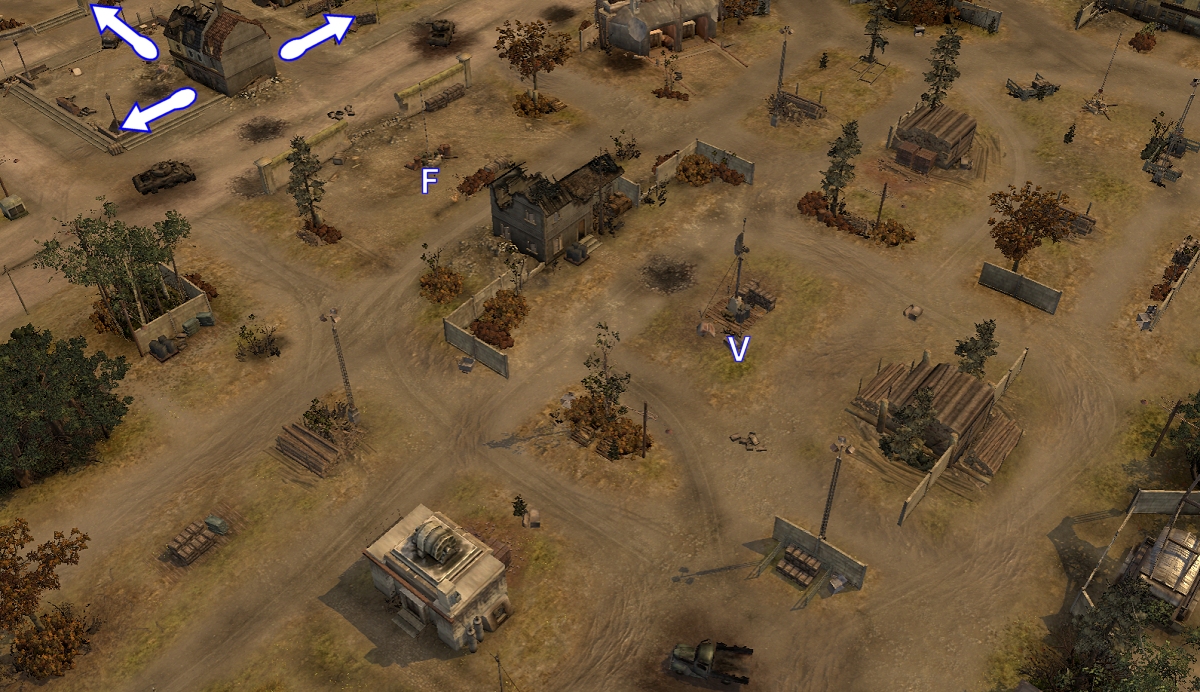
THE EAST SIDE OF THE MAP
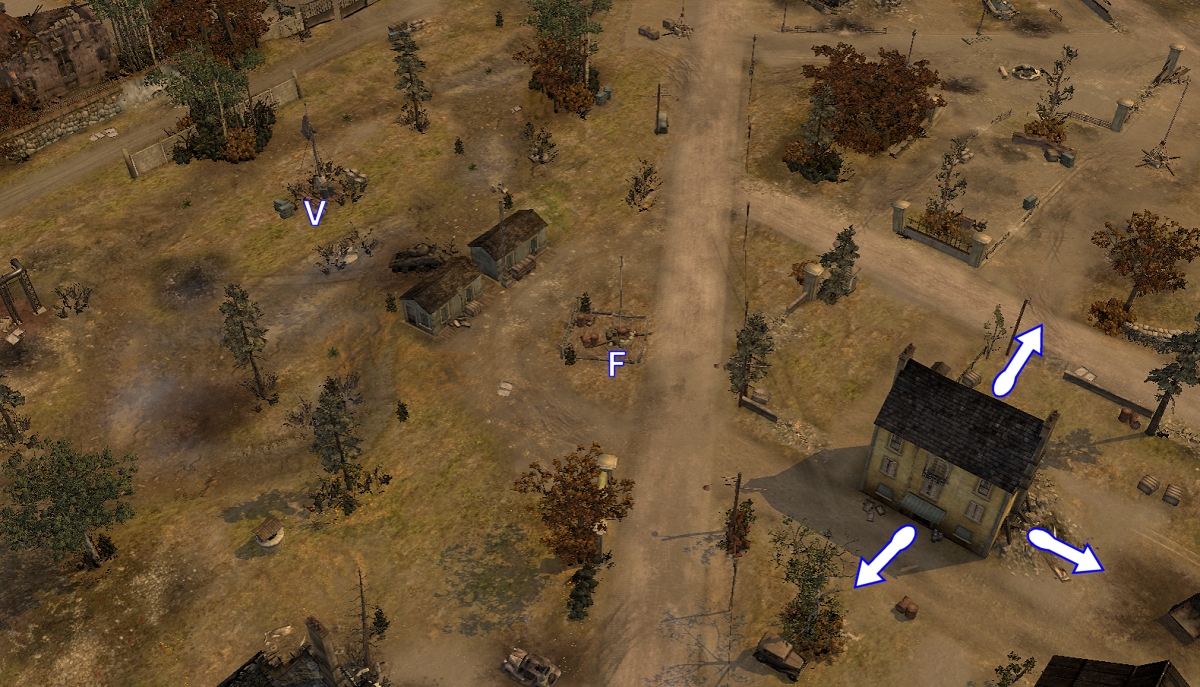
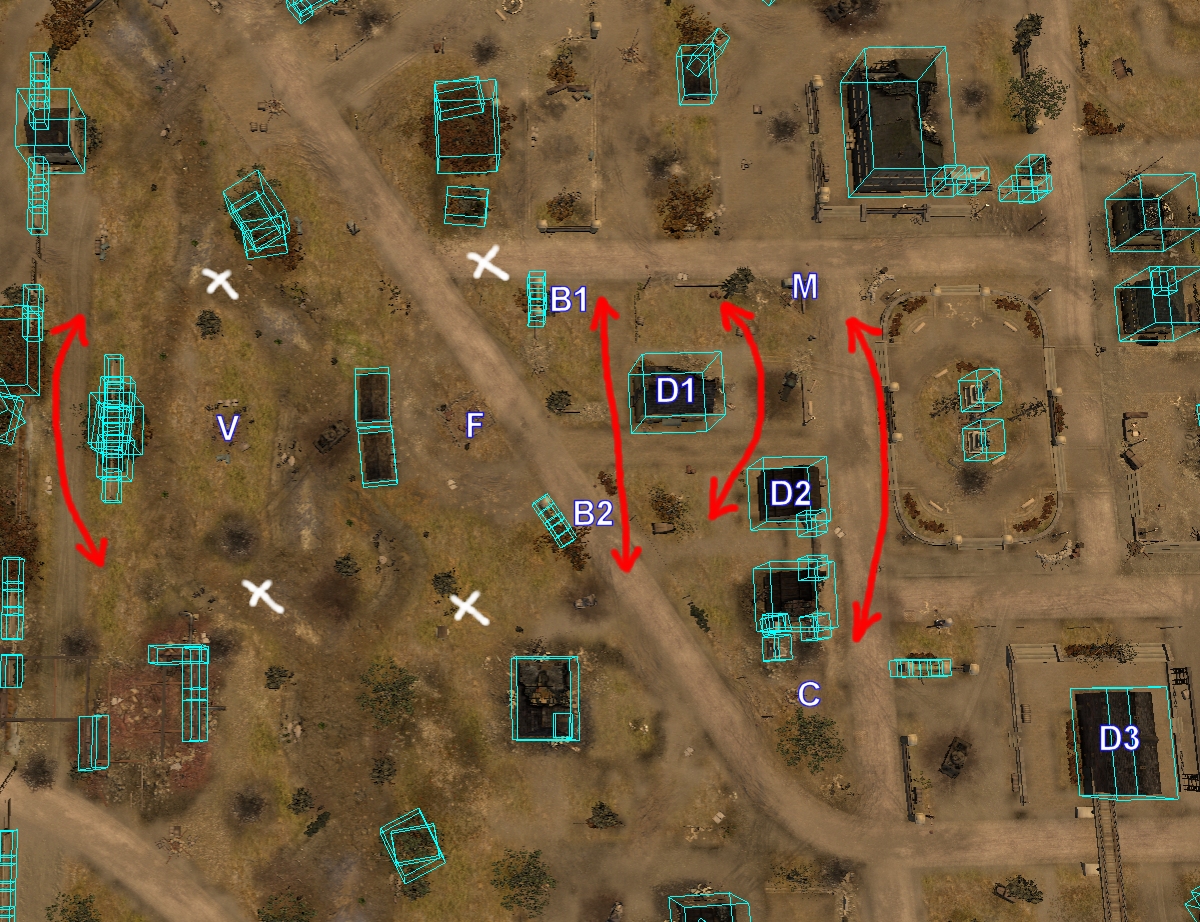
THE WEST SIDE OF THE MAP
ENGAGEMENT AREA GOALS
Each Fuel/VP area has the same basic design. Medium engagement areas for each point that are slightly separated with sight blockers. The Fuel/VP areas will have paths around them to allow aggressive flanking attacks.
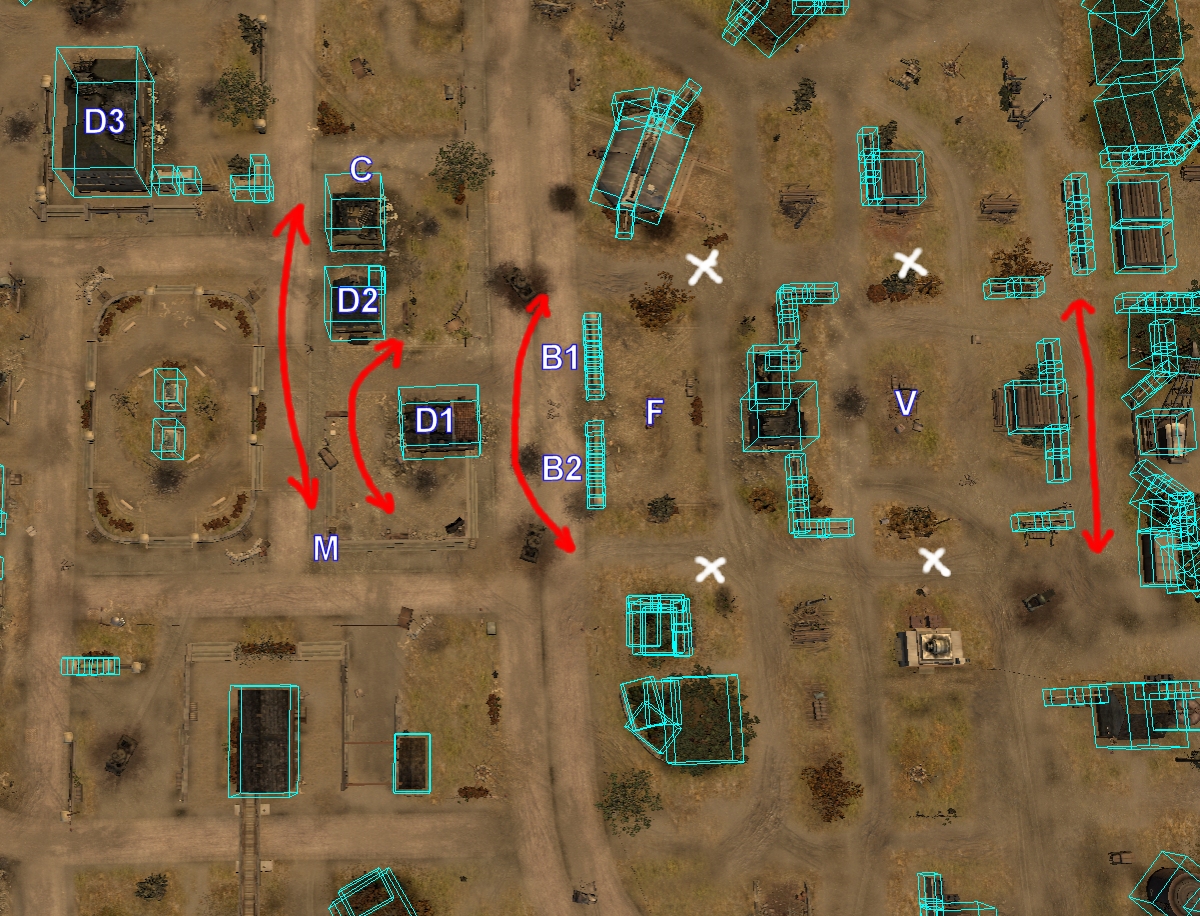
One main goal was a dominant building. On this map D1 is the dominant building. On most maps the buildings are on the Fuel or VPs. For this map, the munition was chosen. The buildings serve three main purposes:
1) Lock Down the munition point.
2) Control flanking thru the middle of the map.
3) Spread the front line out so everyone is not in a blob fighting over the fuel.
To reduce the power of the building, there are no windows facing the fuel areas. And some sight blocking B1,B2 was used to limit firing arcs into the fuel areas.
THE EAST SIDE OF THE MAP
THE WEST SIDE OF THE MAP
Due to the point and sight block layout, we can assume most players will accumulate units on the WHITE Xs. So there were several lanes/areas designed around the Xs to let players flank (RED ARROWS). Most of these flanking routes are on the city side of the map.
These city side flanks make the domination building D1 very important in the early game. Players need to decide if they should push the fuel or this building.
Early versions of this map had the Fuel/VP areas very far to the sides the map, leading to games where players spread out to the side in a 2v2 pattern. Which was the opposite of our goal. To counter this, the Fuels and VPs were moved closer to the center of the map and the middle city area points were redesigned to be very important. Thus rewarding players who take the city and giving players choices. Fuel or city control?
The middle city area has four major points. Each side has a munition point mirrored by the fuel cutoff point. This design makes taking the center of the map very important. And makes building D1 a very focused part of the map. And it creates a situation where a team wins their side of the map, a player can flank thru the center of the map and harass enemy points.
DESIGNING AROUND 4v4 PLAY STYLES
The main play styles to design around are:
1) Camping
2) Blobbing
3) Spearhead
CAMPING
Maps like Red Ball Express have narrow lanes that limit flanking. This creates static engagements that rely on MGs to stop enemy aggression and indirect fire to punish/attack. These matchs can be fun because the front line slowly changes. And you slowly push off the enemy when winning. These games are also desired by most of the lower tier players, which is the bulk of the community. And require the least amount of micro or skill.
BLOBBING
The next level of players are the blobbers. They like to build big blobs and try to run over their enemy. Deal the killing stroke. This tactic works on many map layouts if supported with smoke or the map has enough flanking routes. A drawback of this method is long maps with large base to base distances. Constantly retreating your blob will let the enemy have more resources while you heal and resupply. This play style is very dynamic. You are all-in on every engagement with lots of down time in between.
SPEARHEAD
The next level of players are the masters of distance. These players understand how each unit of their army is used and move them accordingly. This requires the most knowledge and micro skill and is arguably the highest level in a 4v4 game. These players like to have more open spaces with enough flank areas to limit MG walls.
For this map the Fuel and VP areas were slightly separated to weaken MG play. There are several side flanks available for blobbers and spearheads. And the areas on the far outside of the map were made open enough to let spearheads work.
MG PLAY AND DOMINATION BUILDING D1
Since most MGs have such a wide arc of fire, it is very hard to limit them without making all of the engagement areas close quarters and allied favored. So MG play is still strong on the Fuel and VP areas. And if the plan is to go MG heavy, the dominant building must be controlled or the MGs will get flanked. This pulls units away from the fuel/VP areas. Which weakens the fuel presence and allows the outside VP flank routes to be a good place to attack from.
BLOBBING
Sadly you cant really design around blobbers. It works well on all maps until mid game rocket arty hits the field. All you can do is try to create lanes narrow enough for MGs to be strong but wide enough for spearhead players to do their thing. The base-to-base distance was kept short (350m) to allow players to get back on the field quickly.
SPEARHEAD
As stated, these players need enough open space to move their armies strategically. So the outside Fuel/VP areas were designed to be somewhat open. Areas that are too open reward blobbers and create massive sniper battles. Neither of which is fun for anyone.
CURRENT STATE (June 13,2019)
Currently the map is under construction and being changed daily. We have had several matches played on it. These matches have all been played as Allied North and Axis South.
Currently, most matches have been allied wins. This may be due to the sight blockers B1+B2. These create close range situations around the fuel and limit MG play. This may be hurting OST players too much. But opening the area will let allied MGs dominate OKW and reduce flanking. The west side has smaller B1+B2 objects and has been better balanced in games so far. The east side is usually allied dominant.
In almost every game, the team that takes building D1 and flanks around the city has the easiest game. The hard part of balancing a 4v4 map is identifying the meta. Currently we do not have enough games to see how players will engage D1. Which seems to be the key piece of the map currently.
SPECIAL THANKS
The most important part of mapping is map testing. Which sadly, you as a mapper cant do yourself. So thanks to the heroes of the community that helped test the map. Since this is a 4v4 map, there are too many to list but special mentions are WingZero, Olvadi, Sturmpanther, Ishtari, and BritBoy! A map is just a pretty picture without these guys testing.


 cblanco ★
  보드카 중대
  VonManteuffel
  Heartless Jäger