For a long time, I was interested in WW2, and knew about the Battle of the Reichswald (about 25 km North) and the events in the Hochwald Gap (about 10 km East), but always assumed that outside of these notable engagements, the allied forces found little opposition in the area and advanced as fast as their tanks could go.
This changed last year when I visited my parents and we went for a coffee and some pastries at the Büllhorsthof, a farm-turned-café just at the northern edge of Winnekendonk, overlooking the fields. When I glanced over the menu, I found a page describing the history of the farm which said that the main building suffered heavy damage in WW2 from tank shots!
That prompted some investigations. After finding information on the events in the book “Der zweite Weltkrieg zwischen Rhein und Maas” by Heinz Bosch, I started work on my first ever map. Check out this thread, which also describes the events from a different perspective and contains photos of the area. When the 2v2 map contest came up, I produced a larger version of that scenario. It ultimately ended up in automatch.
In this article, I will present the historical background, based on the account given in the far more detailed book “The noise of Battle” by Mark Colvin (which, unfortunately, I had available only after the map contest concluded; the quotes below are taken from this book) as well as explain some of the design choices, including tactical tips.
Operation Veritable
On February the 8th, 1945, the western allied forces launched operation Veritable taking the war to German soil. The goal of the operation was to break through the German defenses west of the Rhine and capture the bridge over said river at Wesel intact.
In the first phase, the British forces broke through enemy positions in the Reichswald area on the Dutch border. The German defenses were determined and the logistics for the British problematic due to the lack of roads and the incredibly muddy ground. The first phase called to secure the cities of Kleve and Goch, which was completed only on the 22nd of February, 11 days behind the plan and at the cost of 6,000 casualities.
In the following days, the attacks were renewed: On the 24th, the 53rd (Welsh) division was sent south in operation Heather to capture Weeze and then Kevelaer. They were stopped on the 25th, one mile north of Weeze; it should take them five more days to occupy that city. On the 26th, operation Blockbuster started, in which the II Canadian Corps was to advance further eastward towards the Rhine, a push that was famously stopped at the Hochwald Gap.
Operation Leek
The 3rd British Infantry Division, on the 27th, set out on operation Leek in the center between the 53rd and II Canadian. The objective was to capture the villages of Kervenheim and Winnekendonk (Fig. 1).
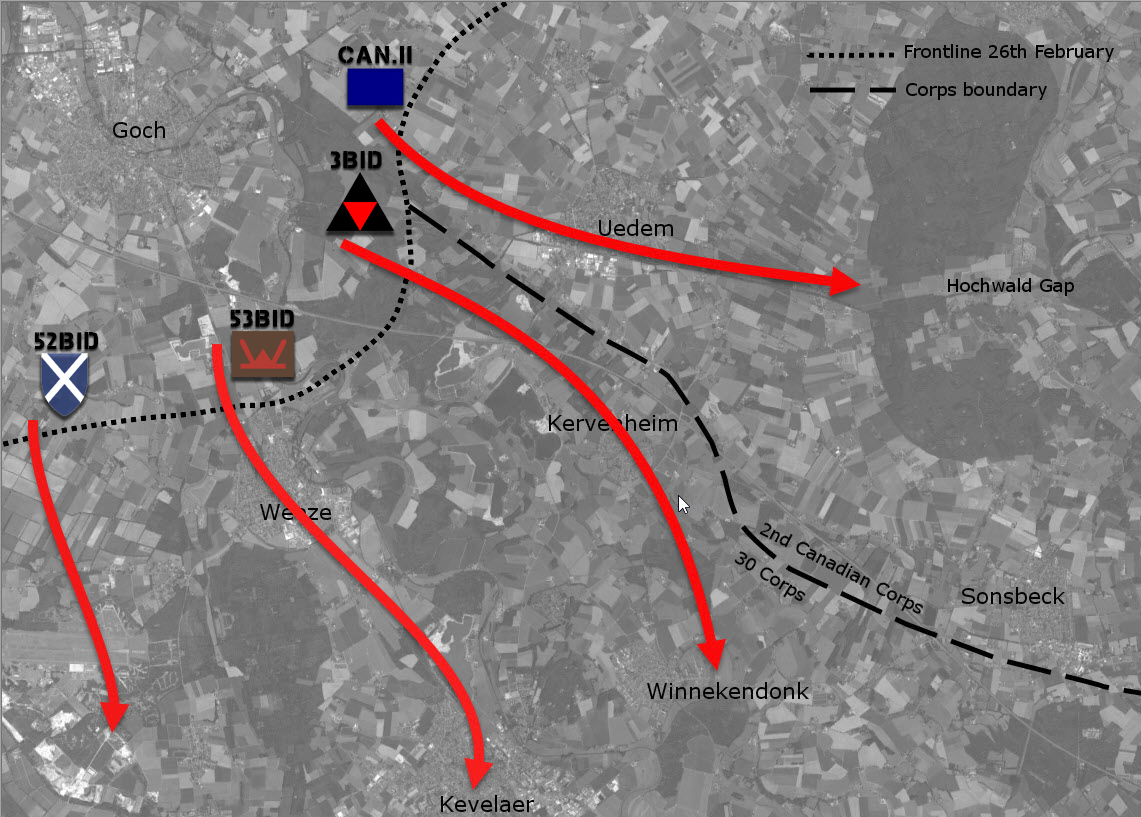
Figure 1: British and Canadian dispositions in the Rhineland on 26 February
On the first day, the British secured a bridge over the Mühlenfleuth, and advanced towards Kervenheim. However, they faced stiff resistance from German units that had fortified several farms in their way. Nevertheless, the 3rd managed to reach the outskirts of Kervenheim on the 28th. An attack of the village on the evening of the 28th was repulsed. Heavy fighting ensued on the 1st of March with many causalities on both sides, but the German paratroopers from the 7th Fallschirmjägerregiment managed to hold their own. When British units finally stormed Kervenheim on the 2nd, they found that the defenders had left the village.
Late on the 2nd, the order was given to advance further and take the next village, Winnekendonk. Intel was poor on the allied side. A Stuart peeking out of Berberheide (fig. 2) for some reconnaissance was quickly taken out by AT gun fire. Still, British units gathered at the start line, at the edge of the woods. Jack Harrod, the Lincoln’s adjutant remembers:
[Major] Peter Clark [commander of D company leading the attack west of the road] looked at his watch. It was 1745hrs, but there were no tanks and no artillery. He looked over towards the CO. ‘Shall I go, sir?’ he asked. ‘Wait’ said the CO, and almost as he said it the noise of the first salvo of shells was heard, and the first tanks appeared in sight. It had been a tense moment.
And with that, the battle of Winnekendonk commenced…
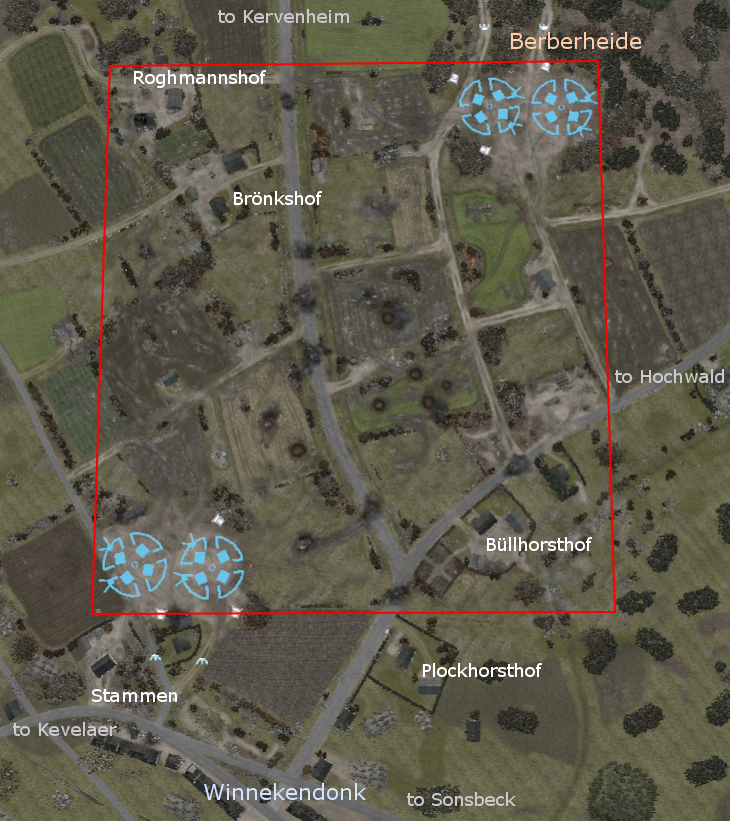
Figure 2: Top view of the map. The red rectangle marks the playable area. The wooded area in the North is the Berberheide. The white labels denote the names of the relevant farms ("Hof" means "farm"). The centre of Winnekendonk is south of the playable area. Gray labels denote where the various streets lead to.
The battle of Winnekendonk
The operational plan called for the 2 Lincolns to advance along on both sides of the road to Kervenheim and take Winnekendonk proper, supported by the Churchill tanks of the 3rd Scots Guards. The left flank was to be secured by the Kings Own Scotish Borderers (KOSB).
The German defenders from Kampfgruppe Krahl - mostly put together from elements of the 7th Fallschirmjägerregiment - waited in prepared positions at Stammen, Plockhorsthof and Büllhorsthof as well as in several slit trenches in the open fields between them. AT support was provided by at least two StuGs at Stammen and more importantly a Flak 88 positioned west of that farmhouse (see Fig. 3). Additionally, there were several smaller calibre AT guns spread along the defensive line and around Büllhorsthof. The German paratroopers blew up the street in several places in order to force the tanks to move through the very muddy fields.
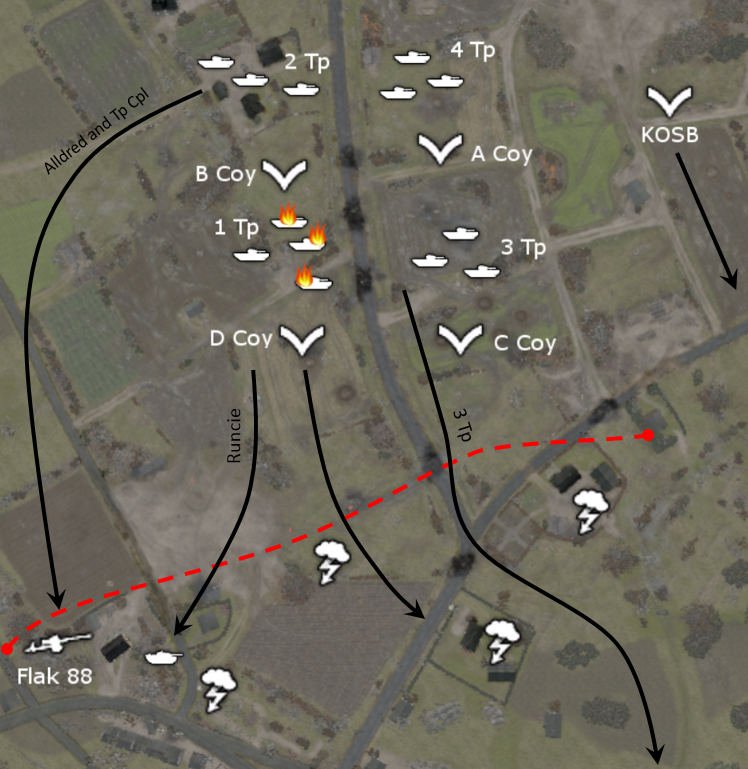 Figure 3: Order of battle: 2 Lincolns advanced along the road. The leading company west of the road was D company (Coy) commanded by Major Clarke, followed by the tanks of 1 Tp of the Scots Guards (Lt. Gordon). The second line then was B Coy (Lt. Smith) and the tanks of 2 Tp (Lt. Runcie). The first infantry unit east of the road was C Coy (Maj. Gilbert) with 3 Tp (Lt. Macdonald-Buchanan) and finally A Coy (Maj. Larkin) and 4 Tp. The red, dashed line indicates the first defensive line of the German troops.
Initially, the British found little to no opposition when advancing from their start line at 17:45. They quickly secured Roghmanshof and Brönkshof. All hell, however, broke loose when they started to cross the open fields south of Brönkshof: Several machineguns opened fire, and mortar batteries located behind the village laid into the Lincolns.
The intelligence report we received did not indicate the strength of the opposition. Indeed, I remember being told that two tanks on the right of the village were ‘knocked out’ German ones, which came to life when the attack began. As 2ic [the 2nd in command], I was bringing up the rear of the Coy when the attack started. The enemy opened fire in earnest. There seemed to be bullets everywhere and men were falling like flies. I saw [Major] Peter Clark go down and went up front to lead the attack. We obtained temporary cover in a ditch opposite the houses the Germans were firing from. We returned their fire and as darkness was falling managed to cross the road into the shell of some buildings, I only had three or four men with me.
Capt. John Pacey, 2ic D Coy
The three leading Churchill tanks commanded by Lt. Gordon were taken out in short succession by the AT guns emplaced at Stammen.
The main threat there was the Flak 88 because it was the only gun that could hope to penetrate the frontal armour of the Churchills. After dealing with leading tank platoon, the 88 started to fire at the tanks of tank platoon commanded by Lt. Macdonald-Buchanan that were advancing on the east of the road. Luckily, the tanks were to some extent protected by the elevated road to their left. However, tanks of Lt. Runcie that were supposed to support the infantry west of the road were still in danger of being taken out as soon as they would leave their cover at Brönkshof.
All hell had been let loose as soon as ‘D’ crossed the SL and one of the abiding memories I have of that day was one of the tanks just ahead of us had been hit and the internal explosion blew off that heavy turret which lifted gently, as though in slow motion, overturned and fell to the ground – only the tank commander got out unharmed before it blew up.
[…]I think the most frighting thing was hearing the 88’s solid shell ripping through the air at the Churchills – that did at least cover up most of the small arms fire until the crack and the thump of a bullet that was too near for comfort made you realise that the tanks were not their only targets. ‘D’ Coy ahead of us were beginning to suffer casualties as they came level with the first of the houses on their left leading into the village. ‘B’ Coy had about reached this point when I was hit for the second time. I was hit in the back and thrown on my face and landed face down on a tree branch which cracked my ribs and I couldn’t even crawl. At that point my interest in the battle, NW Europe and the whole War ended.
Maj. Pat Smith
[Major Smith ended up in a cellar were the village’s doctor was treating wounded from both sides.]
At this point, Sgt. Alldred decided to take his Churchill westward to flank the 88. The crew of the AT gun noticed this manoeuvre late. The German gunner frantically tried to rotate the gun towards the new threat, while the Churchill closed the distance at the highest speed it was capable of. At 400 yards, Alldred ordered his gunner to fire, but the first shot missed. The second, however, hit and took out the 88. At this point Lt. Runcie advanced and took out the StuG (Fig. 3).
When the infantry reached the farm buildings, close quarter combat ensued. There are reports of MGs still firing from the upper floors, while British soldiers already entered the farms on ground level. One of the tanks of Lt. Macdonald-Buchanan’s troop fell into the hole blown into the street in front of Plockhorsthof and had to be abandoned. However, Macdonald-Buchanan himself successfully reached the centre of the Village with his tank intact. Once the farms were captured and night fell, the resistance of the defenders died down and by the morning of the 3rd of March the Lincolns had secured the village.
Casualties:
British: About 120, including 25 killed
German: About 252, including 62 killed
Several British soldiers earned a medal for their actions in the battle. Their citations are testaments to the ferocity of the battle:
MM. 2701039 Guardsman Duncan John Crawford
During the attack on WINNEKENDONK on 2 Mar 45 the tank in which Guardsman CRAWFORD was co-driver, was hit five times by 75 mm AP shot by an SP [the StuG at Stammen]. In spite of this Guardsman CRAWFORD continued to fight his Besa before it became essential to bail out owing to fire. When out, though the shelling and mortaring was severe, he went round giving first aid to a number of wounded infantry until dark, when he returned to the tank and found that though much knocked about, the fire was out and it would still move, so he put some of the wounded infantry on it and drove them back to medical assistance. This Guardsman's cool courage undoubtedly saved a number of lives.
Designer’s notes
The goal was to capture the historical setting in a way that plays well. The main features (roads, location of farms and Winnekendonk itself) represent the area roughly on a scale of 2:1. Figure 4 shows an aerial photograph taken shortly before the battle (which unfortunately I had not available when working on the map). As can be seen, the area is very open so it was clear that I had to be somewhat creative when setting up the actual fields.
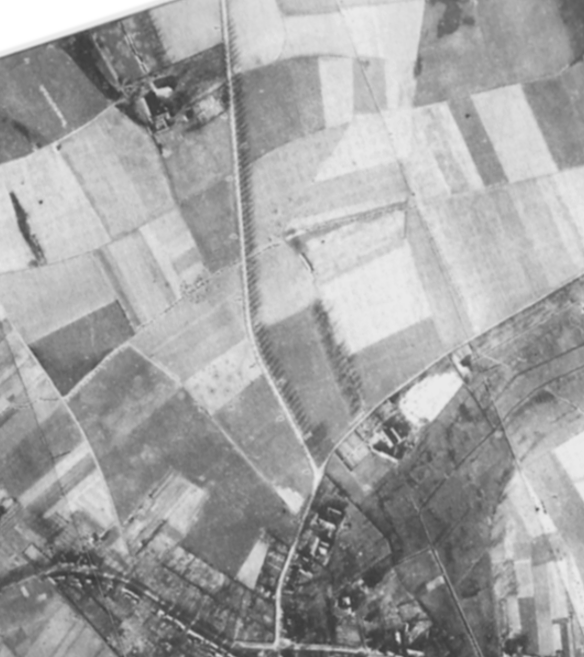
Figure 4: Aerial photograph of the battlefield taken February 1945; the cutout roughly matches the top view of the map in figure 2. Roughmannshof is just outside the bounds of the photo.
Visuals
The ambient settings are supposed to reflect the weather at the 2nd of March 1945, so we are looking at a wet, cold, slightly foggy dawn at the end of winter.
In particular, the “winter day without snow” part is not well covered with the objects available in the world-builder as most trees and plants without leafs come with some sort of snow or ice effects. On the other hand, both vegetation and fields are quite diverse at this time of year (see photos here): While most trees will have no leafs whatsoever, there are a few evergreens as well as trees and bushes that keep the brown leafs until spring. Likewise, fields might be not plowed yet, or have been freshly plowed, or even sport some fresh green.
The buildings from the Ardennes maps, in terms of shapes, are okish, but anything that has natural stone textures should in fact have bricks instead, of which there is a paucity in the rural building sets. Similarly, there are no walls made of natural stones in the area, as there is no exposed bedrock: The top soil consists of variable mixtures of sand, clay, gravel and humus.
In terms of decorations, (which players typically refer to as “cover”) I wanted to create a somewhat believable, functional atmosphere and keep the amount of random clutter on the field as low as possible. Note that the area wasn’t evacuated beforehand; during the battle, the farmers and their families took cover in the basements of their farmhouses. Fences around meadows should actually be fit to keep kettle from running away (although obviously several need some repairs after the winter). Also incredibly important: All houses should come with at least one bike.
Aerial strafing was rather common in these days. In fact, several of the slit trenches along the main road mentioned earlier were dug not for the defense of the village but rather for civilians to be able to take cover in case of strafes. Furthermore, Winnekendonk was heavily bombed just days before the attack. I used this to model some cover elements mostly around the centre, like the strafed truck on the street, the crashed plane and the many craters.
Gameplay
Given the theme of the map, it was clear that open fields should be the dominant feature so the central part of the map is rather open. In order to make MGs not too strong, sight blockers were added so that the obvious spots to lock down areas can realistically be flanked. In order to make short and midrange units further viable, the sides containing the farm buildings are more close-quarter oriented.
Green cover generally is scarce on the map. However, there is plenty of yellow cover, some of which might not be totally obvious: All fences and craters as well as the ditches on both sides of the road give yellow cover.
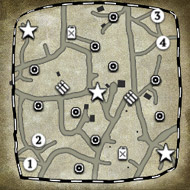
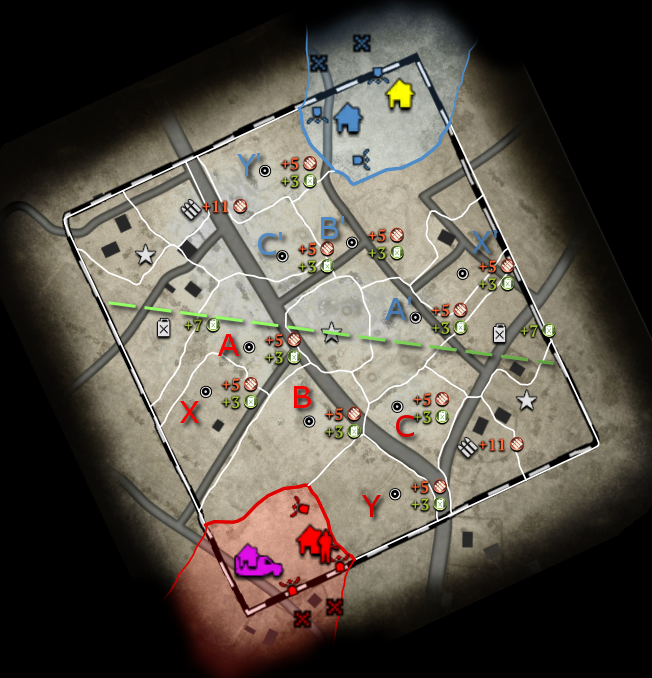 Figure 5: Annotated tactical map; the letters denote the standard territory points; the dashed, green line roughly marks the middle between the bases.
In terms of resources and sector layout, the map is mirrored (see fig. 5). Likewise, I tried to mirror the cover situation at the relevant points, so a piece of green cover at one cut-off will have a functionally similar piece on the other side. The green, dashed line in the map above roughly shows where the frontline would be based on distance from the bases.
The munition and fuel points are positioned towards the edges of the area where short range units should do reasonably well. To balance this, the cut-offs are positioned almost in a circle around the central VP where the terrain is comparably open and thus easier to attack and hold with long range units. It could very well be that the strategic advantages the center is currently underestimated by many: While it is true that it itself does not provide many resources, holding the center makes it relatively easy to apply pressure on any cut-off.
Both sides can realistically compete for both fuel points. While strictly the western fuel point is closer to the southern base, the related cut-offs A and B are harder to defend than cut-off C. The situation for the team in the northern base of course is mirrored (with points A', B' and C', respectively). Note, the points X and Y (and likewise X' and Y') are merely standard territory points. While Y/Y' may connect C/C' in case B/B' is not held, X/X' does not connect anything.
This distribution of sectors makes it hard to lock down a larger part of the map with just a few units; even if one team locks down a certain resource or cut-off, there always should be another spot that is worthwhile attacking. So if you find yourself attacking the same spot over and over without much success, it often could be advisable to redirect your efforts elsewhere instead.
Due to the relatively exposed cut-offs the income on this map might turn out to be lower. On the other hand, in a case of a larger skill gap between the teams, it will be comparably easy for the better team to starve the other team of resources and thus win quickly.
Editor's Note: Needed something to break this text up. We all like cats, yes?
As mentioned, there are a lot of fences. Those typically have open sections in order to facilitate reasonable retreat paths from most hot-spot areas. Likewise, the central street has craters (i.e. yellow instead of red cover) at spots where units are likely to retreat due to open parts of the fences. Still, depending on the situation, vaulting can shorten some paths considerably.
All of these fences can be crushed even by the lightest of vehicles, so these can be used to open certain passages as well as unfavorable retreat paths for your opponents. Light vehicles can also crush the wooden walls near Brönkshof and the eastern fuel point (see below).
In terms of garrisons, I wanted to avoid having buildings that need to be rushed. All buildings are fairly fragile and go down to a few barrages. There is no building covering any cut-off. The munition points each have a building covering them. The more relevant buildings will be discussed below.
Two building discussed below (the main building of Brönkshof as well as the small house between the eastern fuel and VP) are in strategically relevant positions but initially of very limited use due to sight blockers around them.
Most of these sight blockers can be removed by different means:
- Crushing with a vehicle: This works for the wooden walls. Bushes mostly require vehicles with at least medium crush, but the taller bushes at these locations actually need heavy crush.
- Shooting through the bushes with vehicles (attack ground) will remove the quickly.
- The "Destroy Cover" ability of the Royal Engineers: I found this requires some practice: I failed to plant the charges at the bushes directly. However, it is possible to target the trees and the blast radius is sufficient flatten the nearby bushes to open the field of view considerably.
Western fuel
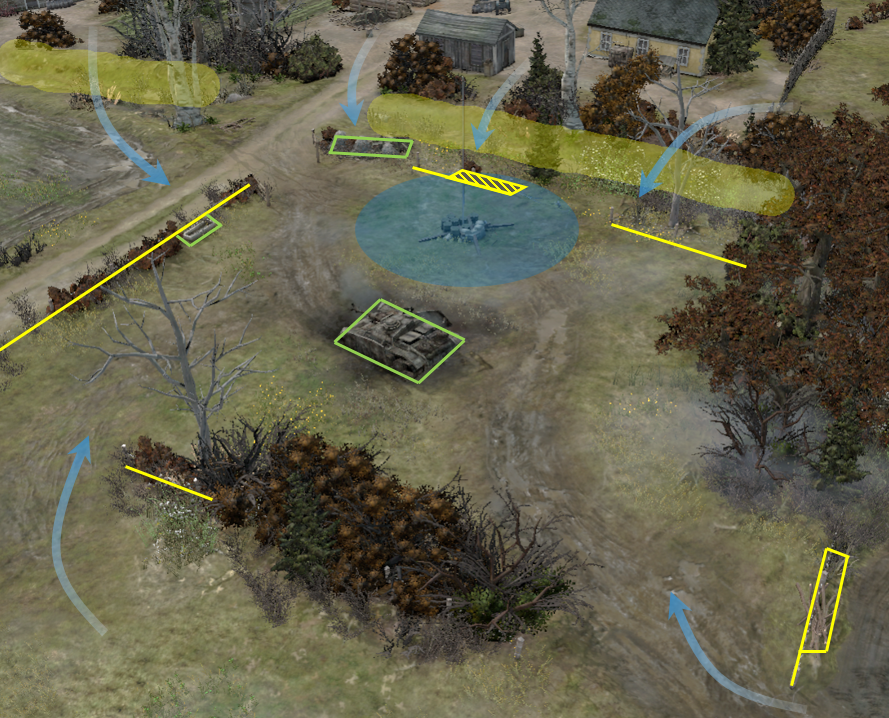 Figure 6: The western fuel point (see text);
Fig. 6 shows the situation at the western fuel point. The capture area is indicated by blue ellipse. Yellow and green lines indicate the position of yellow and green cover, respectively. The ditch, marked with the transparent yellow shape provides yellow cover as well. The blue arrows indicate potential routes to the fuel point. The hatched, yellow area indicate the position of light cover within the capture circle that can be used from either side.
Eastern fuel
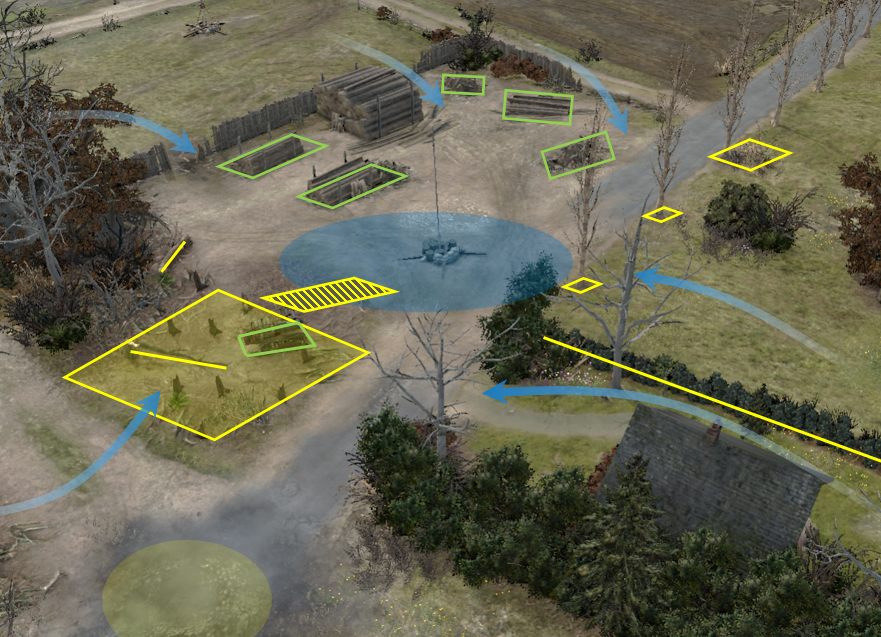 Figure 7: The eastern fuel point (see text);
Fig. 7 shows the area around the eastern fuel point. Again, the capture area is indicated by blue ellipse. Yellow and green lines indicate the position of yellow and green cover, respectively. The blue arrows indicate potential routes to the fuel point. The hatched, yellow area indicate the position of light cover within the capture circle that can be used from either side.
The wooden wall towards the northern base can be flattened by any vehicle, including Kübelwagen and UCs. The area with the tree stumps marked by the transparent yellow shape, however, can not pathed through by light vehicles. Medium sized vehicles and up can crush the stumps without problem.
The house southwest of the fuel point has a very limited field of view due to the bushes around it, so initially it is not very useful to hold. However, once the hedgerows are removed the house can cover both the fuel point to some extent as well as the eastern VP. Still, the building does not have a lot of health and will collapse rather quickly once under fire.
Brönkshof
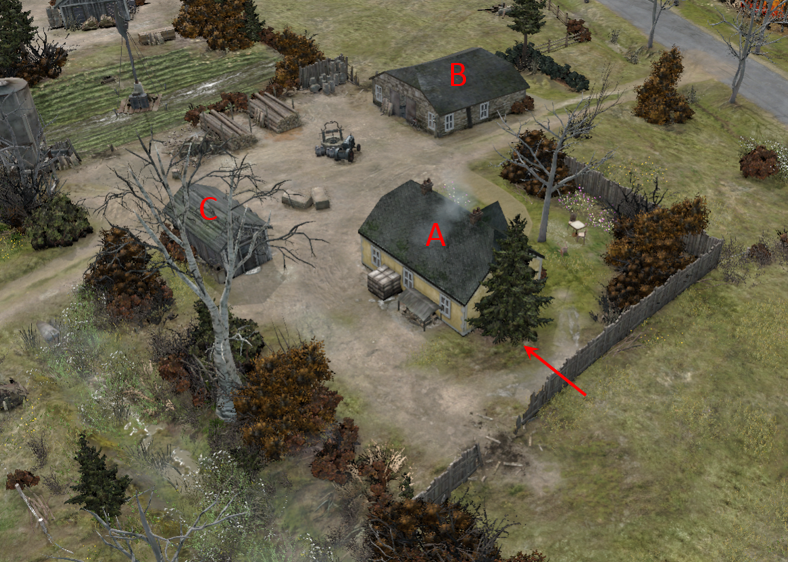 Figure 8: Brönkshof (see text);
Brönkshof is likely the most prominent group of buildings on the map. It consists of three separate buildings (see fig. 8): The main farm house (A), the barn (B) and a small shed (C).
The barn is probably the most relevant building on the map in the early game: It covers the northern munitions point, like the main building of Büllhorsthof is on the other side (see below). However, it is located closer to the center of the map and thus can be used to control a larger part of it. The northern players can reach the building more quickly, but it also is more painful for them if the southern team has an MG in there. The main weakness is it low health and that it can be attacked easily from multiple sides by both teams.
The farm house itself is the building with the most health on the map. It has incredibly limited vision due to a lot of sight blockers around it. Again, the wooden walls to the north and east can be knocked down by any vehicle. The bushes, however, require heavier vehicles or again the Royal Engineers. The tree placed on the southern face of the building (red arrow in fig. 8) limits view towards that side; it can be removed in the same way as the bushes though. Still, even with the tree intact, it can happen that garrisoned MGs can fire at and suppress units on that side. It is possible to use flamers through the wooden wall with attack ground.
The small shed obviously is very frail. It was placed there mostly to provide another weakness to the main building: Flamer engineers can enter the shed out of sight to dislodge troops in the farmhouse. In fact, flamers in both sheds (B and C) can smoke out units from the main house (A) and vice-versa.
So with a considerable amount of preparation Brönkshof can be turned into a reasonable strongpoint. If the opposing team manages to set that up, keep in mind:
- The compound does not cover the related cut-offs (A, B or C' in fig. 5, respectively).
- The buildings have reasonably low health and will go down fairly quickly to indirect fire.
- It is possible to flank around the northwestern corner (Roghmannshof).
Büllhorsthof
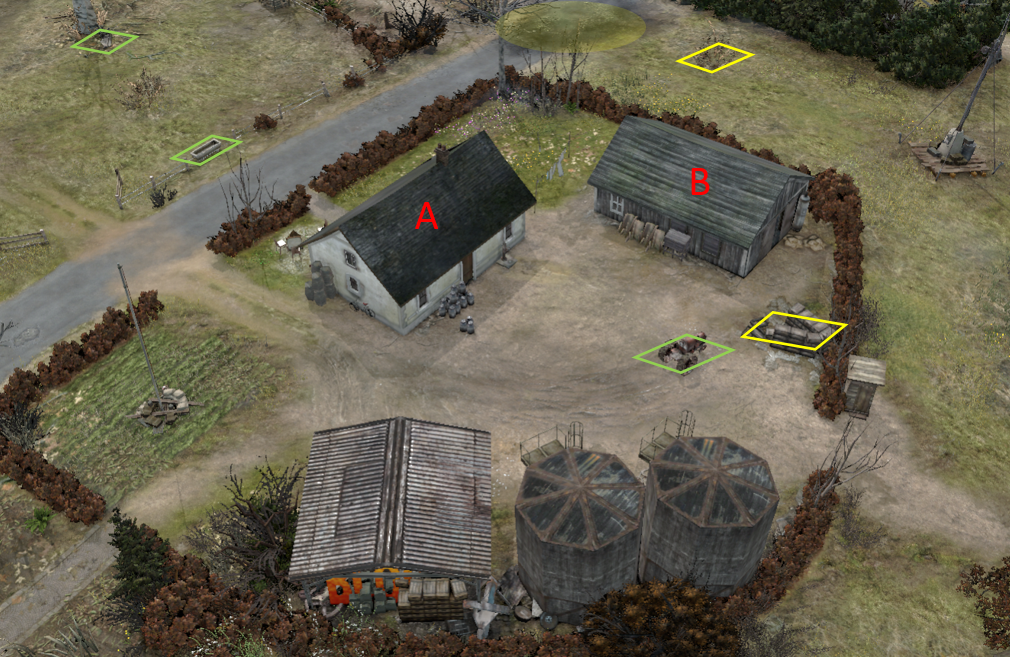 Figure 9: Büllhorsthof (see text)
Figure 9 shows Büllhorsthof, the farm in the west; the green shapes indicate objects giving green cover; additionally, some pieces of yellow cover are mark. Obviously, there is way more yellow cover, notably the hedges and fences.
The main building (A) overlooks the munitions point, similar to the shed at Brönkshof in the North. The wooden shed here (B) on the other hand can be used to secure the Western VP. Similarly to Brönkshof, the two buildings are close enough to each other so that flamethrower teams in one can smoke out units from the other.
In case the southern team looses control of the main building, it can flank around along the southern boundary of the map.
Both buildings have little health so they quickly go down to e.g. indirect fire.
Cut-offs A/A'
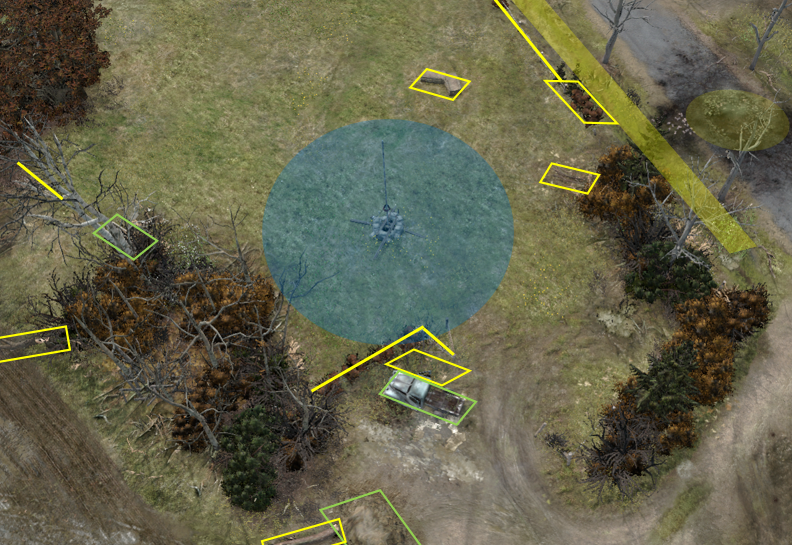 Figure 10a: Cover layout around the western cut-off A; Figure 10a: Cover layout around the western cut-off A; | 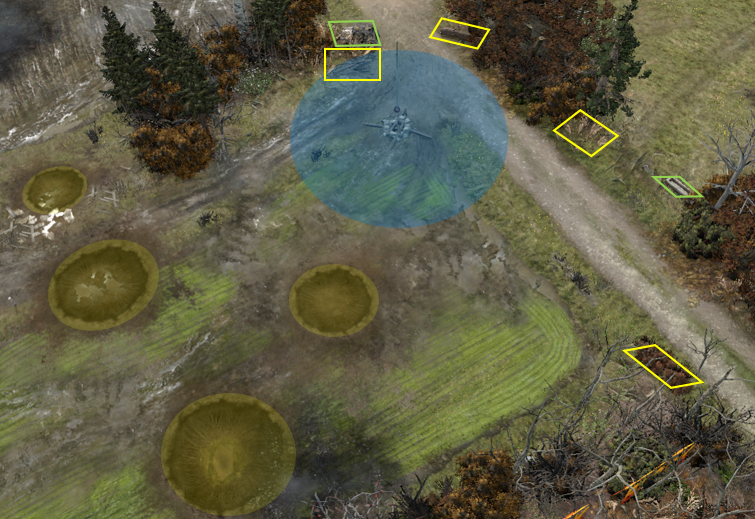 Figure 10b: Cover layout around the eastern cut-off A'; Figure 10b: Cover layout around the eastern cut-off A'; |
Figs. 10a and 10b show the cover situation around the two more exposed cut-offs A and A'. The attacking side in both cases has some yellow cover on the approaches to the capping circle (blue). There is also some yellow cover in the capping circle that can be used by the attacking side.
There is some green cover available for the defending side, which however can be flanked either from the center of the map or the fields towards the edges of the maps (points X and X' in Fig. 5).
Middle VP
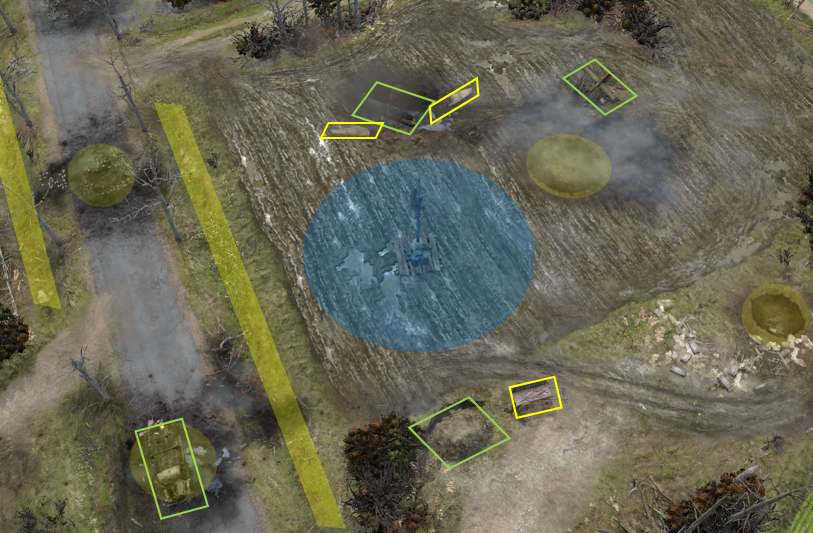 Figure 11: Most relevant pieces of cover around the central VP;
The cover situation around the Middle VP is indicated in Fig. 11; both sides have a piece of green cover closer to the VP and then another piece (the plane's tail and the truck) somewhat further away. There is also some yellow cover dispersed over the area.
Small Shed Close to Northern Base
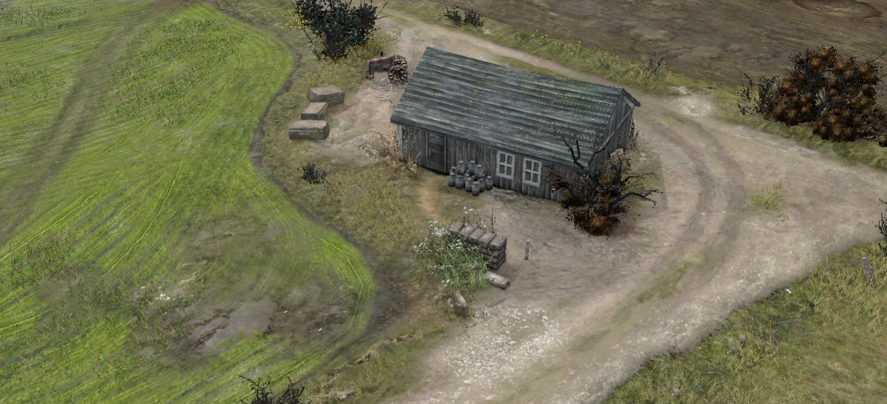 Figure 12: Small shed at the eastern edge of the map close to point X';
Fig. 12 shows the small shed towards the northern base. It is not really an important garrison, but it is worthwhile noting that it only has a door to north, no window. So, it is relatively useless for the southern team.
Thanks to everybody giving feedback during the contest!
Also, happy about any feedback in the thread as I might have a chance to update the map in the near future.
Also, happy about any feedback in the thread as I might have a chance to update the map in the near future.
 Siphon X.
  RitaBrush
  FichtenMoped
  Yukiko


 cblanco ★
  보드카 중대
  VonManteuffel
  Heartless Jäger