

Introduction
I will start with a short introduction.
First, why am I making this guide while CoH 3 is not that far away? Simply because I noticed that new players lack a detailed guide and must ask questions around, which is not always easy when you’re new to a game that is already almost 10 years old. Also, I recently played Starcraft II for the first time (yes, yes, I know, it’s 2022 and I’m late) and noticed how good the guide especially the IN GAME tutorial were easy to understand.
This guide’s purpose is to explain the basic game mechanics of CoH2 while overcoming the chief difficulty of not overloading new players with information. Therefore, I will try to only talk about the very necessary mechanics and leave further details for future guides about factions and specific gimmicks.
For experienced players and people used to playing the game, you shouldn’t find many interesting pieces of information here, but you still might. I will ask to the same persons to avoid saying things like “You didn’t talk about this unit or that unit”.
The units I mention here are only for reference and I will explain their functions and roles in future guides.
Finally, I wish that experienced players don’t talk here about balance. This guide is not about balance as it is not something the new players should bother with; it is about explaining the very basics. Although I obviously have my own balance opinions, I will try to not let them show.
That being said, let’s dig in, following this Table of Contents:
I. Getting familiar with the UI
II. Win conditions and general system or “rules”
III. Basic combat guides
IV. Brief explanations of statistics
V. Useful links and resources
VI. Credits
I. Getting familiar with the UI
In any games, especially strategy ones, you might roll your eyes the first time you look at your screen, so I will try helping you getting familiar with it.
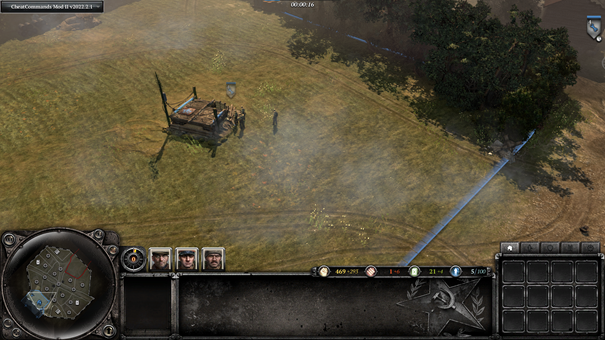
Here is your screen at the beginning of the game. don’t pay attention to the top left corner as I used a mod to disable the bot.
We will go over the different elements we’re seeing.
Please forgive my terrible calligraphy skills.
In Company of Heroes 2, you can select three commanders to take with you into battle before a game begins. The commanders provide special units and abilities. In battle, you can select only one of the three so think carefully and no mis-clicks!!
Command points are another resource. They indicate which abilities you can use from your commander and imply which stage of the game we are in. For example, I have 0 Command Points (CPs) which means the game just began. With the commander I just chose, you can see that I have access to the first ability but not the other ones. A lock indicates which abilities cannot be used. CPs can be used by earning XP which I will go over shortly.

Below your resource counter and commanders you can see the unit that you selected.

On the left we see a 0 number followed by a line that will fill up with a yellow color. That number refers to how many units your own unit killed and the yellow color bar will be filled when your unit deals and receives damage. We also have veterancy (the stars), which I will get into later.

On the right we have a list of upgrades. Some units can get upgrades like this, some units go through another process which is more appropriate for a future guide.
Here is the unit description which explains the capabilities of the selected squad.
Let’s read together, shall we?
“Combat engineers are basic combat troops whose primary tasks are building structures”. We will stop here. As in most RTS, CoH2 has a “worker” type of unit. They can also fight, sometimes fairly effectively, but they are still workers, making them an important part of the army and sometimes a high priority target.
This will help us transition to the UI on the bottom right of the screen as the worker units have a UI with more buttons than regular units
NB: you should see the actions in the row labelled 2 on almost every unit type but unit capabilities can vary depending on the factions.
Finally, the bottom left corner is the mini map which exists in most RTS.
It allows you to see the layout of the map.
The mini-map can be used as a feature which is, to my knowledge, unique to Coh: the tactical map.
The tactical map takes up the entirety of the screen and allows you to move more accurately through the mini-map. Please, note that not all players use it. It depends a lot on your preferences. I personally don’t like to use it, but a lot of top players do.
Here is your screen at the beginning of the game. don’t pay attention to the top left corner as I used a mod to disable the bot.
We will go over the different elements we’re seeing.
Please forgive my terrible calligraphy skills.
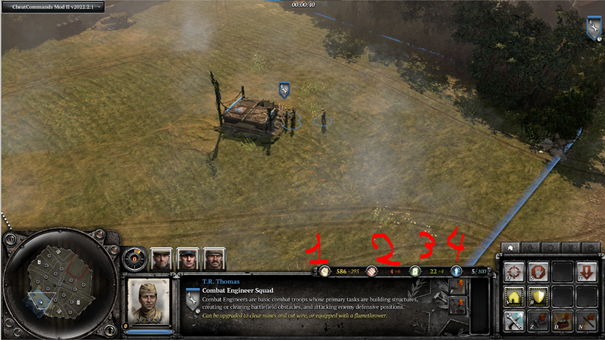
- 1 = manpower. This resource is gathered automatically.
- 2 = ammunition
- 3 = fuel. Fuel and ammunition are gathered by taking territory points which we will go over shortly.
- 4 = popcap. It defines how many units you can “fit” in your army. Example: Here, I have a Soviet Union Combat Engineer Squad that takes 5 popcap
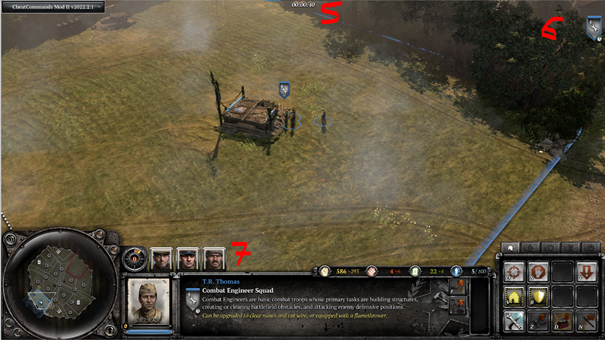
- 5 = timer. It’s very obvious, I know. But in Company of Heroes 2, a big part of playing the game is defined by certain timing. Keeping an eye on timing is essential.
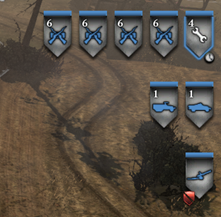
- 6 = unit list. It has three rows. The first one is for infantry, the second one is for vehicles, and the third one is for certain types of immobile weapons like howitzers. It should look like this:
- 7 = commanders and command points.
In Company of Heroes 2, you can select three commanders to take with you into battle before a game begins. The commanders provide special units and abilities. In battle, you can select only one of the three so think carefully and no mis-clicks!!
Command points are another resource. They indicate which abilities you can use from your commander and imply which stage of the game we are in. For example, I have 0 Command Points (CPs) which means the game just began. With the commander I just chose, you can see that I have access to the first ability but not the other ones. A lock indicates which abilities cannot be used. CPs can be used by earning XP which I will go over shortly.
Below your resource counter and commanders you can see the unit that you selected.
On the left we see a 0 number followed by a line that will fill up with a yellow color. That number refers to how many units your own unit killed and the yellow color bar will be filled when your unit deals and receives damage. We also have veterancy (the stars), which I will get into later.
On the right we have a list of upgrades. Some units can get upgrades like this, some units go through another process which is more appropriate for a future guide.
Here is the unit description which explains the capabilities of the selected squad.
Let’s read together, shall we?
“Combat engineers are basic combat troops whose primary tasks are building structures”. We will stop here. As in most RTS, CoH2 has a “worker” type of unit. They can also fight, sometimes fairly effectively, but they are still workers, making them an important part of the army and sometimes a high priority target.
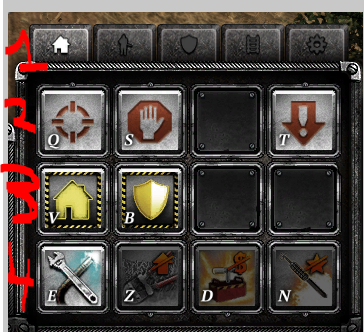
This will help us transition to the UI on the bottom right of the screen as the worker units have a UI with more buttons than regular units
- 1 = list of available building and tech structures. They will appear in white after you build them and you can access them directly from this bar.
- 2 = the basic orders available to almost every unit in the game. The first one is the attack move order. Your unit will move to a location and automatically attack any enemy unit it encounters on the way there.
The second one is a stop button; pretty self-explanatory.
The last one is a RETREAT button. Your unit will try to take the fastest way to your base.
- 3 = two types of things you can build. The first are base or "teching" structures, with the house symbol, which are displayed in the row labelled 1. These will give you access to new units and help you progress in the later stages of the game.
NB: it is not yet important for you to understand what the second line is.
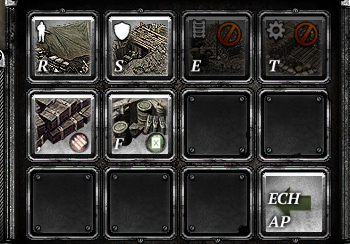
The second type of structures you can build are field defenses as indicated by the shield icon. In the case of combat engineers, we can build mines and barbed wires.
- 4 = The first Icon is the repair button. You can repair vehicles and structures with it. The other icons on this line are specific to combat engineers, and I will go in details through them in another guide specific to the Soviet Union faction.
NB: you should see the actions in the row labelled 2 on almost every unit type but unit capabilities can vary depending on the factions.
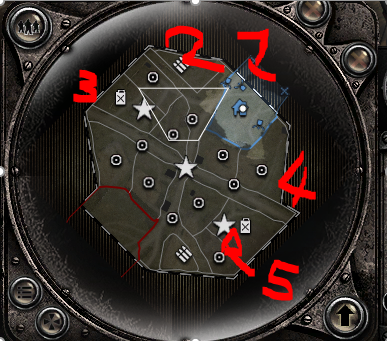
Finally, the bottom left corner is the mini map which exists in most RTS.
It allows you to see the layout of the map.
- 1 = you should see a cross on the map. This is the point where certain units spawn from. Usually, for infantry and some weapon teams, they will spawn from the structure location, but vehicles and Anti-Tank guns spawn from the map edge.
- 2 = ammunition point.
- 3 = fuel point
- 4 = regular resource point
- 5 (the star) = victory point.
The mini-map can be used as a feature which is, to my knowledge, unique to Coh: the tactical map.
The tactical map takes up the entirety of the screen and allows you to move more accurately through the mini-map. Please, note that not all players use it. It depends a lot on your preferences. I personally don’t like to use it, but a lot of top players do.
II. Win condition and general rules
A) True sight system
TrueSight is pretty self-explanatory but it needs to be mentioned.
You can only see what your units (and teammates' units) see. This comes with a sight statistic that each unit has. I will explain statistics in the appropriate chapter.
Furthermore, you can only attack units that you see, at least with infantry squads. Some weapon types can attack any position that is in their range but beyond their normal range of sight.
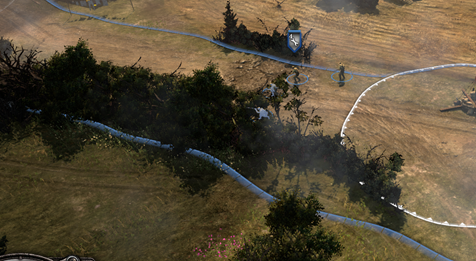
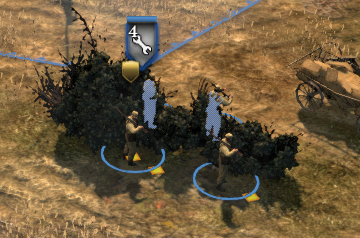
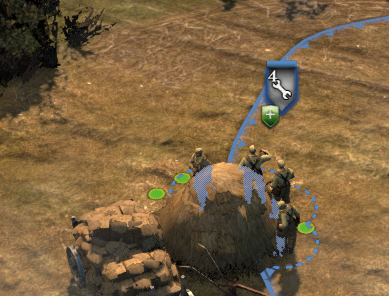
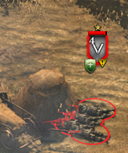
In the following picture you can see a squad that provides me vision, but has its sight partially blocked by an object taller than the unit. This is called a sight blocker. It can be cleared by shooting at it with explosives weapons or rolling over it with heavier vehicles. Some specific abilities can also clear such obstacles.
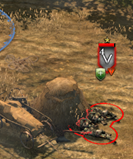
Here is the same position, but with an explosive weapon clearing the sight blocker.
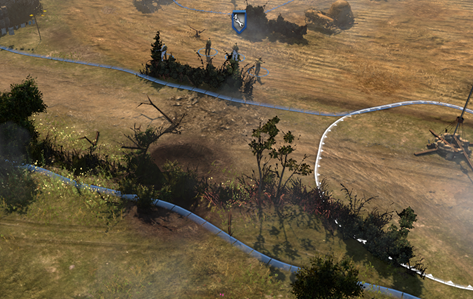
Bigger types of bushes or trees also act as SHOT blockers. Not only they block sight, but you can’t clear them, or shoot through them with vehicles. You can still shoot above them with artillery.
A smoke system also exists. Some tools can provide smoke, which will hide the sight for both players, and allow units to approach. Small arms won’t be able to fire through it.
You can only see what your units (and teammates' units) see. This comes with a sight statistic that each unit has. I will explain statistics in the appropriate chapter.
Furthermore, you can only attack units that you see, at least with infantry squads. Some weapon types can attack any position that is in their range but beyond their normal range of sight.
In the following picture you can see a squad that provides me vision, but has its sight partially blocked by an object taller than the unit. This is called a sight blocker. It can be cleared by shooting at it with explosives weapons or rolling over it with heavier vehicles. Some specific abilities can also clear such obstacles.
Here is the same position, but with an explosive weapon clearing the sight blocker.
Bigger types of bushes or trees also act as SHOT blockers. Not only they block sight, but you can’t clear them, or shoot through them with vehicles. You can still shoot above them with artillery.
A smoke system also exists. Some tools can provide smoke, which will hide the sight for both players, and allow units to approach. Small arms won’t be able to fire through it.
B) General rules or resource system
We went through the resources earlier, to get familiar with the UI, but how to gather them? Unlike Age of Empires, or Starcraft, you don’t gather resources by mobilizing workers. You gather resources by capturing territory points, except manpower, gathered automatically. The higher your popcap is, the less manpower income you get.
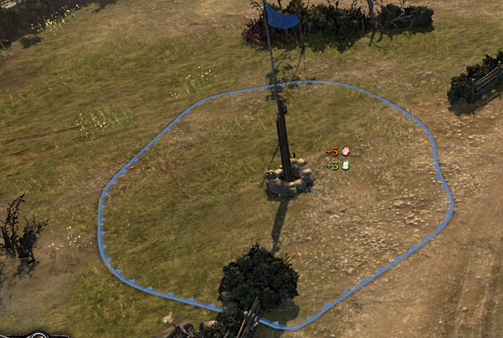
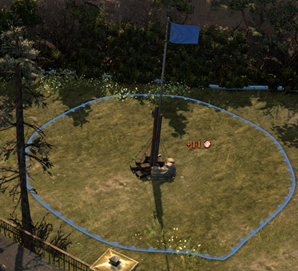
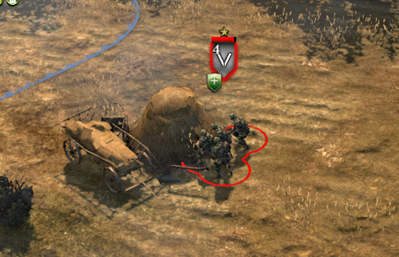
This is a regular territory point. It gives me 5 ammunition and 3 fuel per minute. It’s blue because I own it. The enemy can decapture it by sending a squad inside the circle and staying a short amount of time. The point will become neutral with a white circle. It won’t give me resources anymore, but it won’t be owned by the opponent. Your opponent will have to stay for shorter amount of time to decapture it than it took to capture it.
Specific resource points will only give you one of the resources but more of it. However, they do take longer to capture and decapture them. Here, we see a 11 ammunition per minute point. Fuel points give 7 fuel per minute.
Note that the amount of ammunition, fuel, and manpower you can gather is theoretically infinite.
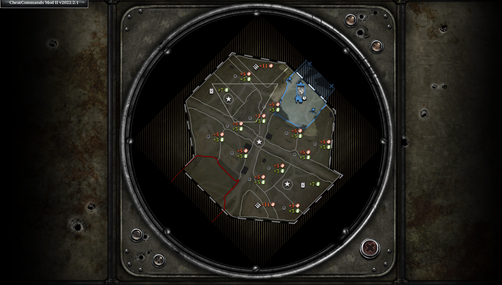
Coh2 also includes a cutoff mechanic, and this is where the minimap and tactical maps become important.
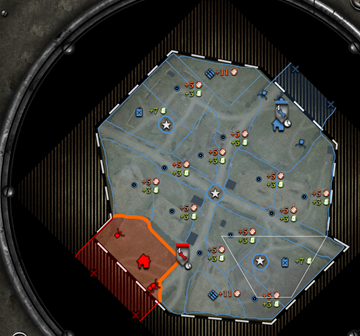
Look closely at the lines between each point. These lines must be connected to your base sector for you to receive your resources. Above, I have the whole map, so a lot of income, but if my opponent plays smartly, the map will look like this:
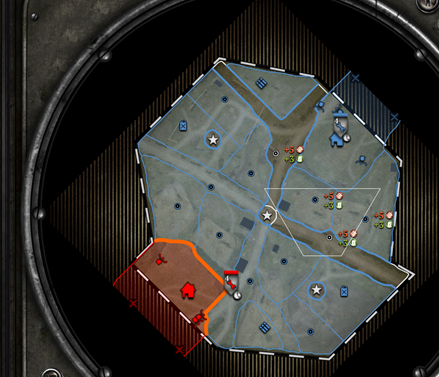
As you can see, I simulated a decapturing order to show that it only took two units and only a decap of certain points to cutoff most of my income, even though I have the entire map. And it was much faster than decapturing all the points individually.
Keep an eye on your cutoffs!
This is a regular territory point. It gives me 5 ammunition and 3 fuel per minute. It’s blue because I own it. The enemy can decapture it by sending a squad inside the circle and staying a short amount of time. The point will become neutral with a white circle. It won’t give me resources anymore, but it won’t be owned by the opponent. Your opponent will have to stay for shorter amount of time to decapture it than it took to capture it.
Specific resource points will only give you one of the resources but more of it. However, they do take longer to capture and decapture them. Here, we see a 11 ammunition per minute point. Fuel points give 7 fuel per minute.
Note that the amount of ammunition, fuel, and manpower you can gather is theoretically infinite.
Coh2 also includes a cutoff mechanic, and this is where the minimap and tactical maps become important.
Look closely at the lines between each point. These lines must be connected to your base sector for you to receive your resources. Above, I have the whole map, so a lot of income, but if my opponent plays smartly, the map will look like this:
As you can see, I simulated a decapturing order to show that it only took two units and only a decap of certain points to cutoff most of my income, even though I have the entire map. And it was much faster than decapturing all the points individually.
Keep an eye on your cutoffs!
C) Win conditions
We talked about the Victory points when I went through the minimap. These are extremely important, as they are one of the three win conditions in coh2, at least for automatch and tournament games (we aren't speaking about custom games).
First, Victory points. On most maps, there are three victory points.
Company of Heroes 2's main victory condition is to hold the victory points (VPs).

Above the timer there is a counter. In Blue, my victory points, in red my opponent’s. The player who reaches 0 loses the game even though he might have a better army or more resources!
When the three VPs are captured by the same player three VPs every 4 seconds will go down from the other player. If one VP is captured by each player and the third one is neutral no VP will go down until the neutral VP is captured or a player decaps the VP their opponent has.
The second win condition happens if your opponent surrenders or leaves. Simple as that. They think they won’t be able to win anymore or are so frustrated that they give up. Both work
The third win condition, the most rare, is annihilation. This happens when you destroy your opponent’s base completely. Usually your opponent will surrender before this point.
First, Victory points. On most maps, there are three victory points.
Company of Heroes 2's main victory condition is to hold the victory points (VPs).
Above the timer there is a counter. In Blue, my victory points, in red my opponent’s. The player who reaches 0 loses the game even though he might have a better army or more resources!
When the three VPs are captured by the same player three VPs every 4 seconds will go down from the other player. If one VP is captured by each player and the third one is neutral no VP will go down until the neutral VP is captured or a player decaps the VP their opponent has.
The second win condition happens if your opponent surrenders or leaves. Simple as that. They think they won’t be able to win anymore or are so frustrated that they give up. Both work
The third win condition, the most rare, is annihilation. This happens when you destroy your opponent’s base completely. Usually your opponent will surrender before this point.
III. Basic Combat guide
A) Unit types
Introducing broad categories of unit types.
CoH2 has a variety of infantry unit types all of which cost Manpower to produce.
“Worker” infantry will be the infantry that has tasks like planting or sweeping mines, repairing vehicles, and other roles specific to faction and unit.
“Mainline” infantry will be your core infantry force, different from “Elite infantry” which are the spearhead.
Your infantry will be supported with “support weapons”.
Vehicles will support your infantry and will cost not only manpower but also fuel for most of them.
There also are “Snipers” which have the unique ability of ignoring cover bonuses and deal instant kills to infantry models at a slow rate.
B) Taking cover
In Company of Heroes 2 you cannot always engage your opponent with brute force. Sometimes you will have to use cover. Cover itself is self-explanatory but it has a few characteristics new players MUST know.
This bush provides me YELLOW cover. It is indicated by the yellow shield icon and the yellow points on the grounds. It applies a modifier of x0.5 accuracy, which raises significantly the durability of your unit.
This provides GREEN cover. It applies a modifier of x0.5 accuracy of x0.5 damageAre these numbers accurate? . Both modifiers will make your squad MUCH more durable. It is vital to always find the best piece of cover available to try fighting your opponent’s squad on equal cover, or superior cover.
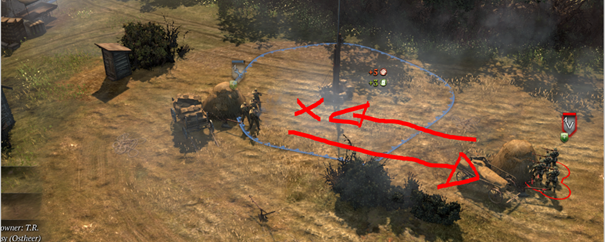
Also, please note that the cover is usually DIRECTIONAL. In the example that follows, the red unit is in green cover and that green cover will protect from the shots coming from the other unit. But the blue unit, also in green cover, does not benefit from it, as it’s not blocking the shots. This highlights how important it is to flank in Company of Heroes 2, and how much positioning matters.
Entering a house also provides green cover, but it is a different type. Most people, probably even top players, don’t know about this, the difference is not big enough to justify explaining it in a beginner guide.
About houses:
Flame types of weapon deal 25 percent extra damage to green cover and building cover.
This bush provides me YELLOW cover. It is indicated by the yellow shield icon and the yellow points on the grounds. It applies a modifier of x0.5 accuracy, which raises significantly the durability of your unit.
This provides GREEN cover. It applies a modifier of x0.5 accuracy of x0.5 damageAre these numbers accurate? . Both modifiers will make your squad MUCH more durable. It is vital to always find the best piece of cover available to try fighting your opponent’s squad on equal cover, or superior cover.
Also, please note that the cover is usually DIRECTIONAL. In the example that follows, the red unit is in green cover and that green cover will protect from the shots coming from the other unit. But the blue unit, also in green cover, does not benefit from it, as it’s not blocking the shots. This highlights how important it is to flank in Company of Heroes 2, and how much positioning matters.
Entering a house also provides green cover, but it is a different type. Most people, probably even top players, don’t know about this, the difference is not big enough to justify explaining it in a beginner guide.
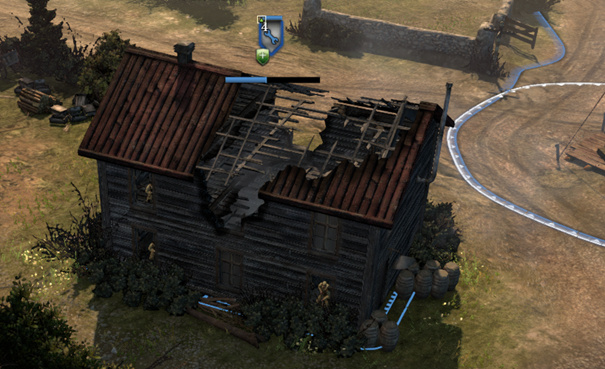
About houses:
- 1) they provide multi-directional green cover.
- 2) they have a certain number of windows. You can only fire through these windows.
- 3) they have a specific amount of health. It can be destroyed by explosive types of weapons, and the squad inside will die as well. More experienced players will also ram the house with a vehicle to bring it down faster.
Flame types of weapon deal 25 percent extra damage to green cover and building cover.
C) Squad "system"
Unlike some other RTS, CoH2 has squads of soldiers rather than individual soldiers. Squads range in size from three to seven soldiers depending on which unit type we are talking about.
Only snipers are a squad of one soldier.
When a soldier dies, you can reinforce the squad in your base for a certain amount of manpower.
When you lose a soldier in the squad, your popcap decreases by one.
It is ALWAYS less costly to reinforce a squad than to rebuild the squad.
A squad loss also results in losing the veterancy bonuses that that squad gained.
D) Veterancy system
I mentioned earlier the veterancy system. Veterancy is an experience system for units. A unit gathers veterancy by dealing and receiving damage. Once it gathers enough it will get to veterancy 1 (1 star) like so.
The more veterancy your units gather, the stronger they are, hence why it is so important to keep them alive, as a veterancy 3 unit would crush the same unit veterancy 0. It can be quite literally game changing.
Example: Grenadiers veterancy 2 bonus provides 40% accuracy to the models. I will round it up, but the DPS goes from 6 per model to 8 per model at point blank range. The increase is significant and exponential for certain weapon types.
Veterancy also provides defensive bonuses. Grenadiers veterancy 3 bonus provides them a reduction of incoming damage of 20%.
E) Suppression
Certain weapons will inflict suppression to your infantry and weapon teams. It will be mostly heavy machine guns that will cause such an effect. That suppression will inflict some negative modifiers called debuffs.
It will be indicated with a yellow icon and will cause major offensive and mobility debuffs. Basically, your unit will be very weak in combat, due to lowered accuracy and reload, but will also be very slow to move. There is no need to know about exact numbers.
If your unit receives too much suppression, it will be pinned. The icon will change and become red; your unit won’t be able to move nor fire AT ALL but also unable to use its abilities. The only option left will be to retreat (unless you use that unit as a bait, but that’s already going into tactics, not suited for beginners).
Getting behind green cover sometimes negates suppression. But if even one of the squad’s models is out of green cover, the whole squad will be suppressed… Mind your positioning!
IV. Brief explanation of statistics
I hesitated a bit to talk about statistics for new players. It is both important and can be a bit weird for new players, especially since they are very different from what others RTS do.
Coh2 uses mainly probabilities. Not only, but mainly.
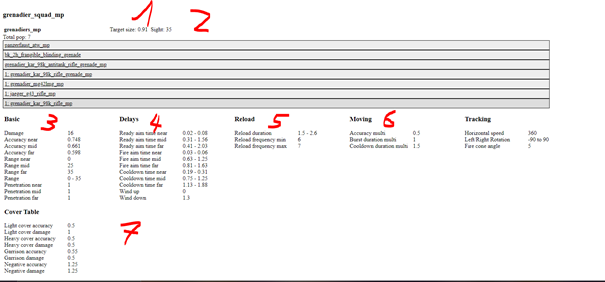
I was using the grenadiers’ example, so I’ll use it again. Please, note that the statistics are not available in game, I use a third-party website for it (partially outdated, mostly accurate though) that I will link in the next chapter. On this website, you will look on the top of the screen to select the faction then the unit. Once I picked the grenadier, I will open the tab for the Kar 98 rifle, and I see this.
Explosive weapon types have an Area of Effect statistic which damages all models within the radius of the explosion.
Vehicles have an armor statistic and their guns have a scatter statistic.
I mentioned armor above, so I will briefly go over the scatter, but it is a bit technical, so it is not vital for new players. It is difficult to define, so I will borrow a formula from a friend: “I'd say something like area around the target in which a missed shot can land”. You could say it’s part of a global accuracy statistic
As you can see, CoH2 loves probabilities, and this explains why sometimes RNG can be decisive in a game.
Note: this website calculates automatically DPS depending on the range, this way you can find out the optimal range to use your weapon and/or squad 😉.
Coh2 uses mainly probabilities. Not only, but mainly.
I was using the grenadiers’ example, so I’ll use it again. Please, note that the statistics are not available in game, I use a third-party website for it (partially outdated, mostly accurate though) that I will link in the next chapter. On this website, you will look on the top of the screen to select the faction then the unit. Once I picked the grenadier, I will open the tab for the Kar 98 rifle, and I see this.
- 1 = target size. Target size, also known as received accuracy, is the chance to be hit by enemy fire. To be calculated as followed: target size x accuracy = percentage to hit the target
- 2 = sight. As I said, every unit has a sight statistic, which is standardized at 35. It can be higher or lower for specific units.
- 3 = basic. It has the damage per hit statistic, the accuracy with their respective range, and a penetration statistic. These statistics are used to calculate DPS (the website automatically does) and the penetration on a vehicle will be calculated as following: penetration/armor = Percentage chance to penetrate the target
- 4 = these can be taken together with 5) to form a single rate of fire statistic, there is not much of a point to explain it for beginners.
- 6 = moving. This is a penalty applied to squads firing on the move. Most squads and vehicles have a 0.5 moving accuracy modifier.
- 7 = the modifier of cover. When I talked about cover earlier in the guide, it targeted most weapons. Some weapons have specific modifiers against cover.
Explosive weapon types have an Area of Effect statistic which damages all models within the radius of the explosion.
Vehicles have an armor statistic and their guns have a scatter statistic.
I mentioned armor above, so I will briefly go over the scatter, but it is a bit technical, so it is not vital for new players. It is difficult to define, so I will borrow a formula from a friend: “I'd say something like area around the target in which a missed shot can land”. You could say it’s part of a global accuracy statistic
As you can see, CoH2 loves probabilities, and this explains why sometimes RNG can be decisive in a game.
Note: this website calculates automatically DPS depending on the range, this way you can find out the optimal range to use your weapon and/or squad 😉.
V. Useful links and resources
- Statistics and DPS calculation
- Veterancy bonuses
- For the ability guides
- For various statistics about the game such as maps played, winrates of factions, commanders pick, leaderboards, etc...
VI. Nota Bene and Credit
I voluntarily left some elements of gameplay out of the guides, like mines for instance, because I don’t think it suits the public targeted for this guide.
Credits go to my friends who helped me making this guide with definitions, statistics, layout, and general observations, Kobal, Spaget, Sidewinder, Olvadi and Victor.
Also credits to my friends who helped me learning more about the game, knowledge that I can now share to help new players. Same people, and I add JibberJabberJobber, Thoton, Fire and Terror.
Credits to Miku for the visual.
A Nota Bene for a top player Orangepest, who I don’t always agree with, but is dead right on this, all the stats and guides will never replace experience. The guides help you, but you are the player, you lead the army, you win the battle!
If you want to translate this guide in a foreign language, feel free to do so.
Feel free to ask any questions you want below!
 Tomy0
Tomy0  Mithiriath
  Gbpirate