
Introduction
Willkommen generals. Today you have chosen to undertake the strategies and tactics that come with the development of the Osttruppen Doctrine. The Osttruppen forces consist mainly of conscripts and volunteers form conquered parts of Europe and the Soviet Union. They are weak and inexperienced soldiers, however they are many in number and fight with the bravery of any German soldier to defend their fatherland. Let's begin; shall we?
The Osttruppen Doctrine
Commander Official Video
Relic's promo video for the Ostruppen Commander
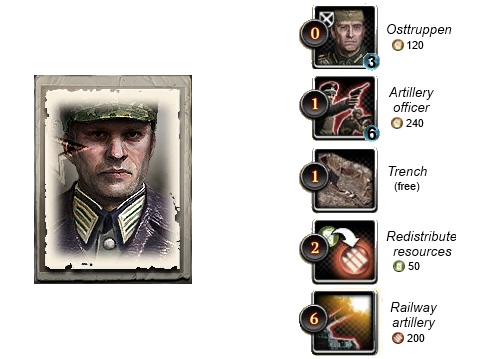
Doctrine Ability Details

Ostruppen
"Deploy weak but numerous Osttruppen infantry to the battlefield." These 6 man squads carry the KAR-98 rifle and are therefore better suited for long ranged combat. Osttruppen do not fire while on the move and do not do much damage. However they are good in cover and in numbers.

Artillery Officer
"An Artillery Field Officer specializing in supporting troops is allocated to your command." Officer units consist of 3 grenaiders wielding KAR-98s and an Officer who wields a Lugar. This unit has 3 different abilities: Focus Fire, Smoke Bombs and Coordinated Artillery Strike.

Trench
"Allows German Infantry to dig defensive trenches". All infantry units apart from the officer and support teams can construct trenches. These fortifications provide heavy/green cover to your infantry. Players can also set up mortars and machinegun teams in trenches if they so choose.

Redistribute Resources
"High command delivers extra Munitions at the cost of Fuel". By spending 50 Fuel, Ostheer commanders who use this ability are instantly granted 150 munitions in return.

Railway Artillery
"Off-map railway artillery will fire three large caliber shells at the designated target." This ability is the most devastating off-map artillery in the game. These 3 shells cause massive damage to any unit that is in the area. Its weakness lies in its cost and the ease with which units can evade the shots.
Build Order
As soon as you start the game choose the Osttruppen commander and begin calling on your Osttruppen squads.
During the first stage of the game you will want to call in around 6 Ostrruppen units and immediately send them off to capture important territories and locations around the map.
Tactics
It is very important to rush the crucial locations and points around the map with your first squads including your pioneers, while your later units cap the territories closer to your base. There are a number of reasons why this is important:
1. You get to choose your cover. Be that a house, a wall or a fence, being able to be behind cover before an enemy reaches you will always give you the upper-hand in a fight.
2. Stationary units are more accurate compared to those on the move. Therefore being at a critical location first and so that your unit is now stationary will give you the best chance possible if any engagement should occur.
3. Osttruppen cannot fire while on the move. This means they are terrible at attacking defensive locations. Consequently being first at a location is again a must.
Osttruppen squads themselves cannot take on conscript squads alone unless they are in a house. Houses provide the best form of cover for your Osttruppen and by putting squads in houses you are stalling your enemy from advancing. Two Osttruppen squads should be able to take on a single conscript squad if they are both in green cover. If needed bring in your pioneer squad to help win those early engagements.
The general strategy for your early game is to stall as long as possible and grab as much territory as you can. Once you have built your sixth Osttruppen squad tech up to Tier 2.
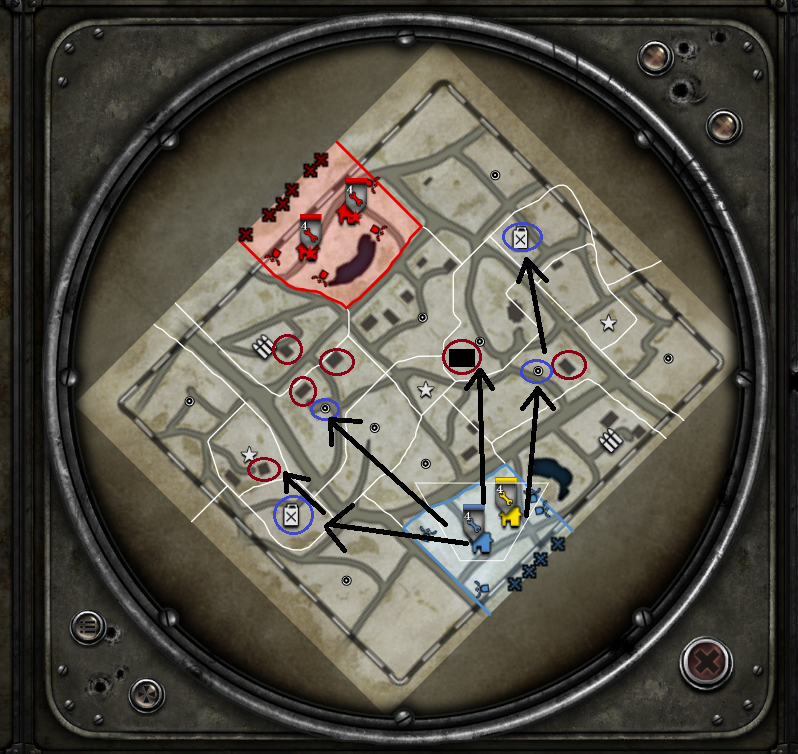
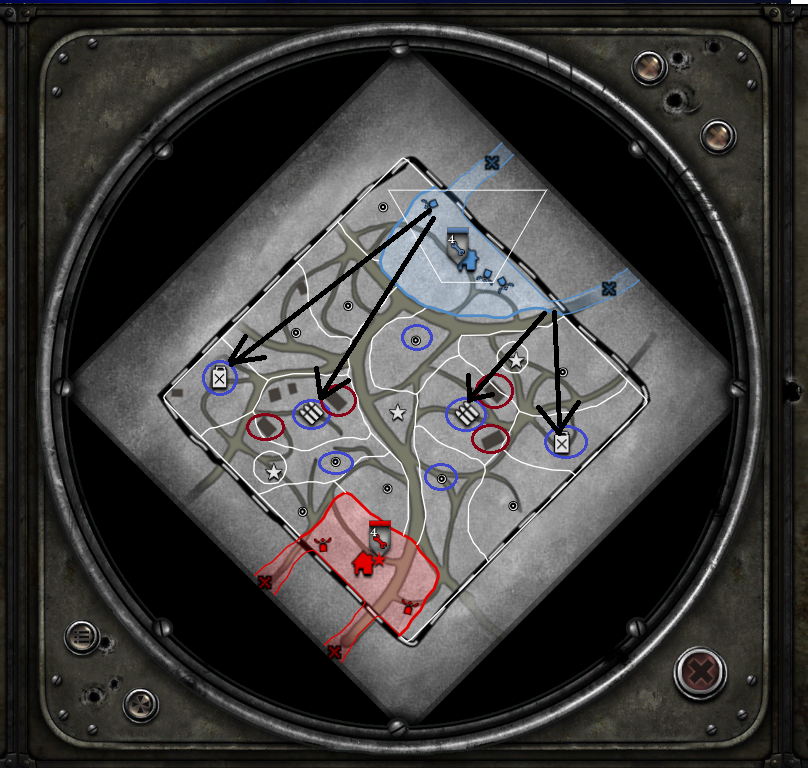
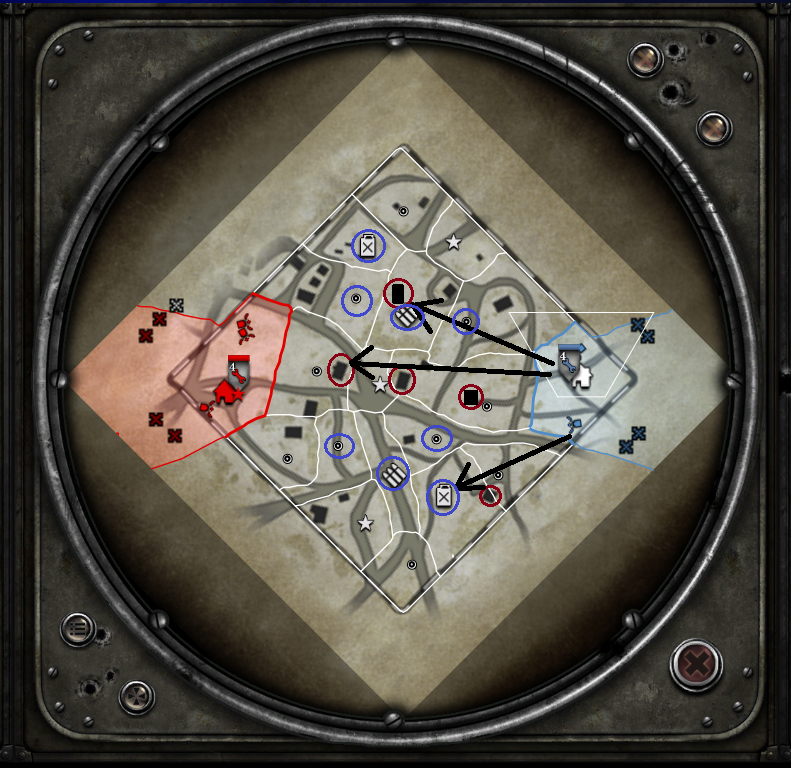
Strategic Locations on Current 1v1 Maps
Here are a few current 1v1 maps with highlighted locations indicating where you should send your first units.
Semoskiy Winter
Moscow Outskirts Summer
Langreskaya Winter
Kholodny Ferma Summer
Key:
Red Cirle = Important Buidlings
Blue Circle = Important Strategic Points
Black Arrow = Capping Order
Red Cirle = Important Buidlings
Blue Circle = Important Strategic Points
Black Arrow = Capping Order
Semoskiy Winter
Moscow Outskirts Summer
Langreskaya Winter
Kholodny Ferma Summer
Tier 2

Once you have teched up to Tier 2 retreat your pioneer squad and construct your Leichte Mechanized Kompanie.


Around this time you should have enough resources to call on a halftrack and both a Panzergrenadier Squad and an Artillery Field Officer. By this point you will probably have 1CP, which will allow you to dig trenches with infantry.
Tactics
Next you will want to build a SdKfz-251 Halftrack and send it out to your forces at the front-line so your can easily reinforce. The great thing about Osttruppen is that they reinforce incredibly quickly, so having a Halftrack around is essential.
The Panzergrenadier unit is excellent at killing enemy infantry up close and are an excellent complement to your Osttruppen squads. They will keep enemy infantry from rushing your Osttruppen, allowing your Osttruppen to stay at range where they are most effective. It is advisable to get two panzergrenadier squads during your Tier 2 phase as you may need to upgrade one with panzershrecks to deal with enemy armor. Keep one un-upgraded so that you still have enough infantry-killing firepower.
Once you call on the Artillery Field Officer it will be the unit that gels everything together. This is because the Officer's Focus Fire 40 Munition ability grants all nearby units a 15% accuracy increase. This makes all your Osttruppen units much more deadly and more effective.
As soon as your are able to you should construct trenches on any position you want to hold. However you must be careful that they are not in a position where the enemy could easily steal them.
Approaching the mid game Osttruppen Commanders should by now have access to their Redistribute Resources ability. This ability is great for requesting more Munitions if you are in need. This ability also allows Ostheer players to be able to upgrade panzershrecks to deal with enemy armor, a flame halftrack to counter enemy infantry, and even some munitions left over for other upgrades or mines. Lastly this ability is great for helping Ostheer players get enough munitions to use their final ability, Railway Artillery.
Tech up to Tier 3 when you have enough fuel and are ready to call in armor.
Tier 3


Depending on the situation you may want to build another pioneer squad as your first may be busy elsewhere which leaves you no time to build your Support Armor Korps. A second pioneer is always handy to have as it enables you to keep your first on the field and speeds up repairing vehicles.

Once your Tier 3 structure is up you will want to start calling in StuGs.
Tactics
The reason for choosing StuGs is that they are great at penetrating enemy armor - even more so than the Panzer IV - and can decently snipe infantry. However they are very vulnerable to being flanked and have poor maneuverability. This is where your Panzershreck-wielding Panzergrenadiers come into play, as they excellently support your StuGs and protect their flanks.
The StuG itself should be kept at the back of your forces so that it can happily fire upon enemy units at a safe distance. You should never rush in with StuGs unless you want to finish off an enemy unit. The best option when attacking is to send in your infantry first followed by your StuGs as they will clean up any AT grenade-wielding conscripts and spot enemy tanks so that you can position your StuGs accordingly. At vet 1, StuGs also gain the ability to Crew Shock enemy vehicles with the Target Weak Point ability, which is excellent if you want to give time for your other units to get their licks in and finish the job.
If the game progresses long enough you may need to tech to your final Tier as your StuGs may not be cutting it. Teching to tier 4 will also allow you to produce units that provide indirect fire, like the Panzerwerfer, to break strong enemy positions.

Tier 4

When you have finally researched the tech for Tier 4 it's time to build your Heavy Panzer Korps.

Produce a Panther if you need to counter those pesky SU-85s or lots of soviet armor in general.

Field the Brummbär if you are facing hordes of Soviet infantry. The Brummbär is especially helpful if you are fighting many squads of veteran Soviet infantry.

If you need to break enemy positions that consist of lots of support weapons like Maxims, mortars or ZiS Anti-Tank guns then produce the Panzerwerfer.
Tactics
When using a Panther you must be careful about running into enemy mines, infantry with anti-tank capabilities like conscripts with AT-grenades and Guards, and T-34s that can ram. You will not want to receive a damage engine or be impeded when trying to flank SU-85s and bigger Soviet tanks. The trick is to close the distance between the SU-85 and the Panther so that the Panther is in range and can circle strafe to avoid the SU-85's main gun.
The Brummbär is a very strong unit that can be used on the front lines as it is able to take a pounding and retreat safely afterwards. However the Brummbär can easily be circle strafed as it has poor maneuverability and a fixed cannon instead of a turret. Use this tank to take out support weapon teams like Maxims, mortars, ZiS crews, and large blobs of enemy infantry.
Panzerwerfers are very vulnerable to any enemy fire, so it is wise to keep them behind your main forces. Hiding them behind cover such as impassable foliage and buildings is highly recommended as these types of terrain will act as shot- and sight-blockers for your opponent. Once you have fired a barrage you should immediately relocate your Panzerwerfers as your opponent may launch a counter-barrage or send some units to find them.
Reaching the late game stage, you should by now have access to your Railway Artillery ability. This ability is very easy to dodge as it is preceded by red smoke on the target area. It is best to use Railway Artillery on a location where your opponent is not looking, on an unmovable unit, on an enemy's position you want to break, or on the enemy base. Examples of a good use of Railway Artillery include:
- Distracting your enemy with an attack on one location of the map and dropping the artillery on another enemy unit or force elsewhere.
- Dropping the artillery during a large-scale attack to force you opponent to relocate his units or risk losing them. This give you time to rush in before your opponent has had a chance to properly relocate his units and to take advantage of his disarray.
- Targeting an immobile artillery piece such as a howitzer.
- Timing the attack to fall on the retreat path of enemy units so that when they reach the base they are instantly blown up by the artillery shells.
Final Thoughts
Well, Generals, there you have it. You now have the knowledge to proceed with the Osttruppen Doctrine and crush the Soviet menace. I am confident that under the command of you and your officers, and with the will of the Fatherland, these Osttruppen soldiers will become seasoned veterans that can withstand the tide of the Red Army.
VODS
versus Lick3tySplit (Semoskiy)
versus HQCondemnationWings (Moskow Outskirts)
versus HQCondemnationWings (Semoskiy)
versus Kulmar (Langreskaya Summer)
 HelpingHans
  OnkelSam
  LeiwoUnion
  AmiPolizeiFunk
  Symbiosis
  computerheat