
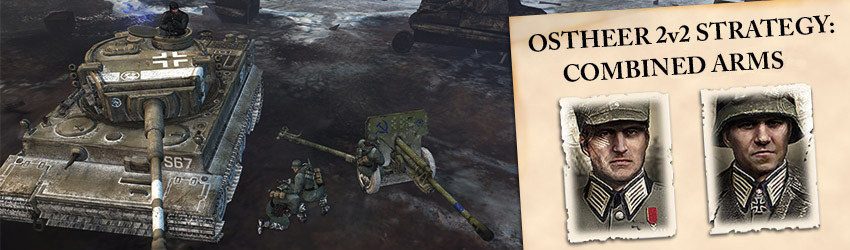
Communication at the Core
A successful 2v2 team at its core comes down to excellent communication. Without this you can never expect to win against the more competitive teams. This strategy is no exception and has even more emphasis on communication as you will both be playing different roles which rely heavily on each other to succeed. So make sure you know what your teammate is doing and always remember to communicate. Even if nothing is happening, it is important to know what your strengths and weaknesses are in your current situation so that you can plan ahead.
Example of good communication: Player 1 notices a large Soviet armor force heading for one side of the map and tells his team-mate, Player 2. Player 2 reacts by moving his Anti-tank units over to that side of the map to prepare.

We, HelpingHans and NoLuckyStrike, created this strategy after trying to figure out how to utilize the best abilities and units the Ostheer had to offer. At the time of writing, we have had great success and have achieved a win streak of 33 wins with this strategy!
Example of good communication: Player 1 notices a large Soviet armor force heading for one side of the map and tells his team-mate, Player 2. Player 2 reacts by moving his Anti-tank units over to that side of the map to prepare.
We, HelpingHans and NoLuckyStrike, created this strategy after trying to figure out how to utilize the best abilities and units the Ostheer had to offer. At the time of writing, we have had great success and have achieved a win streak of 33 wins with this strategy!
Player 1: Jaeger Armor Doctrine
Player 1 will focus on infantry and support. The Jaeger Armor doctrine should be chosen, with its weak early-game, but great power during the late-game. Easily laid AT mines, useful air reconnaissance, and high line of sight coupled with the Elefant Tank Destroyer make it the best late-game commander available to the Germans.
1CP – Halftrack Riegel 43 Anti-Tank mine

The standard German halftrack can now lay heavy anti-tank mines. These mines will deal a lot of damage to any enemy vehicle that drives over them. Anticipate where the enemy will approach from, and place them on choke points.
2CP – Reconnaissance Overflight

A plane will fly over the designated area for a small period of time, revealing all enemy units and terrain near the location. Use it to find enemy anti-tank guns, MG positions, infantry movement or scout the base to see what your opponent is teching.
3CP – Spotting Scope

All tanks can now be upgraded with spotting scopes. When stationary, the line of sight of the unit will be greatly increased.
5CP – Elefant Tank Destroyer

Allows the Elefant Tank Destroyer to be called onto the battlefield. This behemoth has devastating range, firepower, and virtually impenetrable front armor. However, it’s lack of turret and slow speed make it vulnerable to flanking maneuvers.
5CP – Stuka Bombing Strike

A JU-87D Stuka dive bomber is now available for air support. When used, it will bomb the designated area with a 50kg bomb inflicting heavy damage to any enemy unit that gets hit by it. If used on a captured sector, the bomb will neutralize the sector.
Player 2: Spearhead Doctrine
Player 2 will focus on armor and aggression. The Spearhead Doctrine is ideal for Ostheer players who want to field a highly-mobile, vehicle-heavy army. Vehicle smoke-screens allow your units to strike quickly and escape before the enemy can bring his anti-tank weapons to bear. Patient commanders will be rewarded with the ability to call a Tiger tank onto the field, a beast that strikes fear into even the most hardened of Soviet players.
1CP - Panzer Tactician

All armored vehicles gain the ability to deploy a smoke screen blocking line of sight in an area. Incredibly useful against enemy tanks, weapon teams, or any anti-tank infantry squads, as they will not be able to shoot the vehicle without sight.
1CP - Sd.Kfz. 250/7 Mortar Halftrack

The Sd.Kfz. 250/7 Mortar Halftrack with its 8cm mortar can provide vital battlefield support for infantry forces. In addition to its standard high-explosive shells, this halftrack can also fire incendiary shells to burn out the enemy, and smoke rounds to cover retreats or assaults.
2CP - Reconnaissance Overflight
A plane will fly over the designated area for a small period of time, revealing all enemy units and terrain near the location. Use it to find enemy anti-tank guns, MG positions, infantry movement or scout the base to see what your opponent is teching.
5CP - Tiger Tank

The mighty Tiger tank can now be called onto the battlefield. This heavy tank is equipped with a powerful 88mm main gun, has strong armor and an upgradeable MG42 on the top. It can take on any unit on the field.
5CP - Fragmentation Bomb

High explosive fragmentation bombs are dropped on the designated area, inflicting heavy damage to all units in the area. Has a high cost and is easy to avoid; best used on units that cannot move.
Doctrine Synergy
These two Doctrines, Jaeger Armor and Spearhead, are excellent for supporting one another. The weaknesses of each are made up for by the strengths of the other. In addition, both these doctrines supports a solo Tier style of play where one Player goes Tier 2 and the other Tier 3.
For instance Player 1, who goes Tier 2 and chooses the Jaeger Armor doctrine, will benefit the most from the doctrine's abilities. He will make a half-track in Tier 2 and therefore can lay the 1CP Riegel Anti-Tank mines. Later on he will be able to build an Elefant easily as he has not spent all his fuel into Tier 3 as he has stockpiled it by staying at Tier 2. Furthermore by having the 2CP Reconnaissance Overflight and the 3CP Spotting Scope abilities in this doctrine, Player 1 can grant a great deal of sight for his teammate as well.
For Player 2, who goes Tier 3 and chooses the Spearhead doctrine, the same great benefits can be had as well. For instance, he is the one that will make the most vehicles, primarily Tier 3 tanks, and therefore he will gain the most use out of the 1CP Panzer Tactician ability compared to Player 1. The Spearhead doctrine contains a call-in for the 1CP Sd.Kfz. 250/7 Mortar Halftrack which is excellent at countering both kinds of enemy mortars and weapon teams and is perfect at supporting Player 1's MG heavy and weapon teams. Another 2CP Reconnaissance Overflight ability is found in Player 2's doctrine which, as previously stated, is excellent at providing sight for both players. With this ability in both doctrines, the team can continuously launch recon flights to provide a greater period of sight for long-range vehicles and artillery units like the Elefant and the Mortar Halftrack.
Each doctrine supplies one type of heavy tank, the Elefant (for Player 1) and the Tiger (for Player 2). These two tanks complement each other well: the Elefant makes up for the Tiger's poor range and tank destroying capability, whereas the Tiger provides the maneuverability and infantry-killing power that the Elefant lacks.
Lastly both Doctrines contain their own form of off-map strike or bomb. It is always great just to have such an ability that can force an opponent to displace or retreat, or to kill valuable targets of opportunity. When each player has such an off-map in his doctrine, one of the two on the team normally has enough ammunitions to deploy it.
Player 1 - Build Order
Tier 1


With your first pioneer construct your Infanterie-Kompanie and then proceed to send the unit off to cap your closest fuel point. It is always important to be the first to rush the fuel points. If you are late your opponents may have stolen the house in the vicinity making it very difficult to capture the point. If they have done that, back away or go for the cut off that connects the fuel point to enemy territory so they do not gain any resources from their captured Fuel sector.


OR
Next you will want a variation of the above. The build you chose depends on your playstyle. Build two Grenadiers and two MG42s if you are comfortable mircoing more than one MG42. The second could be used to help support you ally.

Once you have the situation under control, it is time to tech up to Tier 2.
Tactics
Use your Grenadiers to capture forward territories while your MG42(s) support your Grenadiers. I advise not getting a standard Ostheer mortar unless you have to (trying to dislodge soviets in a building for example) as your team-mate will soon unlock the mortar half-track which will be an excellent counter to both types of Soviet mortars and any fortified positions if you make use of the Incendiary Round ability.
Tier 2
Once you have completed the tech for Tier 2 you will want to construct your Leichte-Mechanized-Kompanie. It is a good idea to build another pioneer squad to build this structure as your first may be busy elsewhere and having a second on hand makes repairing and constructing things much easier.


This build order for Tier 2 is a fairly safe bet. You have a variety of units here that you can upgrade when needed to suit the situation.
Tactics
As your ally will not be teching to Tier 2 it's up to you to field a SDKFZ-251-Halftrack so that all your units can reinforce on the field. This is where communication plays a vital factor as you must tell each other where you want to reinforce. Now depending on the situation, you will either want to produce a Pak 40 or a Panzer Grenadier as your second unit. If you are starting to see the signs of light to medium Soviet vehicles, get the Pak first and then the PGs later. These signs can be seen by keeping a check on how much fuel the enemy has been able to get. If they have been holding a fuel point for a long time they may have enough to start bringing out tanks. Other signs could be fuel caches or a general lack of Soviet infantry.
If it's the other way around and you are seeing a lot of Soviet infantry then the wiser choice might be to upgrade to a Flame Half-track and get a PG second. A second Panzer Grenadier is not a bad decision either as you may want to upgrade one with Panzershreks, giving you more anti-tank capability yet still retaining some of your anti-infantry strength. Lastly do not forget about your halftrack's ability to lay Riegel 43 Anti-Tank mines since this can be incredibly useful against those early tanks and you may be able to bait one into it.
Late Game Call-In

Elefant Heavy Tank Destroyer
The next unit on your list that you want to build is the Elefant as this will help you counter medium to heavy Soviet armor. In the run up to the Elefant it is advisable to construct fuel caches as the Elefant costs a ton of fuel. Furthermore by building fuel caches you are also helping your teammate's fuel income for his Tier 3 tech.
Tactics
Upgrade your Elefant with a spotting scope as soon as you can to get the most out of its massive range. Remember the Elefant is not a front-line tank like your teammate's Tiger and it can be easily flanked, so keep it at the back and supported with other units. Deploy a Reconnaissance Overflight to give yourself line of sight to enemy vehicles and give your Elefant something to shoot at. Furthermore as Reconnaissance Overflight gives both you and your ally a chance to see where your opponents forces are located, it is an incredibly valuable tool and should be used regularly, granted that it doesn't get shot down within seconds of course.
Tier 4


If you and your ally haven't managed to crack your Soviet opponents by this stage then it is a good idea to tech to the final Tier.


Panzerwerfers should be your last weapon of choice at this stage to finally break your opponents.
Tactics
As these vehicles are incredibly weak and vulnerable to any enemy fire it is wise to keep them behind your main forces. Hide them behind cover such as impassable foliage, terrain and buildings as these will act as shot- and sight-blockers for your opponent. Once you have fired a barrage you should immediately relocate your Panzerwerfers as your opponent may launch a counter-barrage or send some units to find them. Once you have ordered a barrage you can shift-right-click on a safe spot. The Panzerwerfers will immediately drive to the new location after firing, which can save them from enemy counter-barrages.
Player 2 - Build Order
Tier 1
The build order for Tier 1 for Player 2 should be very similar to that of Player 1. Now proceed to construct your Infanterie-Kompanie and send your Pioneers off to capture your closest fuel point in the same manner as Player 1. If both players grab the fuel points early you will win the so called 'teching war'. You will have more fuel to tech up to the next Tiers and will be able to produce vehicles much faster than your opponents can.
The difference in Player 1 and Players 2's build order at Tier 1 is the amount of Grenadiers. Player 2 should focus on calling in more Grenadiers than MG42s as you will be the attacker rather than the supporting player. Furthermore since you are going to skip Tier 2 you will not be getting any Panzer Grenadiers later on, so building more Grenadiers in the early game will help with the infantry engagements during the mid to late game.
Tactics
Use your Grenadiers to attack and capture forward territories. Your teammate should be supporting you with his MG42s. If he isn't, remember to tell him you need support in a certain location. Normally it is a good idea to tell your teammate in advance where you intend to attack so that he can support your push.
1CP - Sd.Kfz. 250/7 Mortar Halftrack
Once you hit 1CP call in the Mortar Half-track. This will probably end up being your most valuable unit as it is excellent at providing support to your ally's heavy weapon team based play.
Tactics
Use the mortar half-track to counter enemy mortars and weapon teams. Dropping Incendiary Rounds normally does the trick. The half-track is very weak and needs to be kept safe so be very cautious when moving it up to take out a target. Try and use the terrain like trees or buildings to your advantage to block line of sight to the enemy.

The next step after you have a foothold on the battlefield is to tech up to Tier 3. It is very likely that during this stage of the game you will have a sizable amount of manpower that you can use as you are not building any Tier 2 units. Consider constructing fuel caches to help towards building Tier 3 tanks and also ammunition caches to help your teammate upgrade his units and yours.
Tier 3

Build another Pioneer squad and have them construct your Support Armor Korps. Again a second pioneer is useful here as having two will help speed up the repairing of your vehicles and general tasks like mine building or bunker construction.


OR
Depending on the current situation your build order for Tier 3 could be varied as shown above and explained below.
Tactics
Choose the first build order, starting with an Ostwind, if you are having trouble against a lot of infantry and especially build it if you are fighting elite units like Shock Troops or Guards. Also Ostwinds are great versus T-70 tanks so build an Ostwind first if you are fighting these units. Build Panzer IVs afterwards in order to strengthen both your anti-infantry and anti-tank capability.
Choose the second build order, starting with a Panzer IV, if you are facing a mixture of infantry and armor like T-34s. Panzer IVs are good all-around tanks that can cope against both types of enemy units. It is still wise to build an Ostwind after the other units as it can help shoot down enemy planes that might be causing you some grief and also against infantry.
Both build orders consist of two Panzer IVs, a Stug III and an Ostwind. The Stug has more armor penetration than the Panzer IVs can dish out and it has more frontal armor so it can be used at a distance while your Panzer IVs protect it from getting flanked. Furthermore at VET 1 the Stug III has the 'Crew Shock Ability' which disables enemy vehicles and tanks for a short while. This gives you time to get you Panzer IVs in to flank and finish off enemy vehicles.
Late Game Call-In
The Tiger
Next on your list is the mighty Tiger.
Tactics
The Tiger was one of the most feared units of the war. Not surprisingly, with its massive 88mm main gun and strong armor it was easily able to take on any kind of Soviet infantry and most Soviet armor. This tank can be used right in the front-line as it can take a beating and still manage to get away safely. Its weaknesses are its speed and range. It can be easily overwhelmed if not supported correctly. SU-85s can out range the Tiger and snipe it without the Tiger being able to retaliate. However this is where your ally's Elefant comes into play. The Elefant can wonderfully support your Tiger by taking out those annoying SU-85s while the Tiger pushes forward through the battlefield.
Tier 4
Tech up to Tier 4 if you feel that your T3 units aren't cutting it for you and you need to rely on stronger units such as the Panther and Brummbär. It is also a good idea to do this if you have lots of fuel to spend.
Construct the Heavy Panzer Korps with one of your Pioneer Squads and prepare for production of German steel.

OR

Build a Panther if you need a strong, reliable and fast anti-tank unit. Alternatively build a Brummbär if you need to tackle elite vet 3 infantry.
Tactics
The Panther is a front-line tank that can take a pounding, so use it as one of your first units to launch a big-scale attack. It is also ideal for circle strafing SU-85s. On the other hand it is quite vulnerable to T-34 ram so be mindful. The Brummbär has thick armor as well and can take a few shots before being pulled back. Use this unit to try and sink Soviet units on icy territories, target blobs of enemy infantry and to decrew Soviet weapon teams.
General 2v2 Advice
This section will cover general tips and advice on how to improve your 2v2 game.
Tip 1: Work together!
Try and never let the game devolve down to two sets of 1v1s. By that I mean one player from each team fighting one player from the other team in an uncoordinated fashion. This is not teamwork and neither of you are working together to secure victory. If you notice the game bogging down to this state let your teammate know and try and support each other.
Tip 2: Share a Medic Bunker


Putting a Medic Bunker down between your teammate's HQ and your own will be a great way to maximize healing effectiveness for both teams.
Tip 3: Keep talking
It is very good to keep your teammate aware of what's going on as he may not have noticed something even though you have. Remember: don't expect him to have seen everything you have! As soon as you see something like one of your teammates units dying tell him immediately. Use CTRL+A and click on the map to send him a flashing message on his tactical map saying attention is needed in that location.
Tip 4: Mines win games

Remember to lay down mines if you have spare munitions and time. You never know how crucial they might be in stopping that one tank rush.
Tip 5: Spare Manpower? Build Caches
If you have spare manpower and are in need of additional resources it is always a good idea to build a fuel or ammunition cache. Caches provide resource bonuses to the entire team, not just to the player who owns the cache.
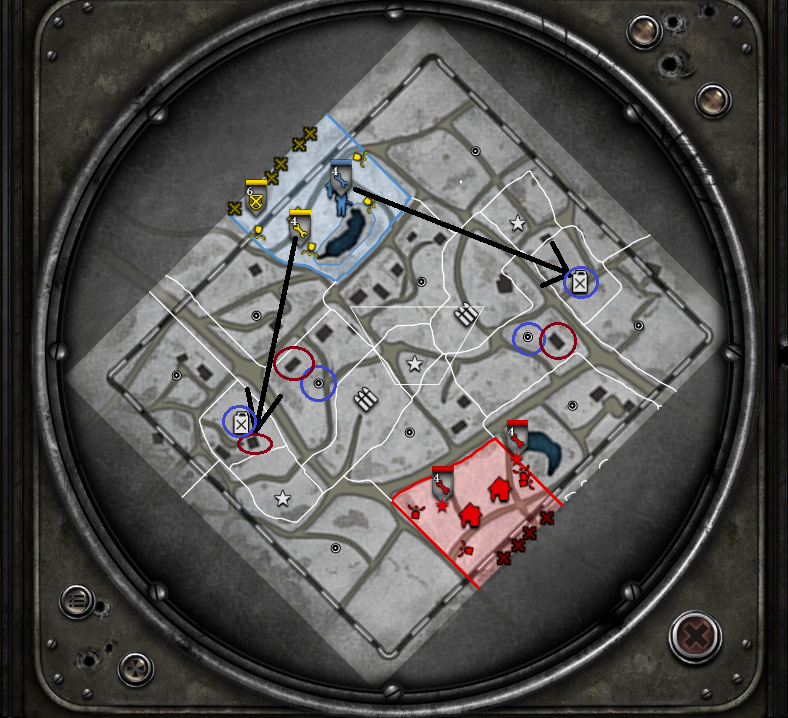
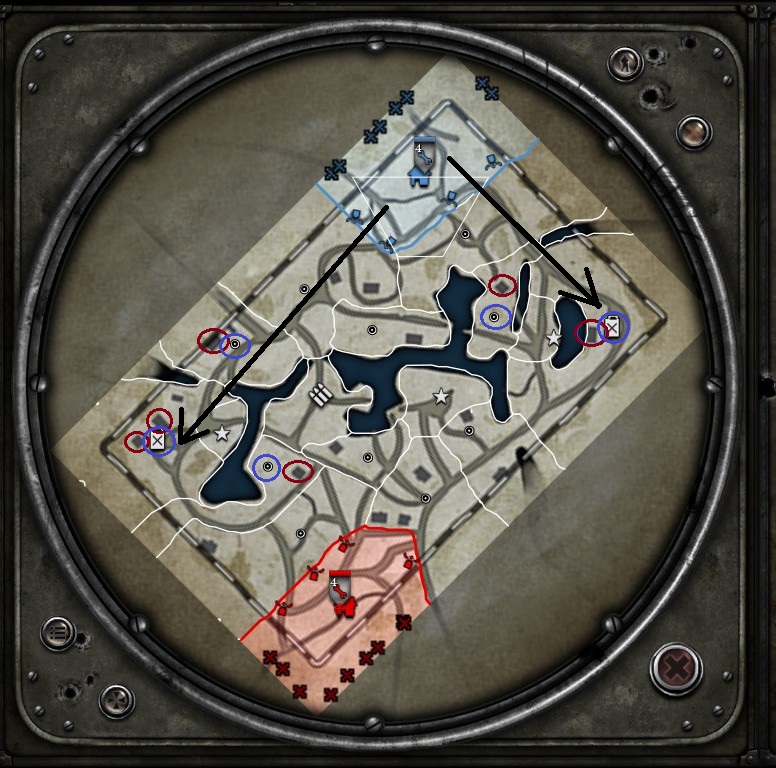
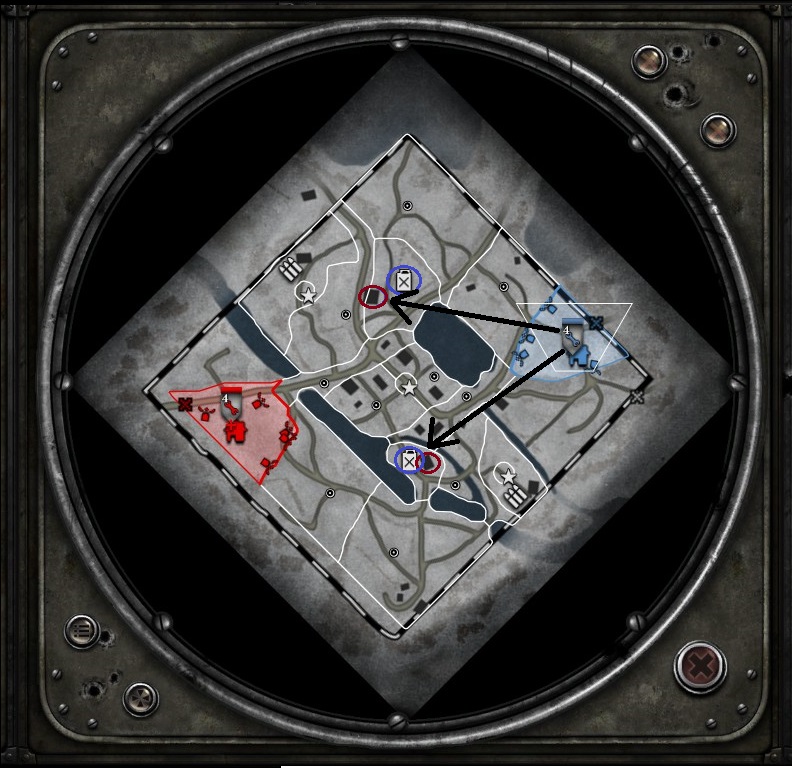
Capping Orders on Maps
Here are a few examples of the important strategic locations on some of the current 2v2 maps.
Key:
Red Cirle = Important Buidlings
Blue Circle = Important Strategical Points
Black Arrow = Capping Order
Key:
Red Cirle = Important Buidlings
Blue Circle = Important Strategical Points
Black Arrow = Capping Order
Moscow Outskirts Winter
Rzhev Summer
Semoskiy Winter
Video Examples of Good Teamwork
Example 1: Offensive Push
Telling your teammate what you plan to do so he can support you in an offensive and also alerting him to a dire situation that needs addressing as soon as possible.
Example 2: Game Sense
Again this example shows the importance of communication. In this demonstration HelpingHans tells NoLuckyStrike to re-position his Tiger, a move that is critical in saving the game by protecting the VP in the north. Furthermore, both players let each other know the current situation by telling each other that they have recently killed an SU-85. Letting each other know this information is important as you can both figure out that you have taken away a large part of their anti-tank force and then build more units or change up your attack plans accordingly. For instance you can now send in your flamer half-track back into the thick of it as you don't have to worry about the SU-85s you just killed.
Conclusion by NoLuckyStrike
Meine Anwärter, with this guide we give you the key to destroy all the Sovjet taktics. If you do your duty the Vaterland will win this Krieg!
Remember the War can't be won by theory alone. You must train and learn to communicate well with your partner. Trust me, the day will come when the Sovjets seem stronger than your Army and defeat you on the Schlachtfeld. However do not be disheartened; analyze the game with your partner and you will get the chance to get your honor back.
Gott mit Uns!
Gezeichnet:
General der Infanterie HelpingHans
Generalleutnant NoLuckyStrike
General der Infanterie HelpingHans
Generalleutnant NoLuckyStrike
 HelpingHans
  NoLuckyStrike
  BradBurning
  AmiPolizeiFunk
  Symbiosis
  computerheat