
Introduction
My in-game name in Finndeed. I have played a lot of hours on CoH2 now. And for the past year or so, I have been in the top 50.
You may have seen me in a few tournaments where I never went much further than the first few rounds. That said, I have a good working knowledge of the game and plenty of strategies.I have become a reasonably versatile player.
I hope this guide will be helpful, or will at least make interesting reading!
The Doctrine
There are many ways to play any doctrine, and this is simply my way of doing it as proven in automatch. This is a style which utilises many or all of the doctrine’s abilities, tailoring the strategy around some of them.
This tailoring has meant that the strategy, if followed correctly, might not be the most effective way to win a game. This is something to which you, as the player, must adapt. e.g. You must learn when it is better to forgo an artillery piece in favour of a tank.
I will try and outline situations where choosing this doctrine gives you the best chances of success, but again, this is only a guide, not the Bible.
The Fortifications Doctrine is far from the most popular doctrine for OKW. It is also not in the top three best doctrines. However, it does make up for the OKW’s inability to hold the map. Due to their late access to an average MG, the OKW can suffer from a lack of map control, which may be due to the OKW's reliance on mostly pure DPS units; killing the enemy before they kill you. Against the often superior Allied infantry, the OKW end up on the wrong side of the fight and must retreat, often losing the map as they go.
This Doctrine gives the OKW a way to hold the map without having to fight for it. By using bunkers, S-mines and even a flak emplacement (if placed correctly), these tools can give a player a stable amount of the map, allowing the OKW to snowball into the late-game powerhouse which every Allied player fears.
Do not use the Fortifications Doctrine if you discover the enemy is using a doctrine with lots of heavy indirect fire. Weapons and tactics you want to avoid include: the Calliope, Priest, Hammer Tactics, air-burst shells or other heavy artillery and the Land Mattress. The following are bad for you as a Fortifications Commander, but you can deal with them: ML20
 amis, 120mm mortar
  soviets and B4 soviets.
 Doctrinal Abilities
At 2 Command Points

| !Most of this stuff is a waste of time. But, a trench is helpful when you need a “garrison”. The Flak Emplacements will be covered later, it can be useful but in a limited way. |
At 3 Command Points

| !This is where the doctrine gives you something worth having. If, you ignore the fact that both the 2CP and 3CP unlocks give you 'trenches'. Bunkers allow you to pretend to be the Wehrmacht with MG42 levels of suppression (pop cap free), and S-mines are simply brilliant. These things are carbon copies of the Wehrmacht ones. |
At 8 Command Points

Cost
- Manpower: 350
- Fuel: 45
- Population: 10
| !The Pak 43 is the most powerful bit of AT in the game. It will two shot all mediums, and will mess up British behemoths like the Churchill with ease. |

Cost
- Manpower: 400
- Fuel: 40
- Population: 15
| !Although utilising the Fortifications Doctrine is not uncommon, going for a LefH really is. It is obviously advantageous to be able to hit your opponent without him/her being able to hit you, but, you must consider the opportunity loss when sinking 400 manpower and 40 fuel into an inflexible indirect fire option. |
At 12 Command Points

Cost
- Munitions: 300
| !I have never gotten this to be that useful. Enemy units just leave the area. Also, the OKW doesn't have the greatest scouting options, it’s hard to keep a unit visible for that long. |
Comment
One of the biggest problems of this doctrine is population cap. The Pak43 takes up 10 population, the LefH 15 and the King Tiger 21. In just these three units, you lose almost half your pop-cap.
Accordingly, you must think about what units are needed in the late game, and plan for them in the early game. For instance, units like the Kubel become useless past the early game. It can be useful throughout the game but its return/micro investment drops significantly as time passes. Requisitioning a Kubel in the early game should not have a long-term impact on a player’s popcap, because it will likely be destroyed. Contrary would be an investment in an extra Volk or a LeIG. This may seem like a good idea in the heat of the moment, but it can hamper you in the long run. Be careful with your choices.
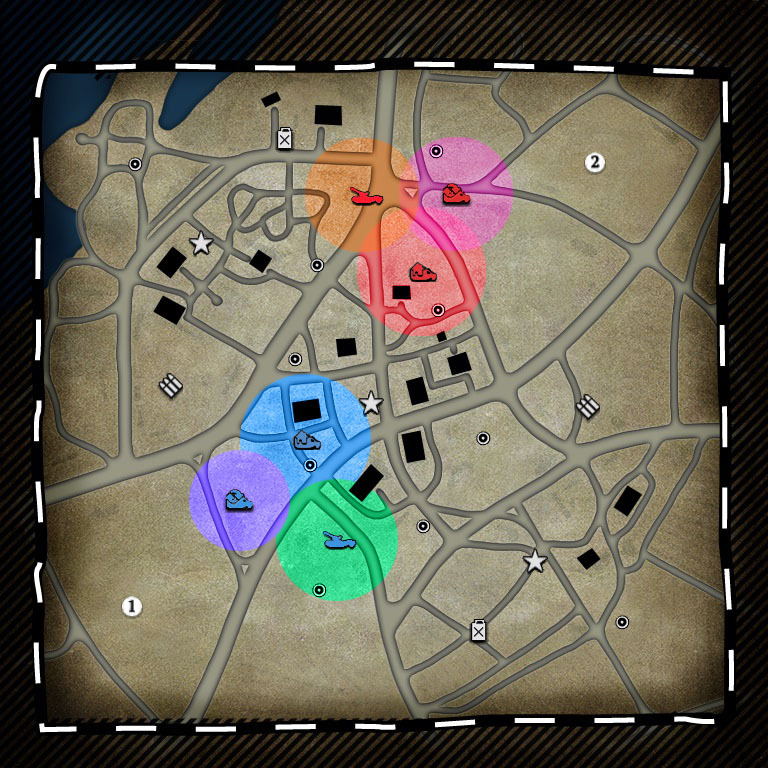
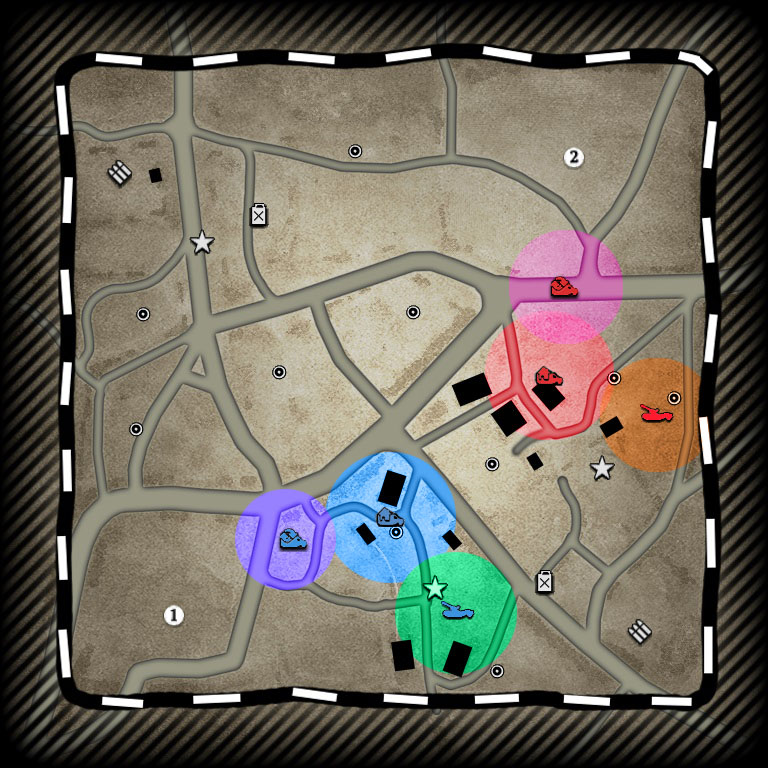
Map Analysis
The icons of the tech structures, with their respective coloured circles around them, represent a rough area in which forward placement of them can and often have worked. I assume you will place a Pak 43 within reinforcement range of the Med HQ, and therefore have not placed an icon to suggest a placement of it.
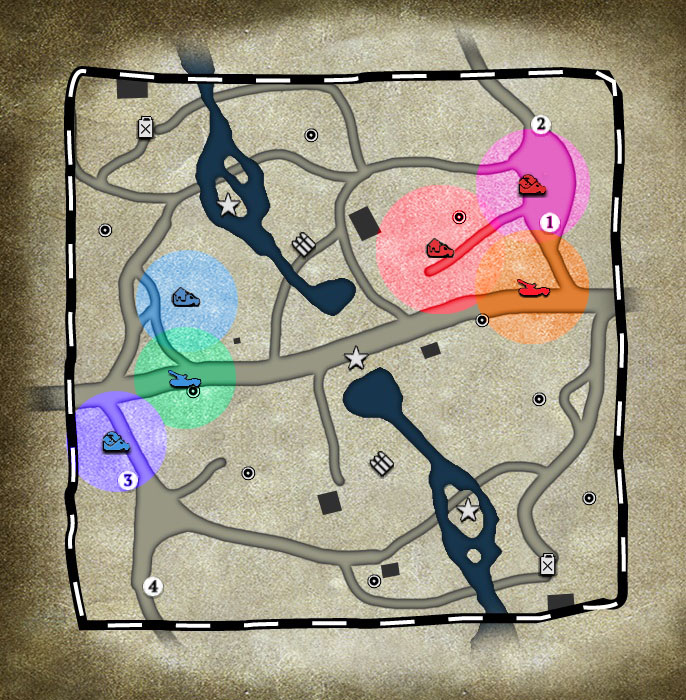
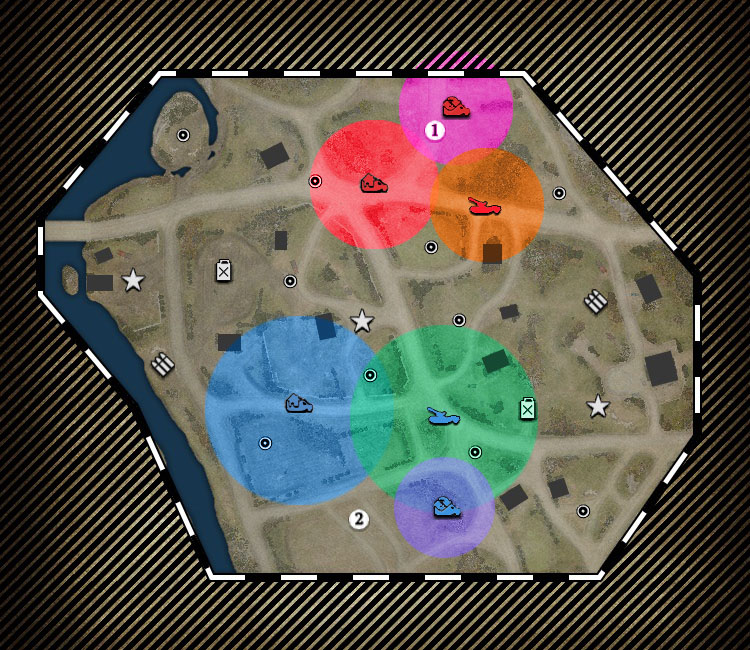
Arnhem Checkpoint
Arnhem is an “acceptable” map for the Fortifications Doctrine. It is, however, far too large and spread out for a concentrated force to hold more than one VP. A forward base can be surrounded, or cut off into a corner. A Pak 43 cannot cover more than one VP. A LeFH cannot neither be protected from flanking infantry nor tanks, and is vulnerable from call in artillery. Bunkers are too directional, and the map is too large and open for them to stop flanking infantry, unless they are interconnected with other defensive positions.
Despite what i written above, S-mines can work well, since this map is 'cut-off heavy'. It is also 'garrison-heavy': a LeIG (or two) enables you to dislodge those irksome opponents.
The South is harder to turn into a fortress. It can be done if you commit to a forward base, place the Flak HQ near the centre of the town and make damn sure no one takes that VP. If you do that, be aware that you will need to commit a lot of forces to keep your Flak HQ safe from AT guns or mortars. I recommend having two LeIGs, so you can hammer anything that tries to assault your OKW trucks from afar.
Ideally, a player on this map would use a strong central position to take or contest the cut-offs which define Arnhem. If this is achieved, the enemy will be starved of fuel and the OKW player can then out-tech their opponent and so avoid, or mitigate their enemy's eventual indirect fire. I would advise caution about building a Pak 43 or a LefH.
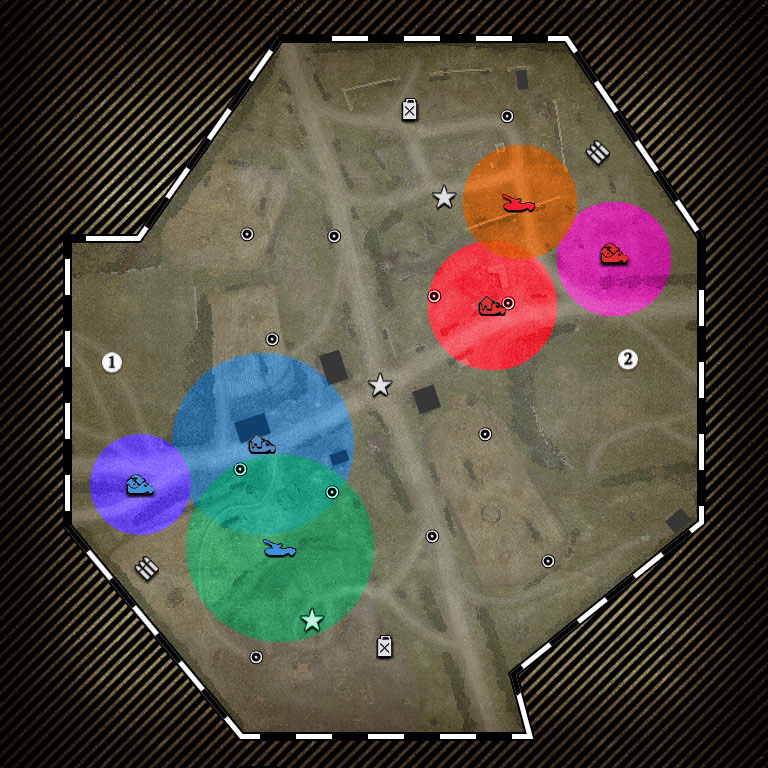
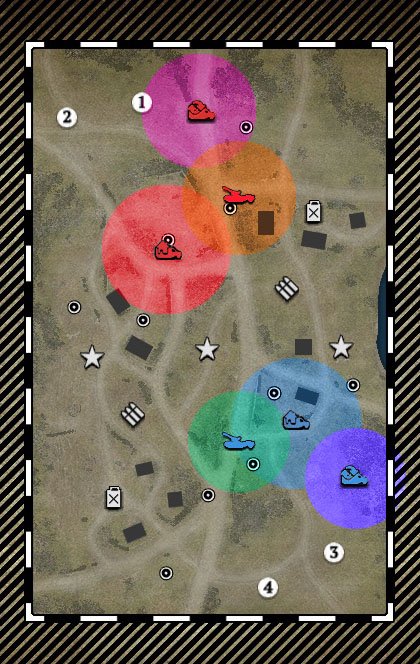
Angoville
Angoville is well suited for the Fortifications Doctrine! I suggest to always go for the right hand side with the 2 VPs on it, no matter if you start north or south. This way, you can hold one VP and contest a second, without holding more than 40% of the map. There is also the possibility that you can get most of the right side, which allows you to cut off your opponent from the other side.
The right side also has an abundance of buildings, which means you can build SimCity.
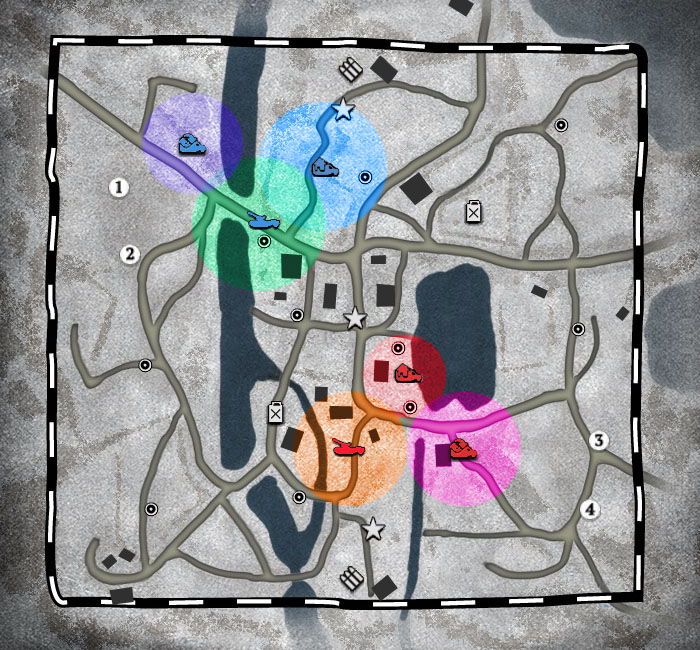
Crossing in the Woods
Crossing in the Woods, like Arnhem, is another map where its large and open nature, with spread-out VPs, make using the Fortifications Doctrine less advisable. It can be useful as a way to strengthen a forward position. Such as one built around a Med HQ, but a Pak 43 can easily be circumvented by an enemy, and it can only really cover one VP while providing a “safe place” for your units to soft retreat to.
That being said the groups of trees on each side can, and often do, block most rocket artillery, making a position behind them extremely hard to dislodge. Beware a British player on this map as they can out-SimCity you pretty well using those same trees which make a mortar pit immortal.
A LefH will be well protected on this map.
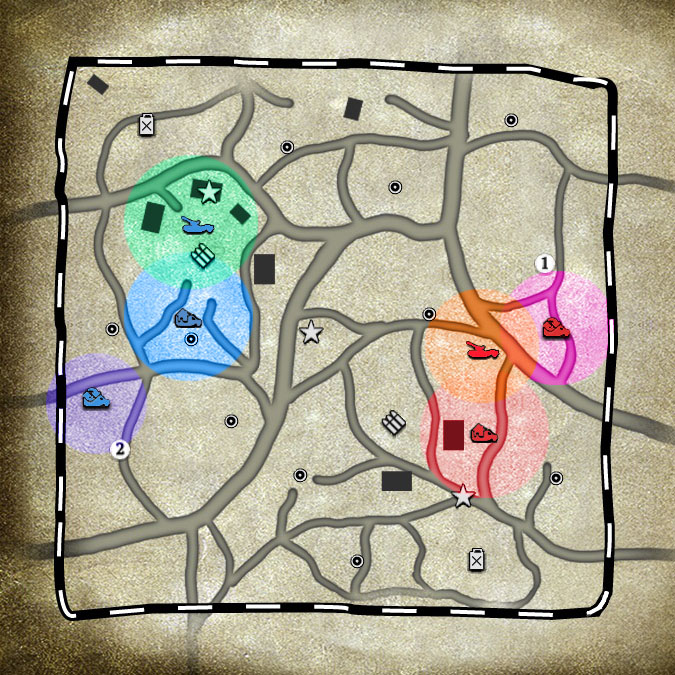
Crossroads
Crossroads is a good map. The map favours a forward base to protect the cut-off and allows a player to keep consistent control over a fuel point. From here, a player can contest the central point: dragging the game out long enough to allow you to put your late game into full swing.
I would suggest using a forward base as a softer point of defence, so as not to encourage your opponent to use too much indirect fire. It may be best to place the Med HQ farther back. The real value in having a forward base on this map is not how close to the enemy you can place it, but how close to the fuel/VP you can obtain it.
Currently, the British have it pretty easy on this map, since a mortar pit near their base can cover a lot of ground.
Langreskaya
Starting south, I would choose the Fortifications Doctrine as the OKW. While open, Langres has many choke points. Bunkers can help secure them and S-mines can be a massive pain for anyone trying to outflank you.
Kholodny Ferma
Kholodny is another great map to utilise this doctrine. If, you start in position two. The fortifications, however, are very vulnerable to both flanks and indirect fire. It is best to delay choosing your doctrine, instead countering your opponent’s selection.
Faymonville Approach
Unfortunately, Faymonville is too open to allow for effective use of many of this doctrine’s abilities. You might be alright if you stick to S-mines, a bunker or two and maybe a Pak 43, if you are not facing a lot of indirect fire and are threatened by armour. The north is a horrible position from which to use the Fortifications commander.
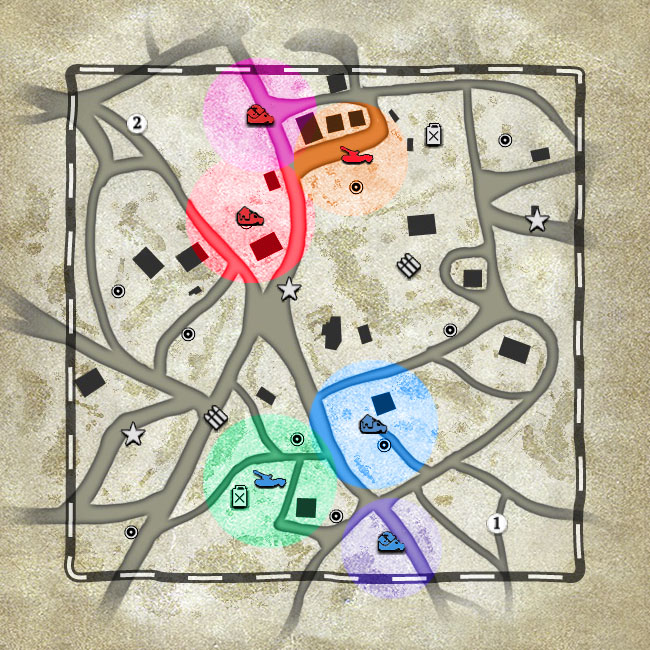
Road to Kharkov
Kharkov is a narrow map where at least two VP's are close by a suggested point to fortify: so yes, the Fortifications Doctrine is a good choice here. Be aware that at these points: you are far away from either fuel point, and the safer of the two is easy to cut off.
Semoskiy Winter
Semoskiy Winter can be a very good map for the doctrine, if you are not too focused on control of the middle. You need to allow room for give and take of the map. The north side is better for this doctrine. I would also suggest using the Flak HQ as a rear guard, to prevent harassment of cut-offs or VP's.
Other Maps
I suggest you think carefully before using Fortifications on the other maps.
Final Map Notes
These suggested positions are just that: suggestions. There is no concrete reason why another position on most of these maps cannot work. Experimentation is encouraged!
Phase One

You will need breathing room and fuel. Start by sending your Sturmpioneers straight to where you can frustrate the enemy most. Be it green cover near a cut-off, a garrison, or just an ambush around a corner. Afterwards, recruit a Volks squad and send them to support. If the Sturms are under no pressure, then have the Volks capture a point or two along the way. Cut the capping short if the pressure is on. The goal here is to prevent the enemy from gaining ground.
Company of Heroes 2 is a zero-sum game. If you gain more than the enemy, even if it’s only 6 fuel to your enemies 3; you are winning.
Recruit three Volks squads in total. Have the second help contain the enemy. If you are in their metaphorical face, they will want you gone. Be the rock to their sea. If this goes well, you can send the third Volks squad to another location, either to capture more, or form another strong point. Take the fights you can win, hold the ground you can but do not throw manpower away: you will need lots of it.
Once the enemy wave breaks across your rock, move and capture what you can without spreading out too far.
At some point, you will be forced to abandon the advanced strong point created by your first squads. When to do so will be down to your judgment. If you think you have done all the damage you can without losing squads, then leave. Capture whatever you can, reinforce, or pull back to a defensive position.
You won’t always be able to push this aggressively. The early game is unique. As the game moves forward, the map and the enemy, will likely frustrate your ability to be aggressive. Be perceptive and opportunistic, be aggressive but only if it works!
After your third Volks squad, you may have to vary your build order if your aggression was repulsed. Calling up a 4th Volks squad is a good way to cement any early gains, but it can be an over investment in infantry. It may lead to manpower starvation when you need to reinforce, place your Med HQ, tech for medics, and/or when you are considering something like a LeIG.
Alternatively, if it is a map well suited to a Kubel, go for one. It can be a great way to soak up the map that your early aggression denied the enemy. Be aware if the enemy has a counter ready or have easy access to one. In that case, avoid the Kubel.
Lastly, I generally favour using the breathing room created by early aggression, to place the Med HQ in a defensible forward position. Be very careful! There is nothing worse than being too optimistic with a position. It can lead to the OKW being limited into one small area, where you are forced to constantly defend the HQ, instead of controlling the key areas of the map.
When thinking about a forward Med HQ position, you should deem the psychological effect it will have on your enemy. In placing it too far forward, they will automatically go for indirect fire, which - when trying to build a SimCity - is counter productive. Yet, you also need to place the Med HQ far enough forward so that if you build a Pak 43 close by, it can play a role in the later stages of the game.
If you opt for the 4th Volks or the Kubel, make sure to tech immediately afterwards.
Phase Two
Once the Med HQ is placed, judge the situation and adjust accordingly.
If there are many garrisons, or the enemy is camping, requisition a LeIG. If the enemy is pushing you back with infantry, recruit an MG34 team instead. If the enemy has a light vehicle which is proving troublesome, select a Raketten.
Sooner or later, you will probably want all three (LeIG/MG34/Raketten), but change the order according to priority. Remember! You are trying to save the MP for the artillery/Pak 43 later in the game.
You should also consider a Flak Half-track if you are under stress from aggressive infantry. This can be favourable for the OKW since their MG34 is pretty poor. Consider it against a Soviet or USF player if: the Soviets go T1 or Conscript spam and is pushing hard for ‘your half’ of the map, or the USF player push you around with their Riflemen.
Beware! The Flak Half-track can be killed or overwhelmed by about anything when unsupported. It will also slow down teching. It is always a gamble, but one that may do wonders for your map control, if your early game did not go as planned.
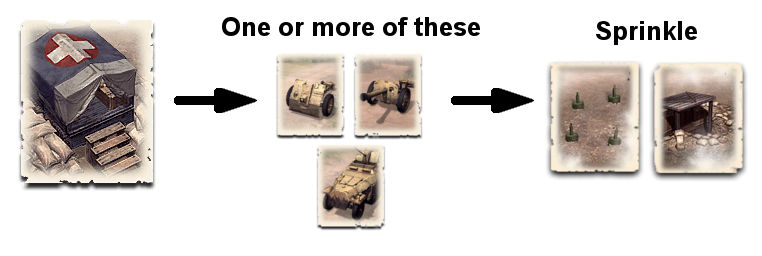
Once the Med HQ is established, you should have enough CPs to have unlocked S-mines and bunkers. Forgo the STGs on Volks in favour of placing S-mines as well as a bunker or two.
When placing S-mines, it is best to place them on choke points, or on fuel and munition points if no choke points exist. It is also a good idea to place them on two different sides of the map. It is unlikely the enemy will spend munitions and manpower on two mine detectors. So, spreading your S-mines out will present more of a threat. Also, consider interrupting the construction of your mines or placing them in such a way, so that not all the patches are completed. This will maximise the effectiveness of your S-mines, because your opponent will still have avoid them, and/or neutralize these patches with the same amount of time, even though they have cost you less.
You should not be too aggressive with bunkers. Bunkers too far forward are destroyed easily, once discovered. AT guns or a mortar counter them pretty well. Instead, place your bunkers as you might a defensive MG. Cover important points on your side of the map, or use them to help defend the Med HQ freeing up more valuable units.
Well, good luck, Penal Battalions! You are on clearing duty...
Also, since most players hate bunkers and want them gone as fast as possible, try using them as bait for a trap. Place a mine in front of the bunker to snare tanks, or have units waiting in ambush for squads flanking the bunker.
The flank emplacement is a great tool to use as area denial, forcing squads and even light vehicles off large sections of map with its suppression capabilities, penetrations values and even some deflection damage.
These defensive buildings generally won’t win you more than one fight, since the enemy won’t return after their discovery. Mines will be swept, bunkers destroyed; but, these structures buy you time and resources while denying them to your opponent.
Continue to play for half or more of the map. Be aggressive if you can but don’t push too hard. The Med HQ’s forward retreat point can be good but it’s not really needed. It may over-congest the Med HQ and lead your opponent to think "Hmm, that’s a nice juicy target for some rocket artillery!’-- The last thing you want to encourage with this build.
Once you are above 100 fuel, preemptively call in a truck and place the Schwerer HQ somewhere easy to defend if it is attacked. It can be useful to cover the Med HQ with the Schwerer HQ's gun, improving the synergy of your defence. Do not place it too close as this just creates a target.
Phase Three
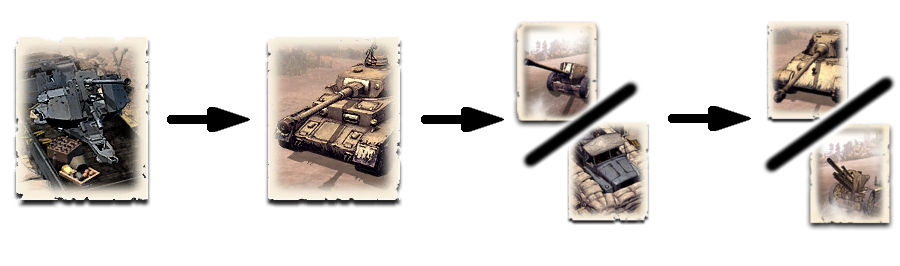
With the Schwerer HQ placed, you should now be thinking about two transitions. If the match has been going well, calling in a Panzer IV is your best bet to seal the win. Having a Panzer IV means you can hunt Allied rocket artillery, which is your worst nightmare, and fight off any infantry squads that get in your way.
I advise calling in a Panzer IV mostly because a Panther/JPiV and a Pak 43 is anti-tank overkill. The Panzer IV is very effective in an anti-infantry role and capable in an anti-tank one, giving much needed flexibility to the somewhat static strategy Fortifications promotes. The Panzer IV does generally lose head to head fights with comparable medium tanks, more specifically the Panzer IV is beaten by: Jacksons, EZ8’s Sherman’s, M10's, T-34-85’s, SU-85's and Firefly's. All of which cost around the same.
While multiple Panzer IV's will allow for a very strong mid-game, they will become increasingly less effective as allied tank destroyers and more efficient mediums saturate the opposing forces. As the real anti-tank power in a Panzer IV heavy build comes from the Pak 43, aggressive pushes will be limited.
The only time I would recommend building a second Panzer IV is to close out a game you are already winning, allowing you to dive an enemy position or base and finish the game, if you are low on VP's and won’t have time for anything else, or are under significant pressure and need something to prevent a forward position being overrun.
If the match is still undecided, place a Pak 43 down in range to be reinforced from the Med HQ, but behind a building if possible. It adds protection. Be wary of allowing enemy units into said building. Consider placing some wire to ‘lock’ the door on the opponent's approach.
Keep in mind that the Pak 43 cannot shoot through your own forward bases. Trying to do so will result in massive damage to them.
Next, set up the Mechanised HQ and play for a King Tiger. Or…
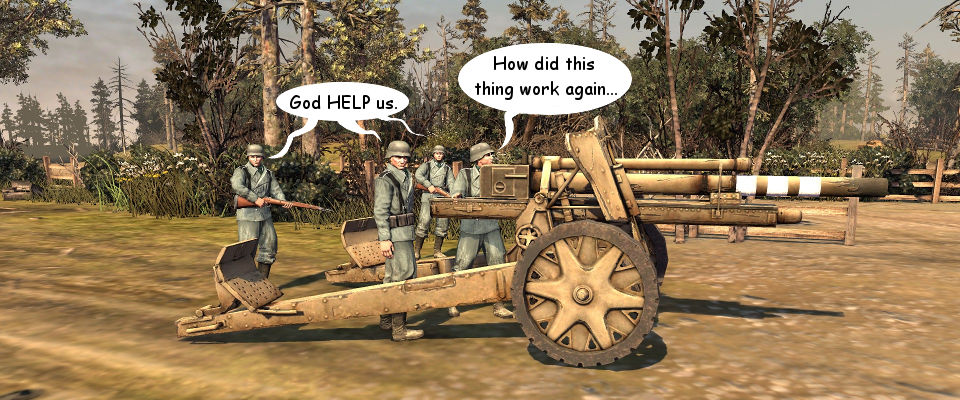
The most useless person in the game award goes to...!
Construct a LeFH! These things are generally consigned to 2v2 and up, but you didnt chose to use the Fortifications Doctrine because it was the most effective, so why not build this and watch as it doesn’t kill UKF emplacements! More seriously, it is actually quite good. It is best to aim it at wherever your opponent has their retreat point to inflict maximum manpower damage.
It is worth thinking about getting a second LeIG instead of the LeFH. They are cheaper, mobile, and are possibly more effective.
However, if it isn’t going well, a Pak 43 is the next step. It is probably the most powerful anti-tank ‘thing’ in the game, which can secure your immediate existence in the match. Once you stabilise, seek a Panzer IV and continue as before.
A note on Obersoldaten: generally, I don't think they are worth it. By the time they arrive they are without vet and they are vulnerable to vehicles already on the field. But, if you have lost Volks, replacing them with Obers can be a nice way of 'trading up'.
If you have a Panzer IV, a Pak 43 plus artillery or a King Tiger, the game is likely in the bag.
Endnotes
Remember: be nice, be cool.
 Finndeed
  Yukiko
  MajorBloodnok