
Foreword
Hope you enjoyed the highlight there - an epic battle in an area where nobody really uses. However to a few who are most deviant and skimming, that area is wrought with potential exploitation and surprises. In this guide I will discuss my general feelings and outlook on strategies that work in (6-8)Port of Hamburg in my humblest opinions after playing the map hundreds of times. There will be contributions from other resident COH2.ORG strategists as well. I will also share some things that you might not have realised yet about this map.
*The guide will primarily focus on the 4v4 aspect. Although I feel that the map plays better and is more balanced in 3v3 mode, 4v4 is more popular so I shall cater to the more popular mode.
*The guide will primarily focus on the 4v4 aspect. Although I feel that the map plays better and is more balanced in 3v3 mode, 4v4 is more popular so I shall cater to the more popular mode.
Overview
Map
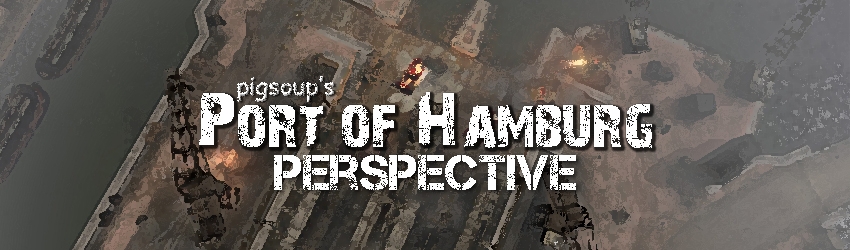
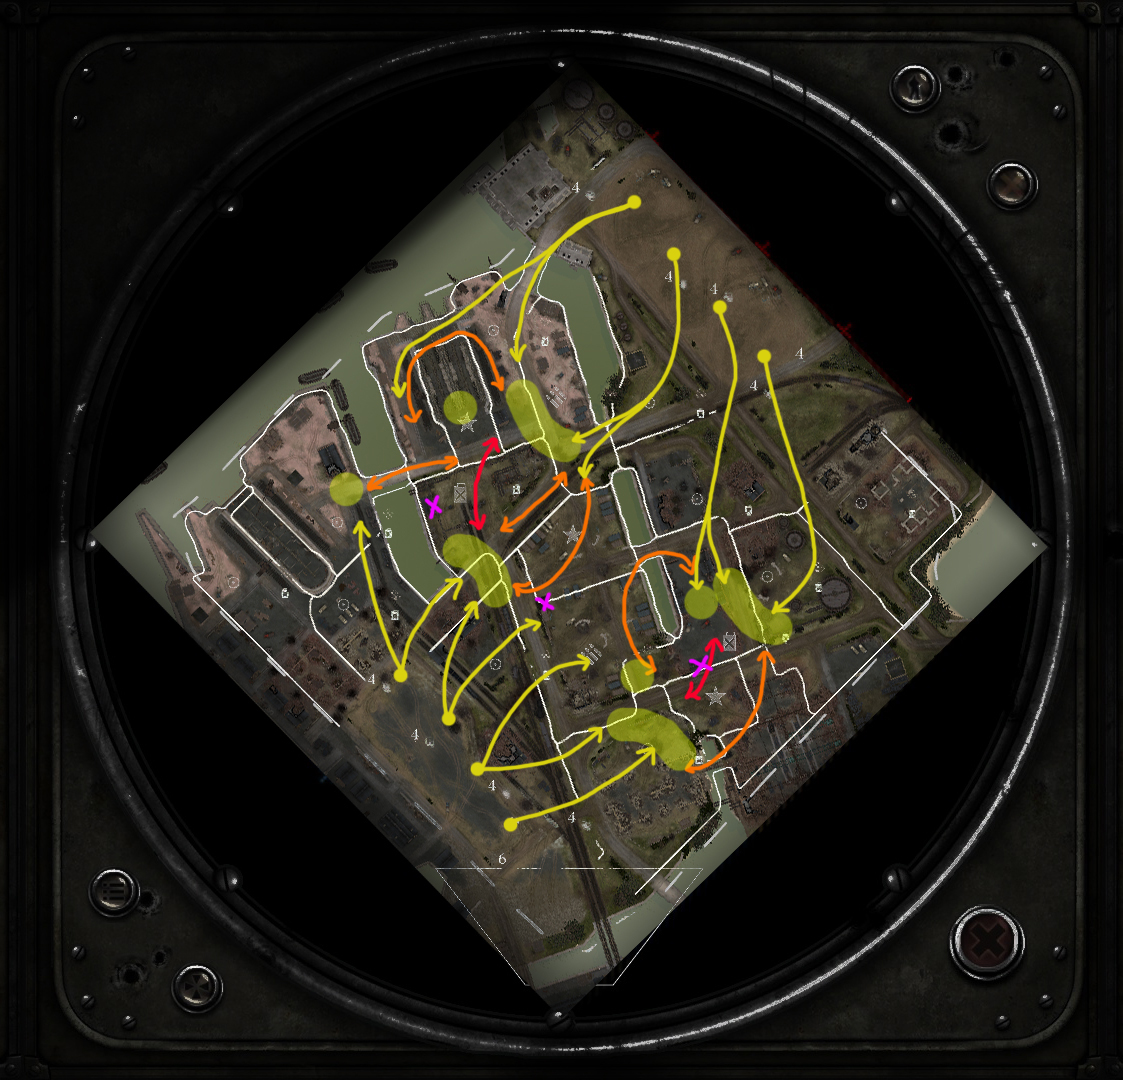
 The Tactical Map
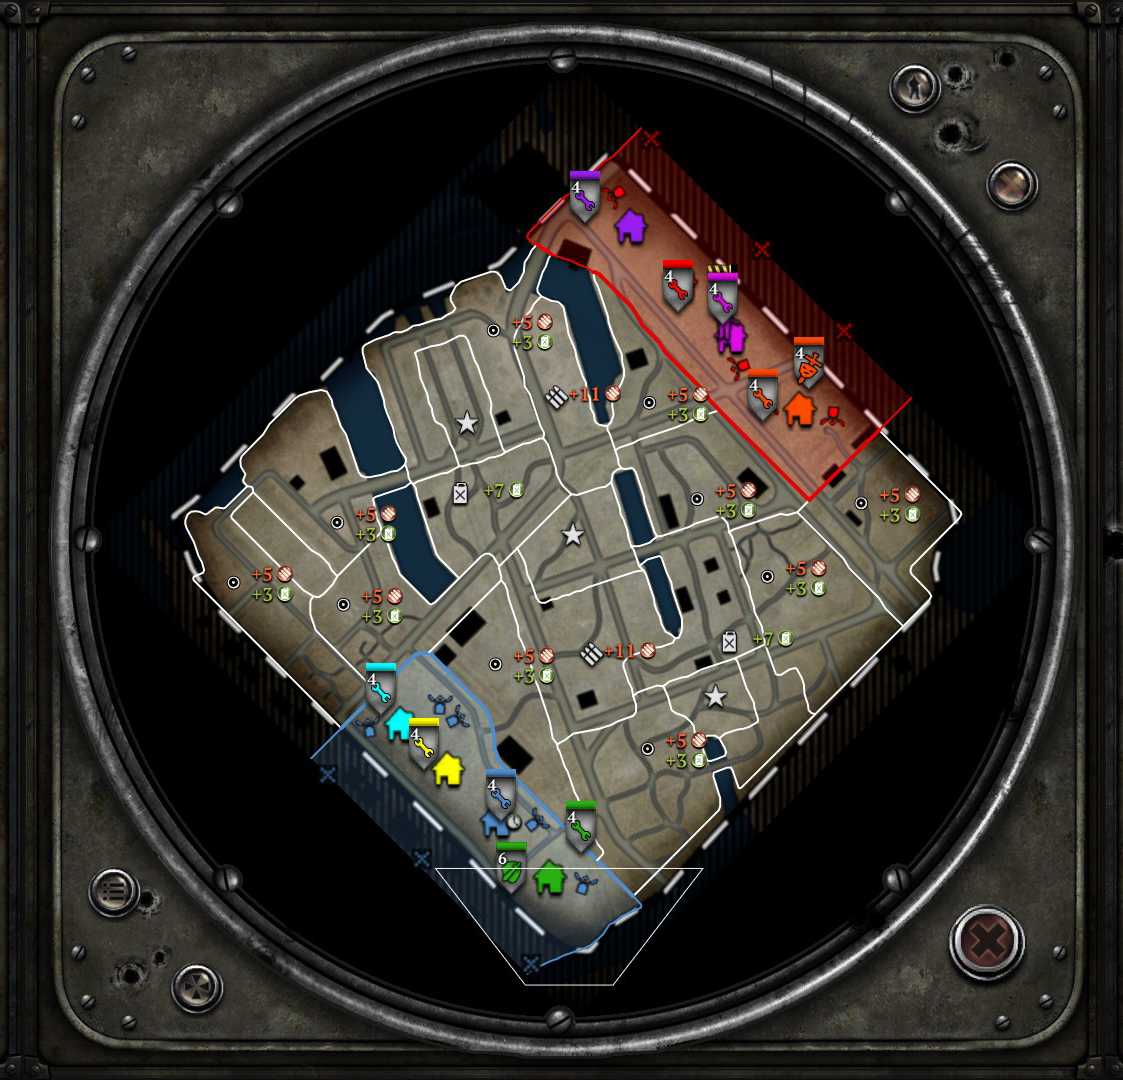
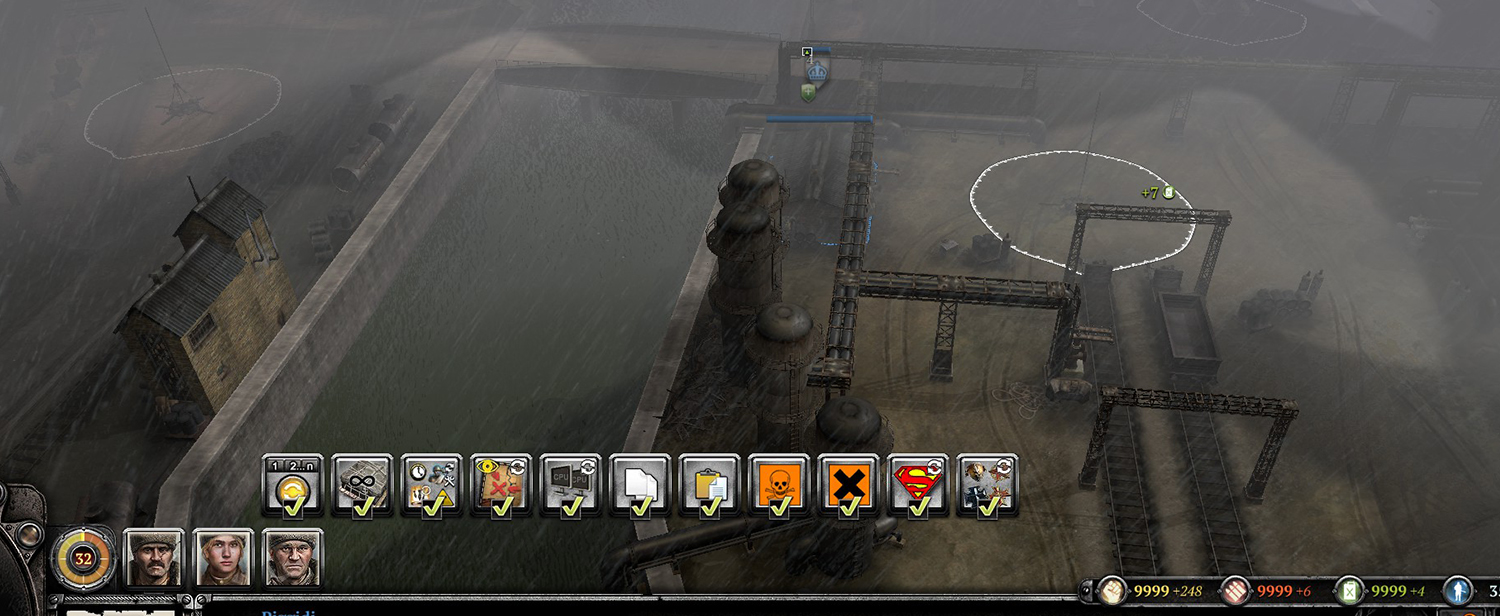
 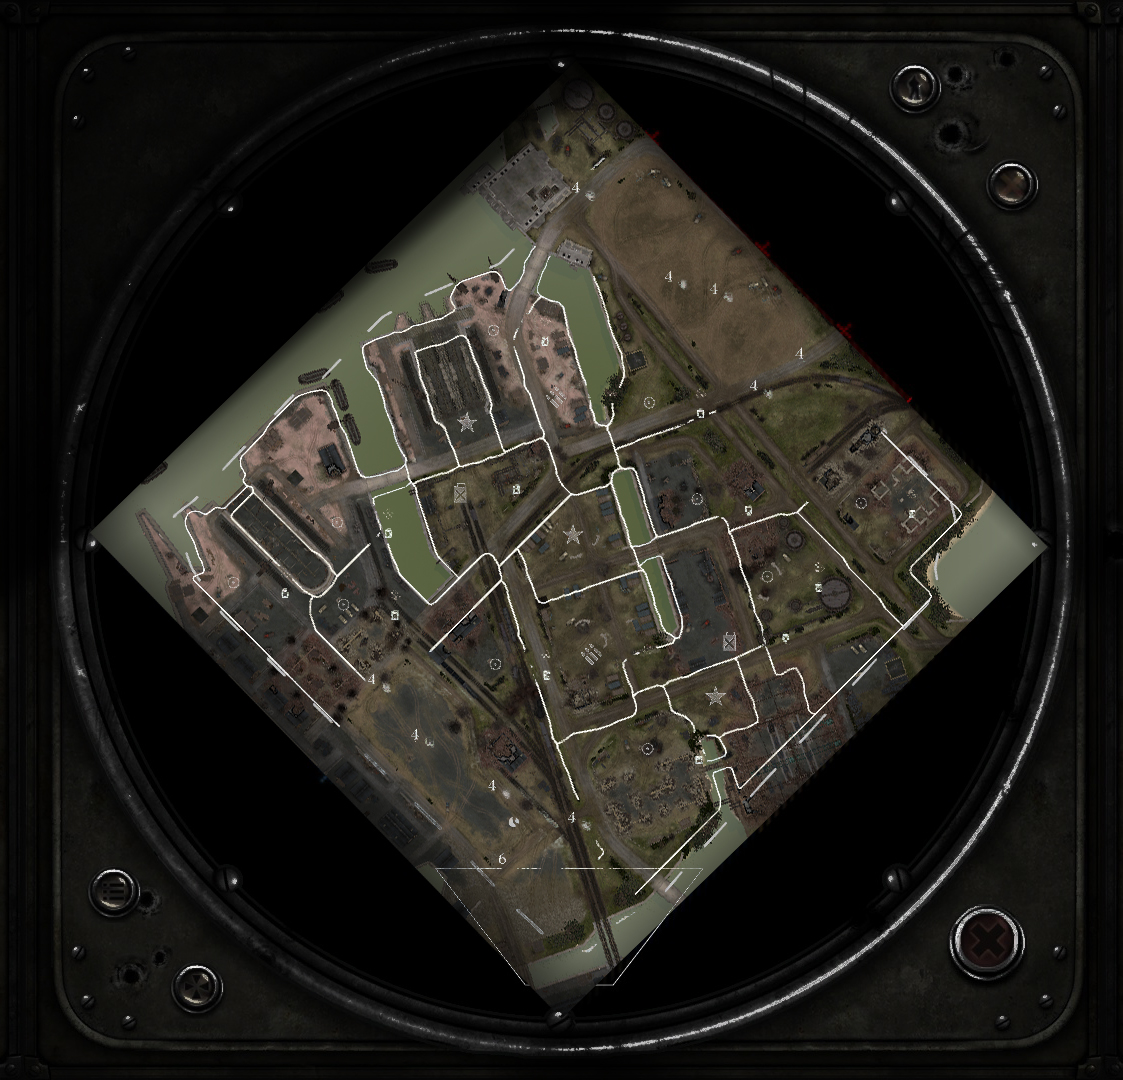 The Aerial View
 As it can be guessed from the map layout itself, in 4v4, the map usually divides in to two 2v2s at each fuel points and in 3v3, 2v1s at each fuel points. Now we will look at the how the map plays out more in depth.
Resources
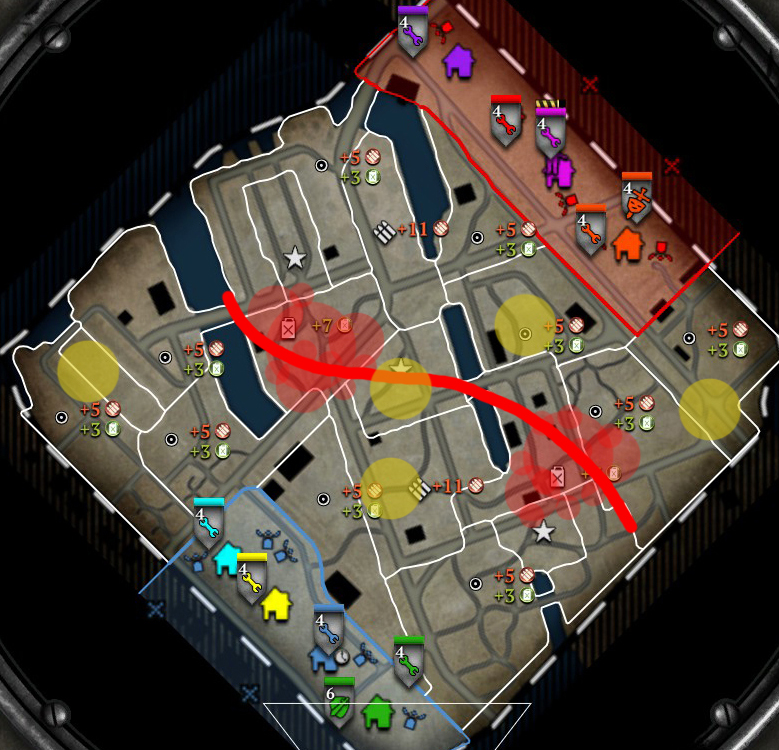
 Green: safe - Yellow: contested - Red: heavily contested
 The map is kitted with the standard 10 Resource Points, 2 of each Munition and Fuel Points and 3 Victory Points. If the map is split in half, both team will get 36 munition and 22 fuel income per minute. This income can be supplemented with caches and the map does have a plethora of safe(green) RPs to build caches on. Use this to your advantage if your team is not able to get any of the FPs(red) which is a big possibility since the FPs will be the most hotly contested area throughout the game. If the frontline is more mobile than static, some more territory points(yellow) will come into play.
Frontline and Staging Area
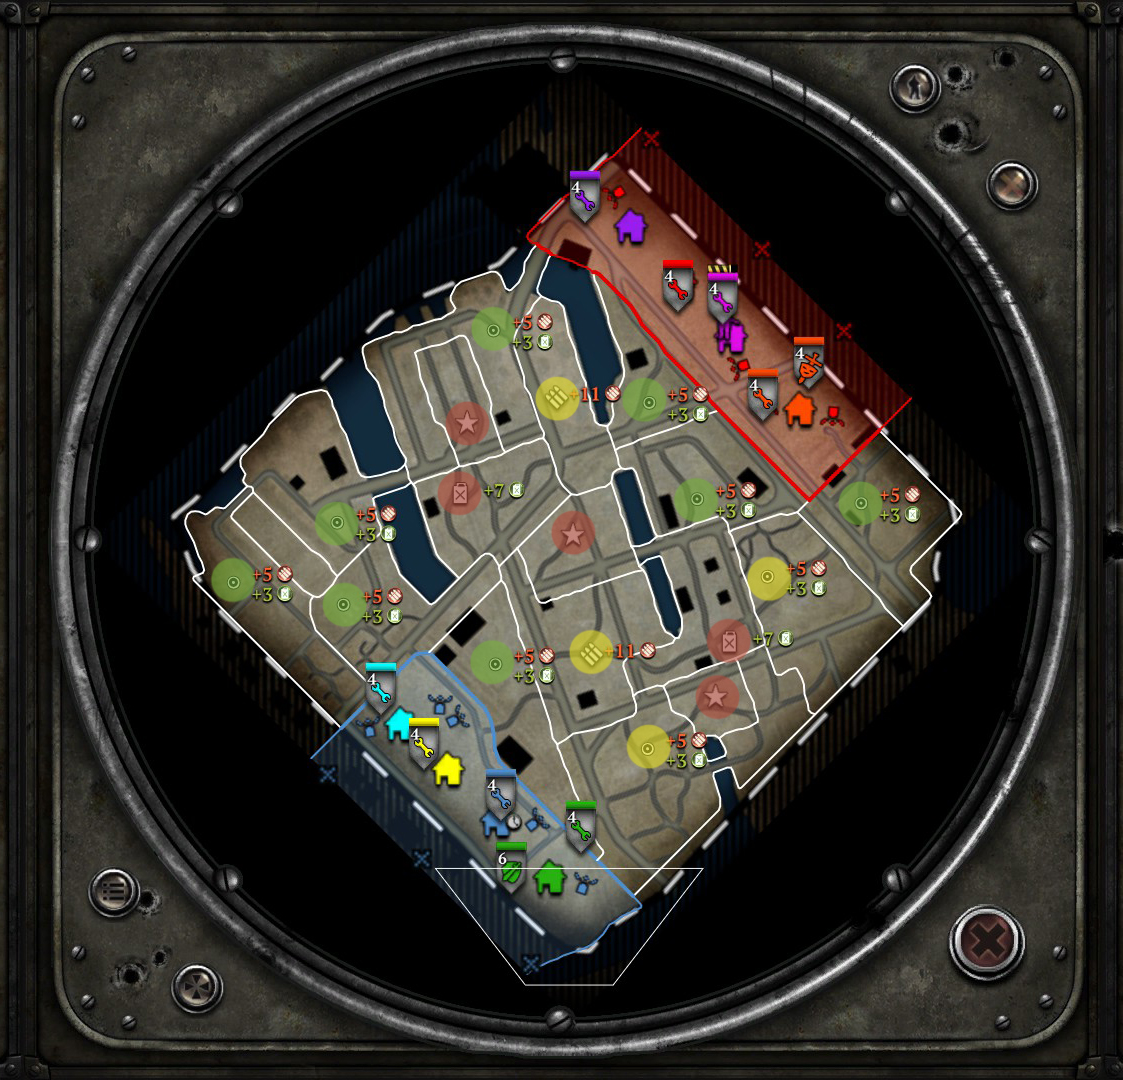
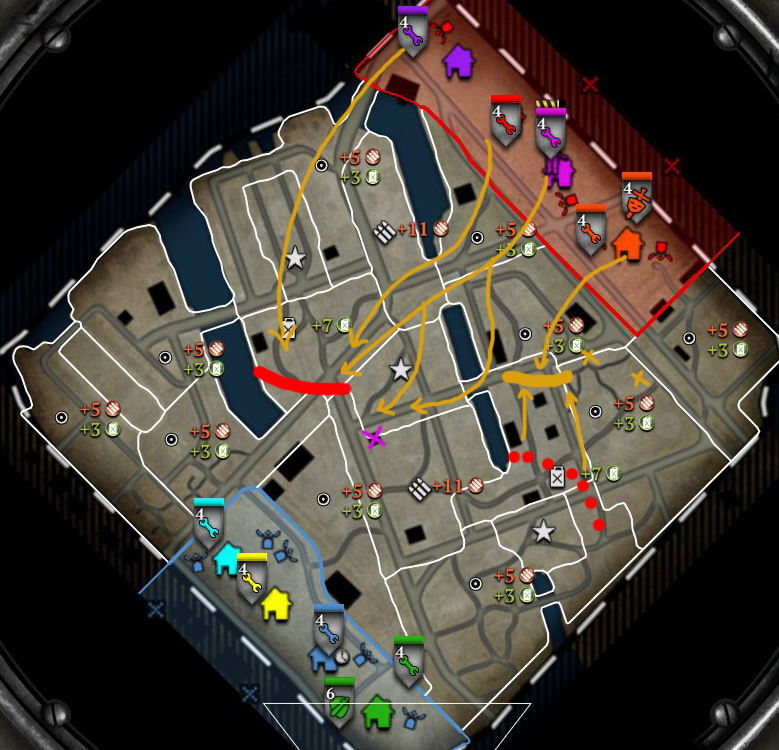
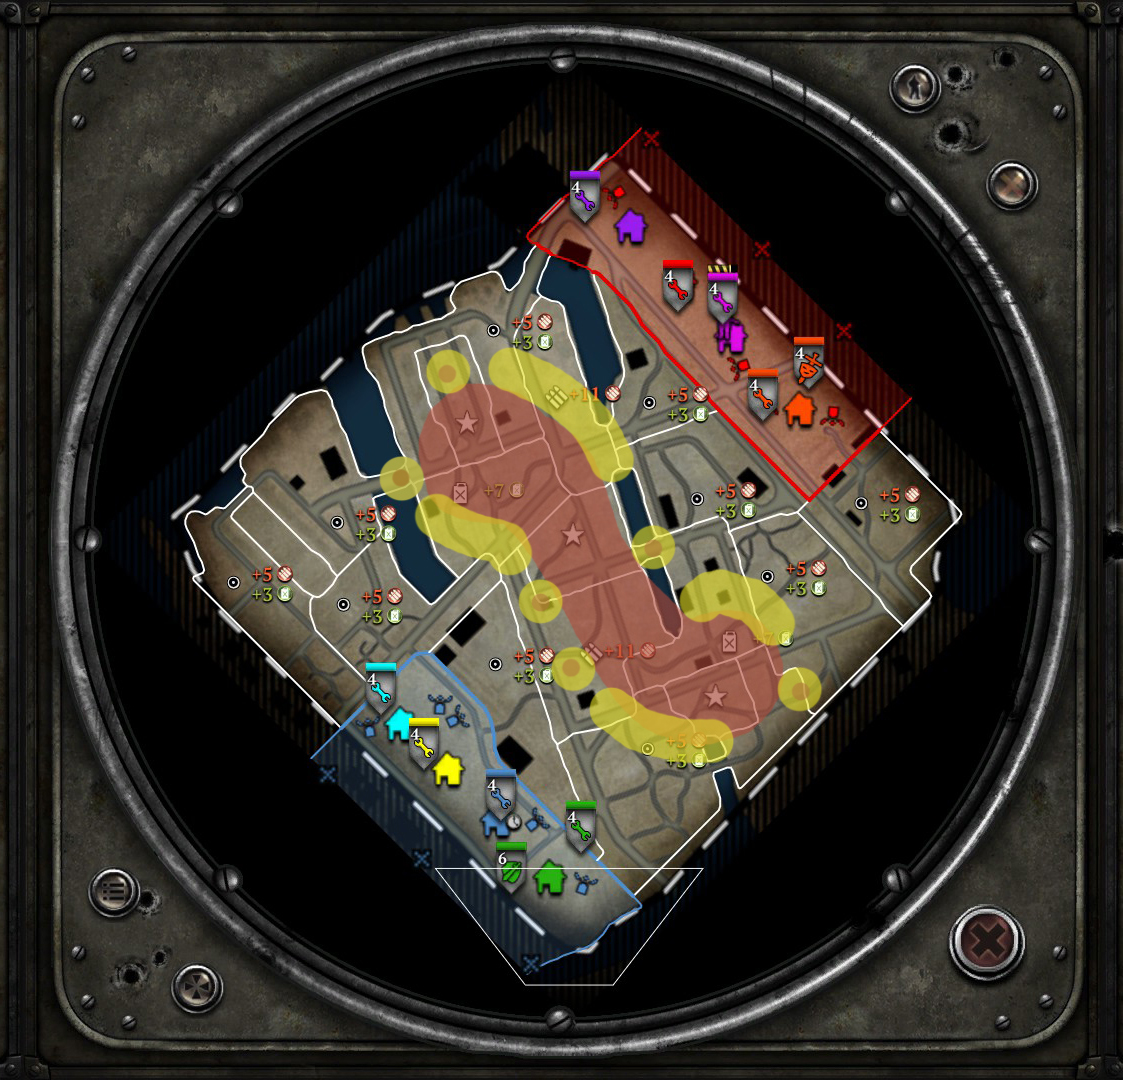 Red: frontline - Yellow: staging area
 The red area is the usual frontline. It is the area your team and you would want to get ideally apart from the total dominance. In the yellow area, there will be support weapons and it is highly likely place where rocket artillery vehicles will move up to when starting a salvo. So keep those sneaky rakentenwerfers and partisans ready! The yellow areas with an orange dot are the areas that might not get used because both teams might be completely pigeon holed into the FPs. When that happens, the whole middle VP area might get ignored, too. This is not advisable. You want frontline to fluctuate! If you are losing, you want to open more areas for possible flanks to gain lost territories. If you are winning, you want to exploit the advantage by spreading out and harassing so the enemy has not a single priority.
Behind the yellow areas are where Forward Retreat Points are usually placed. About half way between the frontline and the base, and FRP there would still save you ~40-60 seconds every retreat (round trip). Put your FRPs where your support weapons will be not! When rocket artillery arrives, the two most juicy targets are FRPs and support weapons - make the enemy choose between them and don't let both of them get devastated in a single salvo! It is all about spreading the traffic which I will talk about more later.
Map Tactics and Strategies
Now it is important to be aware of the whole map and not just your sector. But there is nothing wrong with mentalising the map into sectors. I like to think of the map as 3 sectors - top, mid and bottom.
Top/Port
If there is one biggest fault that prohibits this map from being perfect, it would be size... especially in 4v4 mode. The second one would be that at each FP, there are a key building that very well determines who wins the first engagement most of the time.
 The problem building and its sight range
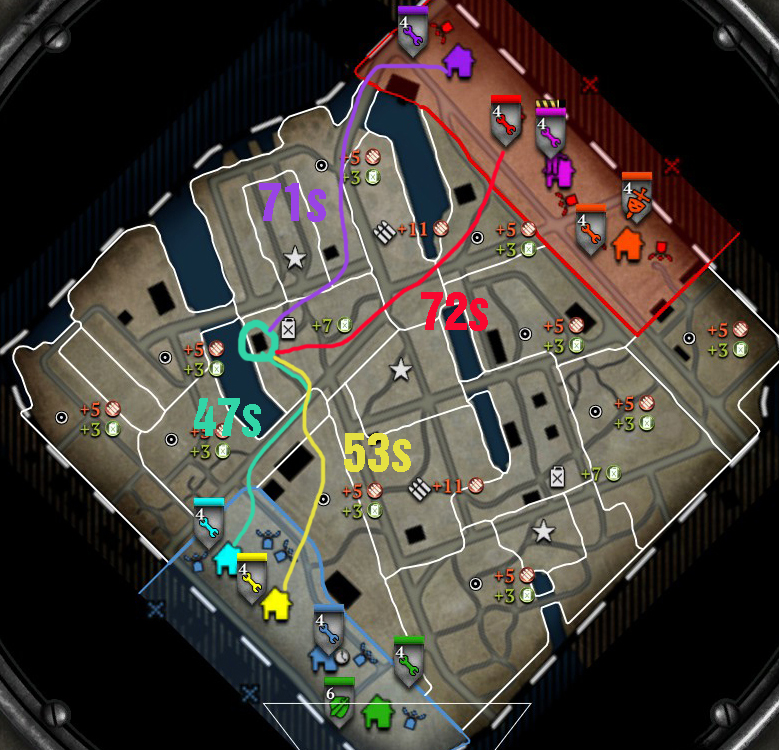 Distance to the building in seconds (simply rushed)
With whopping 25 seconds advantage the light blue has over the enemy, the South Spawn has an enormous advantage in the beginning over the North Spawn.
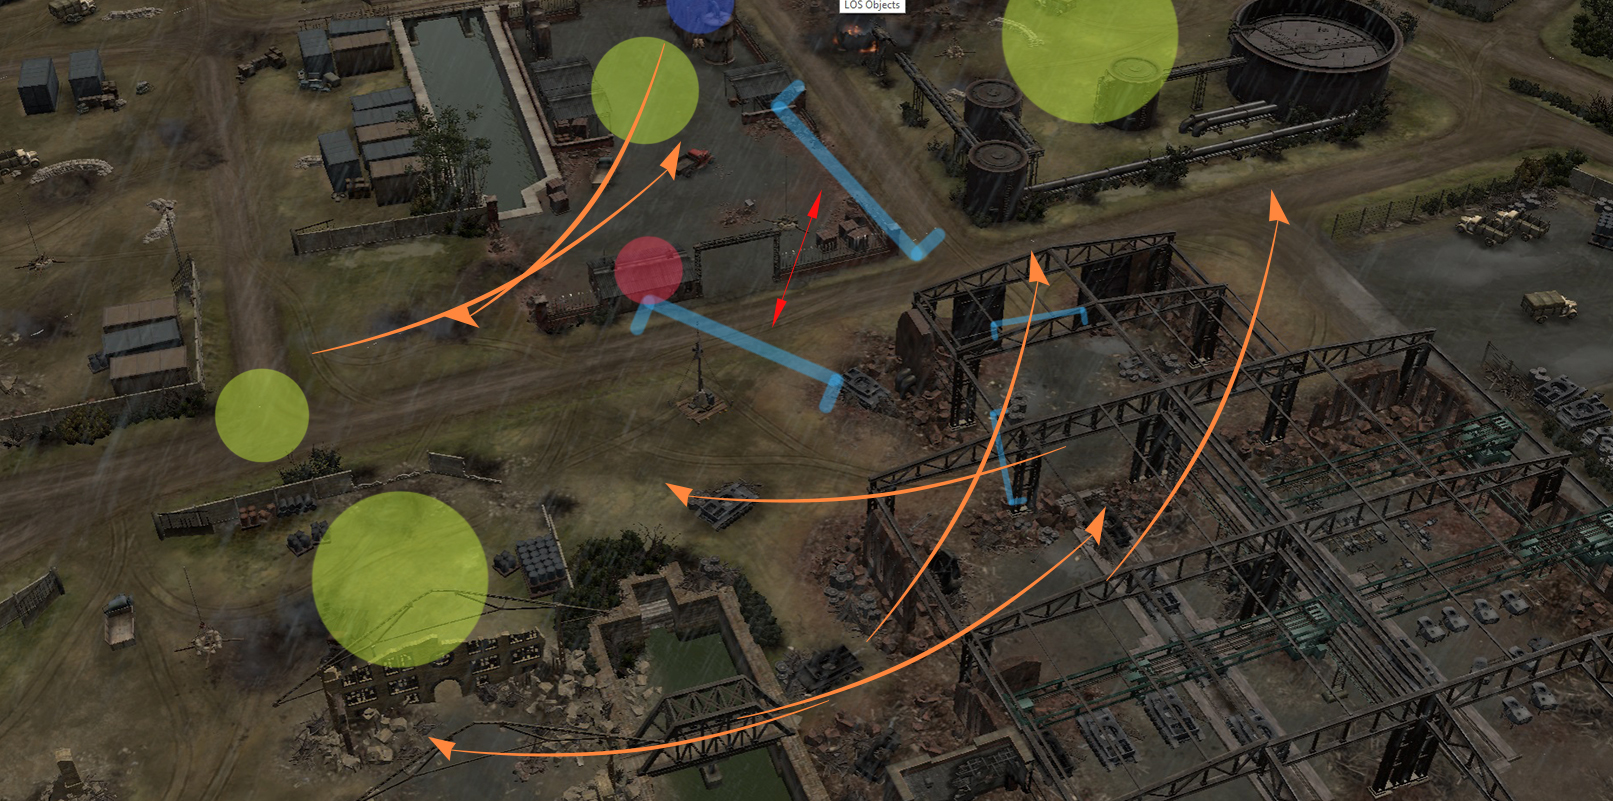
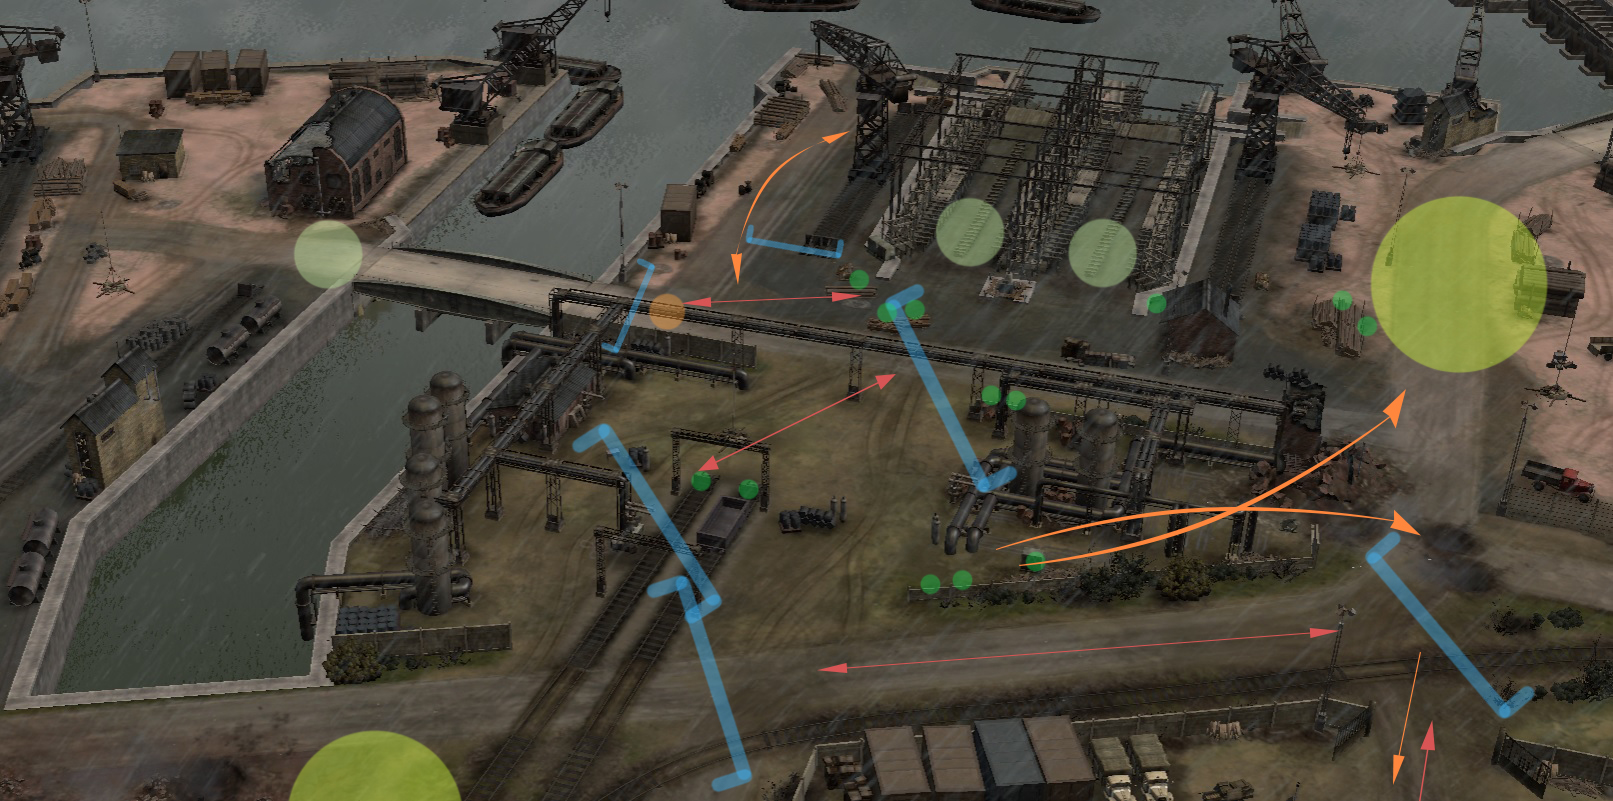 Green dot: green cover - Limegreen dot: staging area - Lightgreen: underused staging area
The thick blue brackets is usually where each side's HMG will be placed covering the FP and the big road. If the enemy has one HMGs watching each of those two hot points, use the other routes indicated by red and orange arrows by the top bridge and middle VP. If the enemy is spamming HMGs to cover all points, mortar is your answer. If you got unlucky and got NS and lost the key building, you can get a flamer and burn the building out from the light orange dot by the bridge. The thin blue brackets indicate areas where there are sparsely any frontline. Also keep in mind of the very top wooden plank portion where the ships are sent off to the sea: the path is wide enough even for a KT!
You might have noticed how the NS has two main frontline and the SS has one larger frontline. This is due to layout of the masonry fence that divides the top and mid, and it is another disadvantage that NS has that you should keep in mind.
The lightgreen dots are sparsely used staging areas. You might be discouraged to use these areas because you are going get cutoff more easily. It is a legitimate concern but if the enemy is ruthless against your main staging area(limegreen dot), you might have to take the risk of getting cutoff and use multiple staging areas. This is especially true when rocket artillery shows up. By having multiple staging areas, you are reducing the overall traffic.
If you have won skirmishes and caused a considerable retreat on the enemy, chase them if you have enough forces left! Decap the MP if you are SS. Go across the bridge and harass if you are NS. Push back them mortars! This is very important at every stage of the game but it is especially important for Allies early game where you want to catch the OKW MedHQ going up or at least know where it is asap.
The stone bridge also sports the famous German engineering. A demolition charge will do about 10% of damage. Anti-tank guns and mortars are better for destroying the bridge but the bridge bounces quiet a lot of shots.
The problem building and its sight range Distance to the building in seconds (simply rushed) With whopping 25 seconds advantage the light blue has over the enemy, the South Spawn has an enormous advantage in the beginning over the North Spawn.
Green dot: green cover - Limegreen dot: staging area - Lightgreen: underused staging area The thick blue brackets is usually where each side's HMG will be placed covering the FP and the big road. If the enemy has one HMGs watching each of those two hot points, use the other routes indicated by red and orange arrows by the top bridge and middle VP. If the enemy is spamming HMGs to cover all points, mortar is your answer. If you got unlucky and got NS and lost the key building, you can get a flamer and burn the building out from the light orange dot by the bridge. The thin blue brackets indicate areas where there are sparsely any frontline. Also keep in mind of the very top wooden plank portion where the ships are sent off to the sea: the path is wide enough even for a KT!
You might have noticed how the NS has two main frontline and the SS has one larger frontline. This is due to layout of the masonry fence that divides the top and mid, and it is another disadvantage that NS has that you should keep in mind.
The lightgreen dots are sparsely used staging areas. You might be discouraged to use these areas because you are going get cutoff more easily. It is a legitimate concern but if the enemy is ruthless against your main staging area(limegreen dot), you might have to take the risk of getting cutoff and use multiple staging areas. This is especially true when rocket artillery shows up. By having multiple staging areas, you are reducing the overall traffic.
If you have won skirmishes and caused a considerable retreat on the enemy, chase them if you have enough forces left! Decap the MP if you are SS. Go across the bridge and harass if you are NS. Push back them mortars! This is very important at every stage of the game but it is especially important for Allies early game where you want to catch the OKW MedHQ going up or at least know where it is asap.
The stone bridge also sports the famous German engineering. A demolition charge will do about 10% of damage. Anti-tank guns and mortars are better for destroying the bridge but the bridge bounces quiet a lot of shots.
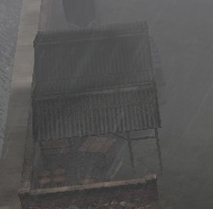
Middle/Yard
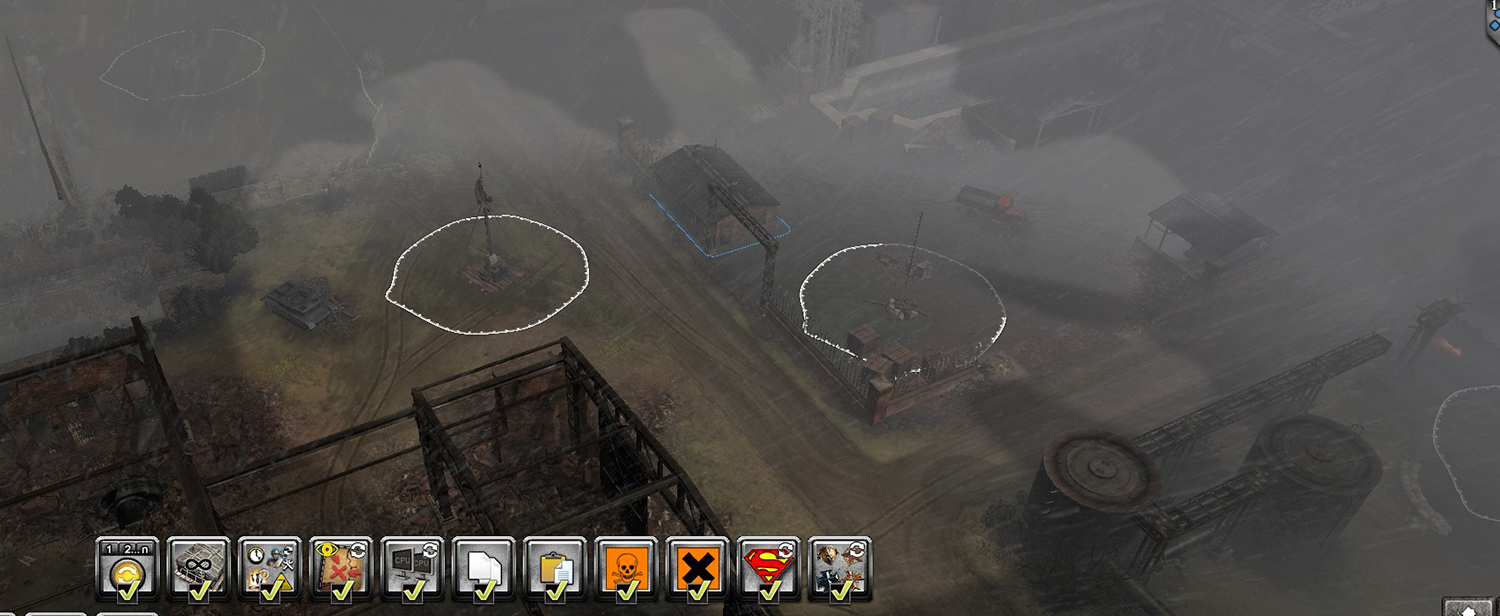
 Red: key building - Blue: key bridge
 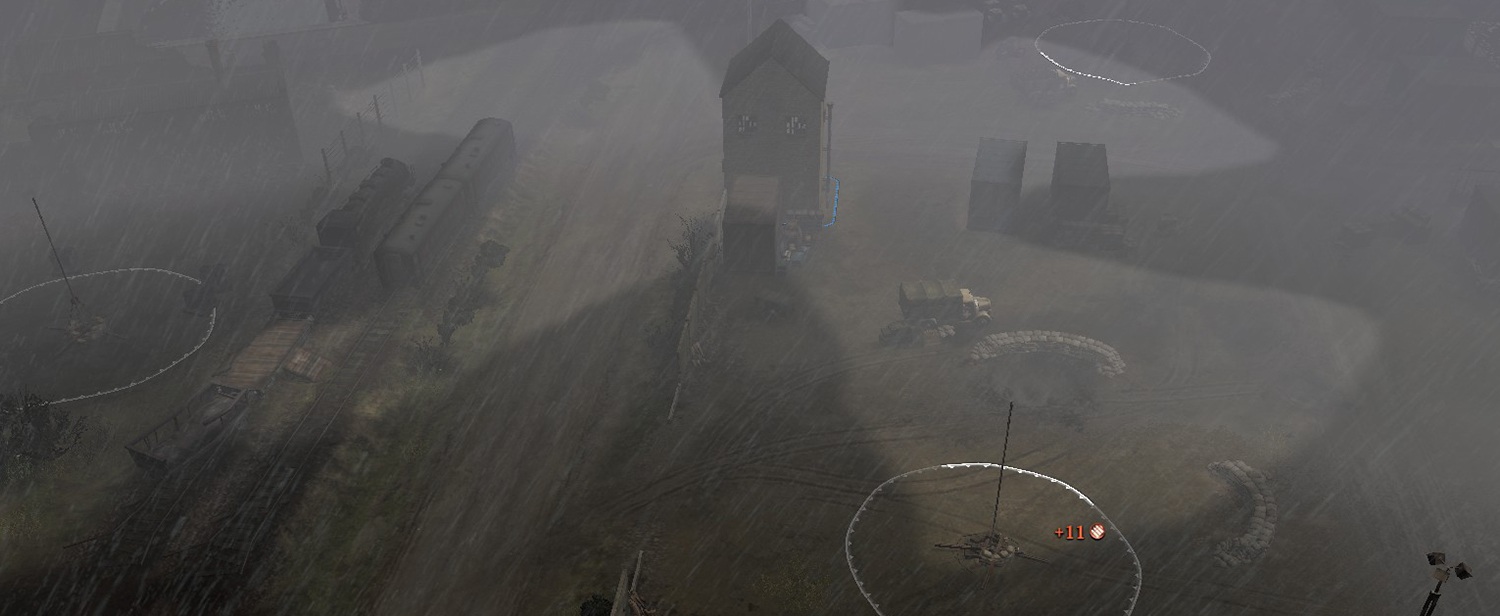 The key building sight range
 The middle is usually crewed by a skeleton crew especially before mid-late game. Only when the VP starts to matter the middle comes into focus. This is usually after countless head-budding at each FPs for good 20 minutes. But as you can see with the arrows, the middle is the facilitator of flanks both into bottom and top. Not to mention there is a tasty MP to harass for NS team. For some reason if you cannot spare anything for the middle, at least put down some defensive mines.
The obvious problem is that the region also has a key building(red dot) closer to SS. It gives a perfect sight to spot any flanks by NS team. It does not cover the middle VP too much but having any unit in that building as SS strictly for reconnaissance is invaluable. This is especially true since the building also gives a great sight towards SS, too. If NS team is able to capture it, they will be able to seriously disrupt both top and bottom SS staging area. It is for this reason that SS team should always rush a unit into the building as soon as possible and NS team should try to make a play for it if they want more options at both FPs.
There is also a very important wooden bridge(blue) that can be a boon or a headache to both teams. Unlike the stone bridge, it is destroyed with a single demo and even light indirect fire will do good damage to its structural integrity: use it with utmost caution! The enemy let you use the bridge 2 times to pull of a big flank with no big trouble and you see no resistance the third time but a measly conscript? Maybe he is reeling you in for a big demo surprise. I personally like to destroy the bridge if our team is on the back-foot and cannot spare enough force to cross the bridge and do a flank.
If you got SS you might also want to think twice about knocking down the stone fence above the key building. Sometimes keeping that chokepoint can serve you better... but sometimes not. Be mindful.
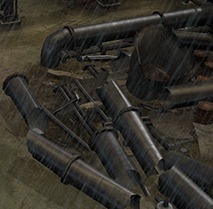
Bottom/Factory
 The problem building and its sight range
 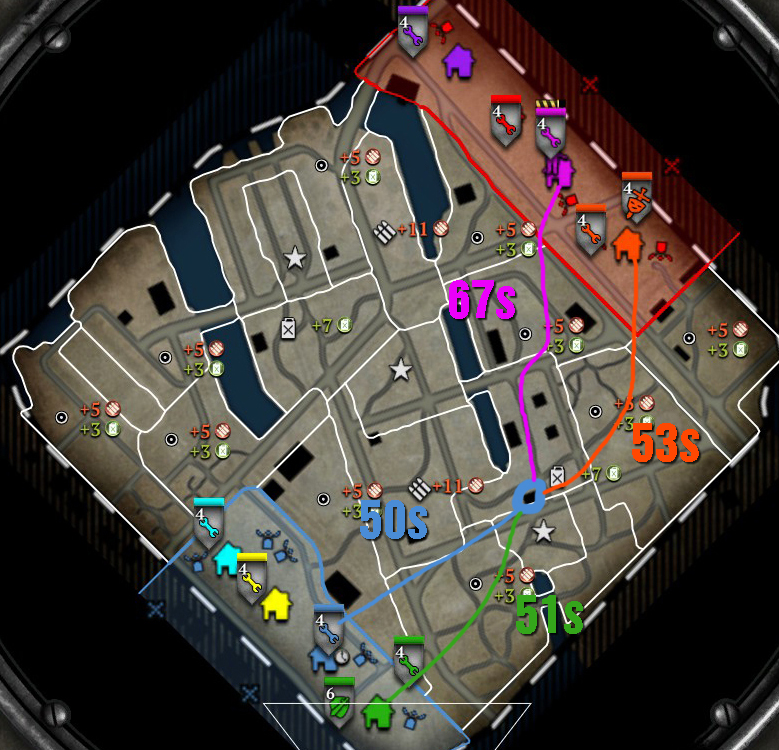 Distance to the building in seconds (simply rushed)
 Even at the bottom section, the SS team is able to beat NS team to the key building.
 Limegreen dot: staging area - Red: key building - Blue: good building
 Compared to the top, this area seems smaller but that is because a huge factory ruins sits on the edge. It is accessible and it can provide a valuable flanking routes after the initial engagement. Also do not forget that cute little bridge bottom left, especially if you are SS team. It is definitely hard to counter an HMG spam in this sector - much more so than on the top. But there is plenty of green covers on both sides and even on the FP. This is where the mid comes into play to open up this area. The NS team has a very nice building indicated by the blue dot that looks over the wooden bridge. If you get continually harassed, it is definitely worth using. If you are SS team and flanking through the bridge, it can be worth it to take it because although you will not be able to shoot directly south, you get a great vision and stall possible reinforcement coming that way from NS.
Same idea as before: push up if you won the engagement; catch an ambulance or OKW MedHQ with its pants down! Or even a greedy mortar emplacement plays! The key building, even when demolished provides a nice sight+shot blocker and good players' tanks love to play around it. Get ready to micro that ATG!
Meta-Strategies
Now let's get to the fun part where I can talk about how my team plays the map. Meta-Strategies from other strategists might be added. When it is just a normal game and we do not know if the opponents are good or not, we just go standard 2:2 split towards both FPs. I mean why not? Both sides have enough but not too much spaces and routes that both support weapon heavy strats and infantry heavy strats can work.
 How the map plays out usually
But people do not need advice about when things are going good. It is when shit hits the fans that things get interesting and your teams' strength to adapt and coordinate is tested. If we are stuck at dead 50:50 split and the skirmishes are such devastating stalemates that keeps both you and the enemy occupied 100%, it might be worth it to stay there and keep the stalemate.
 Stalemate
Still make sure to harass enemy points marked by yellow. There are two big opportunities to break the stalemate: they are when light vehicles arrive and when tanks arrive. Light vehicles from Ostheer Flame HT to Soviet's T70, if arrive early enough or just micro-ed good, will have a big chance to win the skirmish without too big of infantry casualty which allows you to move up the front line.
If we fail to break the stalemate with our first medium tanks, that is when we pull away from the stalemate no matter what (on the side that we do not have FP. It is obvious at this point that the enemy is playing at our level or greater that simple 1:1 ratio between us and them will only result in stalemates. We make tactical retreat without trying to push for the last time.
 An example of tactical retreat for NS on bottom FP
As you can see from the diagram, we fall back and one NS member hold the new frontline - positioned along chokepoints - while another NS member who was at bottom FP go top and/or mid-top to effectively start a 3v2 up top. The NS member who is holding the orange line should know that he can be flanked to the right and put down defensive mines.
Then two things can happen: the SS team on bottom FPs can try to break the new orange frontline or swing themselves. The NS member who is still at bot have to keep an eye out to find out which. If he is under full assault, his job is to stop or stall with maximum enemy casualties. If he detects a swing, he himself can do a rotate (using the wooden bridge) and disrupt enemy's coordination.
Of course, this rotation tactic works best when done in secret. The rotated member should be on the attack just a few moments before or after the engagement has started.
If it is a failure, at least try to maintain the status quo and wait to see if the enemy is going to exploit the failure. If it is a success, it is best if you can keep the momentum going. As you can see, there is not much to take on the top even if the enemy is in full route. If possible - enough tanks and infantry standing, the three people now on top/mid should rotate down and break the stalemate at the bottom. The knowledge of whether you have enough to break another stalemate is the responsibility of the teammate who stood behind.
We might try this from the very start if we know the enemy is really good: 3v2 push to secure one FP at least then go to other FP or at least capture the mid.
If you are the one getting swung on, the priority should be 1.warning your team 2.not losing everything and 3.stalling. It is important to realise that your team might handily defeat one such rotation but the enemy might try again. It is important to not let your enemy take the flow. Once their rotation is over, attack yourself to break their tempo.
How the map plays out usually But people do not need advice about when things are going good. It is when shit hits the fans that things get interesting and your teams' strength to adapt and coordinate is tested. If we are stuck at dead 50:50 split and the skirmishes are such devastating stalemates that keeps both you and the enemy occupied 100%, it might be worth it to stay there and keep the stalemate.
Stalemate Still make sure to harass enemy points marked by yellow. There are two big opportunities to break the stalemate: they are when light vehicles arrive and when tanks arrive. Light vehicles from Ostheer Flame HT to Soviet's T70, if arrive early enough or just micro-ed good, will have a big chance to win the skirmish without too big of infantry casualty which allows you to move up the front line.
If we fail to break the stalemate with our first medium tanks, that is when we pull away from the stalemate no matter what (on the side that we do not have FP. It is obvious at this point that the enemy is playing at our level or greater that simple 1:1 ratio between us and them will only result in stalemates. We make tactical retreat without trying to push for the last time.
An example of tactical retreat for NS on bottom FP As you can see from the diagram, we fall back and one NS member hold the new frontline - positioned along chokepoints - while another NS member who was at bottom FP go top and/or mid-top to effectively start a 3v2 up top. The NS member who is holding the orange line should know that he can be flanked to the right and put down defensive mines.
Then two things can happen: the SS team on bottom FPs can try to break the new orange frontline or swing themselves. The NS member who is still at bot have to keep an eye out to find out which. If he is under full assault, his job is to stop or stall with maximum enemy casualties. If he detects a swing, he himself can do a rotate (using the wooden bridge) and disrupt enemy's coordination.
Of course, this rotation tactic works best when done in secret. The rotated member should be on the attack just a few moments before or after the engagement has started.
If it is a failure, at least try to maintain the status quo and wait to see if the enemy is going to exploit the failure. If it is a success, it is best if you can keep the momentum going. As you can see, there is not much to take on the top even if the enemy is in full route. If possible - enough tanks and infantry standing, the three people now on top/mid should rotate down and break the stalemate at the bottom. The knowledge of whether you have enough to break another stalemate is the responsibility of the teammate who stood behind.
We might try this from the very start if we know the enemy is really good: 3v2 push to secure one FP at least then go to other FP or at least capture the mid.
If you are the one getting swung on, the priority should be 1.warning your team 2.not losing everything and 3.stalling. It is important to realise that your team might handily defeat one such rotation but the enemy might try again. It is important to not let your enemy take the flow. Once their rotation is over, attack yourself to break their tempo.
Faction Tactics and Strategies
General
- In most cases, frontal assault will be the only way forward. Keep indirect fires coming - from mortars to Calliope.
- As for unit composition, you do not want too many infantry since the map is small enough that HMGs can shut you down good. However the small size affect the weapons teams equally bad once rocket artillery comes into play. There is simply not enough room to spread out 3 mortars and 3 HMGs.
- The map is flat and at many places, you will find there is enough clearance to take advantage with long range SU-85 or Stug. This is also the reason why Jagdtiger, Elephant and ISU commanders work out in this map.
- However the map is not too lane-y (Red Ball Express) that IS2 and other heavy tanks are useless.
- There are plenty of safe areas in front of the base for ML-20 and Lefh-18 artillery.

- The first two are completely destructible. The latter two will always block paths/shots and the third one will block vision as well.
Allies
- 2 USF, 1 UKF and 1 SOV (T2 favoured) will provide maximum diversity, a lot of strong mainline infantry plus early game HMGs and mortars. More SOV can harm you because no FRP and fragility of T2 once rocket artillery comes online.
- Ambulance. I sometime get it as 4th unit. With enough soft retreating skills, you will be able to outlast your enemy in the beginning.
- UKF and SOV should bring up ATGs because USF would be taking the brunt of the enemy.
Axis
- Mix Ostheer and OKW. You want the best of support weapons and FRPs.
- At the start of the game, Ostheer should bring up HMG42, mortar and Grenadiers. OKW should Volksgrenadiers to help secure flanks and push up in front of Ostheer support weapons.
- With OKW Sturmpioneers, rush for the key buildings anyway and camp it from one window side.
- OKW should bring up Rakentenwerfer earlier than Ostheer Pak40 in case of fast early vehicle rush.
 pigsoup
  Sturmpanther