
Stormless’s Encirclement Guide
The Encirclement commander is one of the most interesting commanders for the Ostheer faction. More suited to team games, his abilities on the battlefield may look ineffective at first glance, however utilising this commander effectively can deny map control to your opponents for most of the game, stalling the enemies chances of late game armour. As the battle progresses you are able to call in the largest and most devastating artillery strike in the entire game, enough to wipe out an entire enemy army and maintain map control when you need it. Be under no illusion, this is a powerful commander for the Ostheer.
Let's have a look at the abilities available from this commander in detail...
1 CP - Sprint

Sprint allows every infantry type unit on the map to use this ability (including the Ostheer Sniper!) For 10 munitions the infantry squad is able to quickly retreat to a better fighting position and continue the fight.
2 CP - Stormtroopers

Stormtroopers can be spawned from any unoccupied building on the map allowing you to surprise your opponent in engagements and reclaim territory behind enemy lines. These stormtroopers have the ability to stealth in cover and hold fire, making them the perfect surprise weapon for infantry, shock troops etc. The stormtroopers can be upgraded with 4x STG44’s or 1 Panzershreck. Each upgrade unlocks a powerful ability for the ostheer.
STG44 upgrade - As well as having a very credible offensive fire the Stormtroopers unlock ‘Tactical Assault’. This ability allows the Stormtroopers to fire accurately whilst slowly moving in formation. This ability is powerful enough to wipe an entire squad of shock troops running towards you. Be aware that you will not be able to move or retreat at full speed until the ability has finished, so timing is essential.
Panzershreck upgrade - The Panzerschreck upgrade gives 1 panzerschreck to the squad and also unlocks ‘vehicle detection’ ability. This ability will allow you to see vehicles coming on the tactical map and minimap allowing you to plan your trap accordingly. A patient player will be able to stealth his units on 'hold fire' until the moment is right, and nullify any armor threats together with a frontal assault
7 CP - Breaking the Lines

This ability allows you to neutralise any enemy territory on the map (excluding VP’s). It is similar to the Stuka Bombing Strike from the Ostheer however it does not have the same damage output meaning it will not destroy or neutralise points with caches. It is best used to neutralise strategic connection points when your enemy is occupied attacking you on another area of the map. I’ve included some great examples in this guide of how to use this. This ability is key to a successful ‘close the pocket’
9 CP - Breakthrough

This ability gives a small speed increase to your vehicles and allows them to very quickly decap enemy territory. You can also capture territory but it is at normal speed. This ability is best used when you have forced your opponent to retreat. You will be able to neutralise 3 or 4 points in very rapid time leaving your enemy with no vision or map control. This ability is one of the keys to a successful ‘close the pocket’.
12 CP - Close the Pocket

There is a reason that this artillery strike is more CP than most heavy tanks.
This ability will HEAVILY bombard any separated enemy territories that are not connected to the enemy base and also lightly mortar any front line territories your opponent has. Heavy bombardment consists of light artillery shells, Ju-87 air support and Stuka Dive bombs. There is no limit to how much artillery will occur during the time of this ability.
Your opponent will not be able to move out of the way of this strike, there is no option except full retreat. I personally have seen this ability wipe out a full health ISU in a matter of seconds however it is one of the hardest abilities in the game to set up and maintain correctly. You can watch me taking out 2 full health ISU's with 1 use of this ability in this video. Click here to watch
Close the Pocket will continue to work as long as territories remain disconnected. If your opponent manages to recapture a connecting territory, the heavy artillery will stop and the frontline mortars will continue alone. Using Stormtroopers, Breaking the Lines & Breakthrough, you have a number of ways of orchestrating this devastating ability. We’ll discuss this more later in the guide.
How to ‘Close the Pocket’
This ability needs its own section because it can be a little tricky to get this ability working the way it needs to. The core of this commander is patience and timing. It is essential in making this commander useful.
Close the Pocket bombards all enemy territories that are disconnected from the enemy base. This means that the best time to use this ability is when your opponent has a lot of territories that you can cut off, or when you need to scatter enemy forces for a frontal assault. The commander tree has key 3 abilities to help you attack these strategic points quickly to make the assault ruthless and devastating. Here are 3 very effective ways to perform close the pocket. Each one depends on your game situation and your resources. Bear in mind you will always need 200 munitions for close the pocket.
Close the Pocket bombards all enemy territories that are disconnected from the enemy base. This means that the best time to use this ability is when your opponent has a lot of territories that you can cut off, or when you need to scatter enemy forces for a frontal assault. The commander tree has key 3 abilities to help you attack these strategic points quickly to make the assault ruthless and devastating. Here are 3 very effective ways to perform close the pocket. Each one depends on your game situation and your resources. Bear in mind you will always need 200 munitions for close the pocket.
Option 1 - 340 manpower, 280 munitions
If your opponent hasn’t built caches on his strategic points, your best chance of decapping him quickly is to use this combination. Spawn Stormtroopers behind the lines and take cover in the strategic point. Use the ‘break the lines’ ability to neutralise the second strategic point (if there is one). Once these two points are decapped activate close the pocket immediately and try to stop the strategic points getting re capped by your opponent.
Option 2 - 40 fuel, 1 or 2 vehicles
If your opponent has built caches use breakthrough, send a tank around enemy lines and very quickly decap 1 or 2 strategic points. This is most effective with an ostwind because they can take out caches very quickly. Activate close the pocket immediately after decap and use the vehicles to camp the strategic points denying the opportunity to recapture. This option is devastating as you will have a vehicle taking out scattered vehicles on the retreat.
Option 3 - 40 Fuel, 280 munitions, 340 manpower
This really is overkill, but also totally worth it to make sure you 100% complete a successful close the pocket. Using breakthrough, Stormtroopers and denying another strategic point with Breaking the Lines will ensure that you get full map control (and hold it)
When to use this commander
You can use this commander on a lot of maps, denying territories and resource points can be useful anywhere however there are a lot of maps which don’t provide great opportunities for the final ability ‘Close the pocket’.
Let’s have a look at some maps to see where this commander tree really fits in.
I will focus on these maps to show players some interesting ways of denying your opponent map control, and also sneaky ways to surprise your opponent and wipe squads. It’s up to you to use this commander creatively in every environment using these strategies.
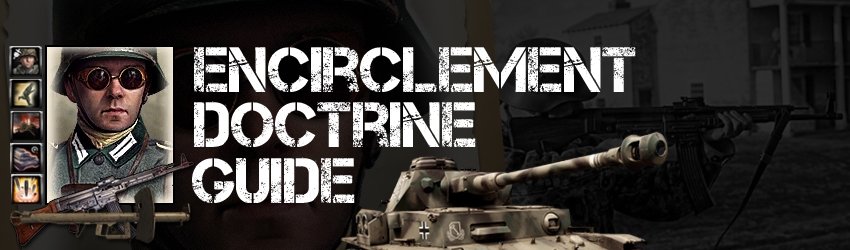
- Points that are good to decap with infantry and vehicles are marked by RED circles
- Points of interest to use break the supply lines are marked in YELLOW
All strategic points (not fuel/munitions) marked in any colour are good to activate Close the Pocket
Let’s have a look at some maps to see where this commander tree really fits in.
Minsk Pocket
Road To Kharkov
Vaux Farmlands
Road To Kharkov
Vaux Farmlands
I will focus on these maps to show players some interesting ways of denying your opponent map control, and also sneaky ways to surprise your opponent and wipe squads. It’s up to you to use this commander creatively in every environment using these strategies.
- Points that are good to decap with infantry and vehicles are marked by RED circles
- Points of interest to use break the supply lines are marked in YELLOW
All strategic points (not fuel/munitions) marked in any colour are good to activate Close the Pocket
Minsk Pocket
This is one of my favourite maps for encirclement if you are playing from the South starting position. There are 2 strategic points next to the northern base which denies full map control to your opponent. Added to this, there are spawnable building right next to both of these strategic points, meaning that your Stormtrooper and Break the supply line abilities can easily make close the pocket work. Denying these two points and activating close the pocket will mean that every enemy unit outside of their HQ will be forced to retreat! Buildings on North and South VP's with cover positions inside the vp's will make it very easy for your stormtroopers to hide whilst they cap and safely upgrade to STG44's.
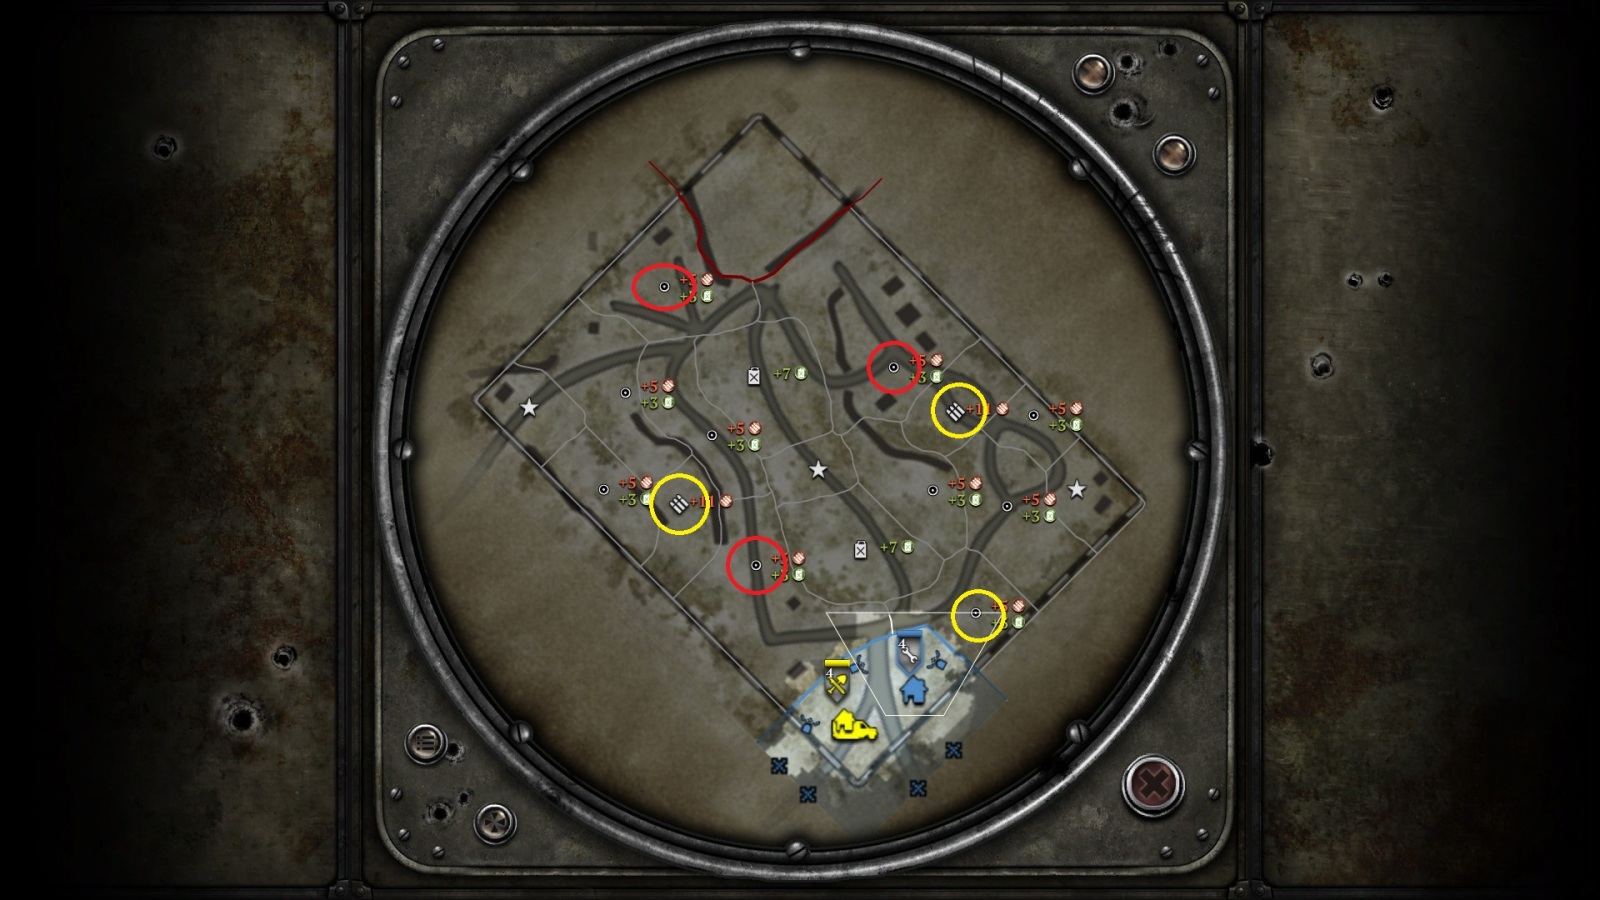
Road to Kharkov
On this map there are 4 main cut off points in this map which will deny multiple resource sectors for your opponent. If you are playing from the North and your opponent has set up on the left VP side of the map try neutralising the marked strategic point. This will deny fuel and munitions to them and give you a bit of a lead in resources. You can also deny this point and use close the pocket, which will result in your opponent being completely removed from that part of the map. The same tactic works if you are playing from the south and want to deny North-East resources.
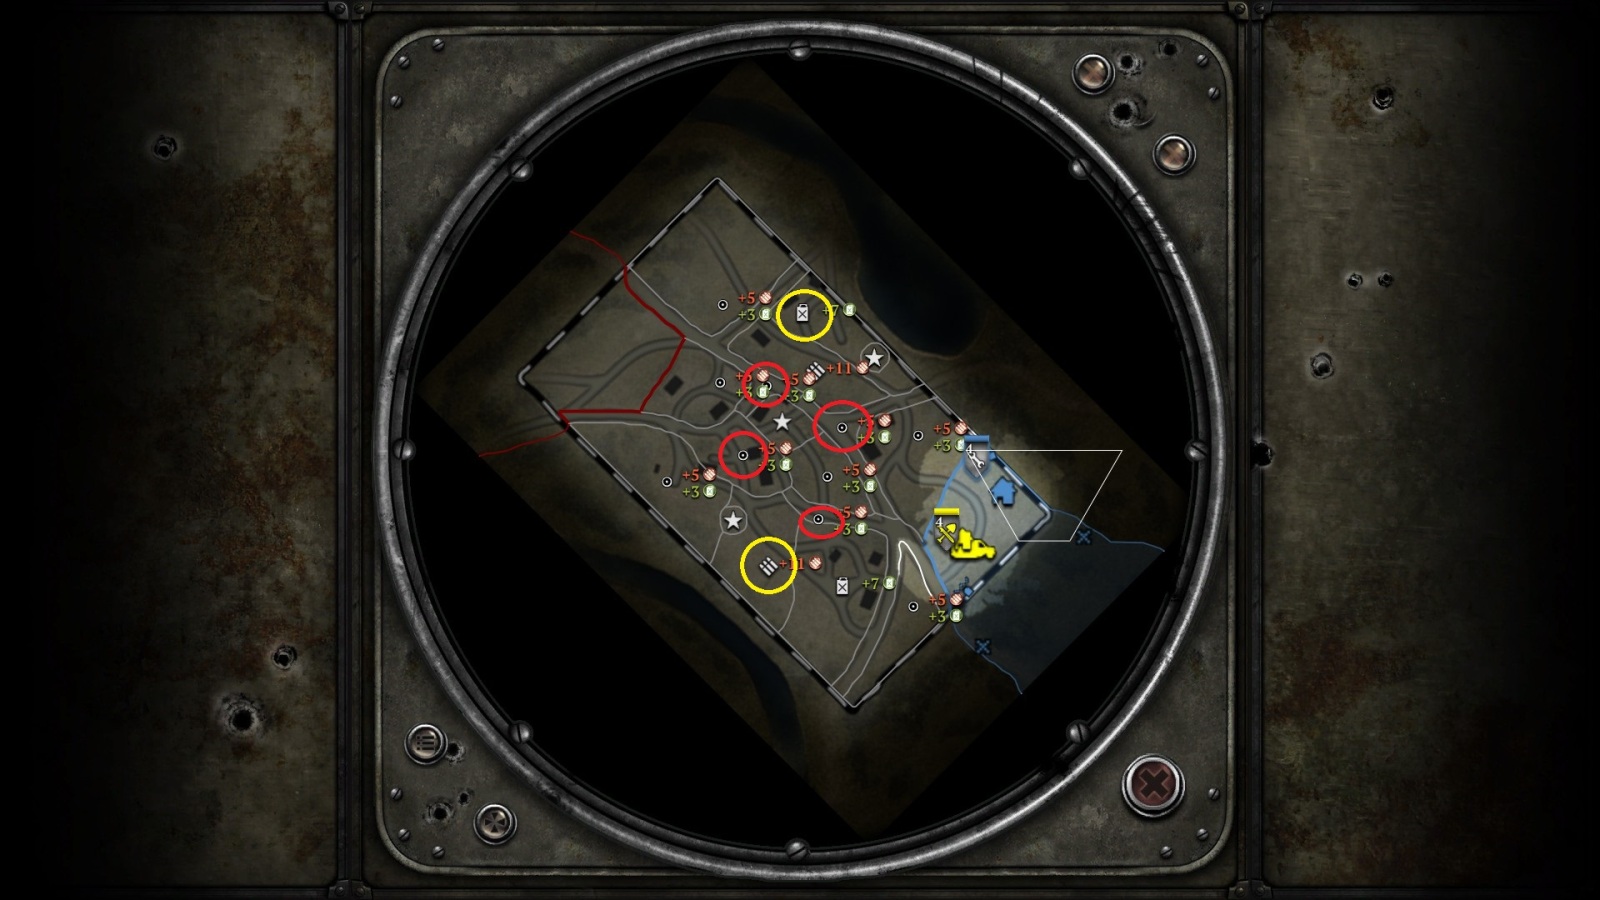
Vaux Farmlands
Another great map for encirclement. Because the resource points are so spread out on this map you can constantly deny strategic connecting territories or fuel/munitions points whilst your opponent moves his army away from them. If your enemy has an army in the middle of the map you can easily deny fuel on the outsides of the map using break the lines. This will keep your opponents army diluted and allow you to maintain intense pressure on him to keep his resources coming in. Due to the size of this map, you can bring into effect one of the most devastating close the pocket strikes by cutting both strategic territories outside of the base.
Build Orders
Playing vs USF


With this strategy you will be looking to utilise the sniper and machine gun to deal with the hordes of early USF infantry. It's important to get your sniper vetted so that you can unlock incendiary rounds as this ability will really prevent your opponent from pushing past your front lines and also deal alot of manpower damage to USF. Make sure to use that sprint ability to stay on the front lines as much as possible!
Look for signs of your opponent's teching. By the time you have gone for Tier 2 you may have seen a lieutenant on the field. If you see the lieutenant you will need to go Scout Car with the upgrade as soon as possible to deal with the M20 and half-track. If you don't see the lieutenant at all by the time you have Tier 2 up then I personally would build an AT gun first in case of the Stuart. The panzer grenadiers can be swapped out with Storm troopers as you feel necessary however for the same price you might find that PG's are more effective as they don't take up a valuable 100 munitions for good weapons in the early/mid game.
Depending on your opponent's fuel spending throughout the game the Ostwind is usually a safe choice as a first vehicle. If you haven't seen any vehicles on the field by the time you have your T3 up it means your opponent is rushing a Sherman or waiting for off map vehicles. If this is the case I highly suggest you invest in a Panzer 4 and possibly another AT gun in order to deal with early Jacksons.
At this point it's time to start getting creative with your gameplay, start breaking up the enemies territory trying to leave them with as little resource income as possible. This will allow you to outpower your opponent and also keep all of his units on the map occupied with recapping points rather than fighting!
Against Soviets


This build order is focused on wehrmacht strangling opponents strategic points. I would suggest using the first build order against USF and aiming to get a Scout Car out to deal with M20 and infantry as soon as possible. The second build order is more suited to Soviet engagements and allows you to deal with early game infantry, support weapons and Scout Car. It’s always good to have that extra unit from T1 on the field against Soviets. The Encirclement commander thrives on munitions, so don’t be afraid to pop a munitions cache if your micro is good and you are floating manpower after the early engagements. This will only serve to strengthen your mid and late game.
Choose a good moment to bring out your Stormtroopers as this will most likely be the first time that your opponents detects Encirclement commander has been chosen. The best use of this unit is to decap a strategic point denying large map areas or to cap a specific point of importance. You shouldn't’ spawn these units near your opponent's army as the STG44 upgrade takes a while to upgrade and you can be killed fairly easily. The STG44’s are really well suited against Soviet players. Using the ‘Tactical assault’ ability you will easily be able to wipe a squad of shocks running towards you and these can be a very beneficial tool in preventing soviet rushes.
Provided that you have the AT gun on the field, use an Ostwind to help defend your territory against infantry pushes. Your sniper or mortar depending on the starting game build order will be able to deal with any enemy AT guns whilst work your way through the enemy infantry. The ostwind is also very important to keep hold off as in the late game this unit will be necessary to flank and quickly remove any caches on strategic points quickly, so don’t overwork it.
If you are worried about late game Soviet call ins it would most likely be better to go straight for T4 and bring out a second AT gun to keep you going until you reach the panther. At any rate PLANT MINES. I can’t emphasise enough how many games can change instantly when a heavy call in drives over a mine and without a heavy call in of your own you will certainly need them. Always make sure that you can respond quickly to mines being triggered by keeping your AT in range.
And lasty, don’t forget about your powerful close the pocket ability. Punish your enemy from pushing your forces back by cutting around their lines and releasing a devastating full map artillery strike.
And finally...
You can check out a full game of encirclement using everything in this strategy here :
 Stormless
  TM.Dutchy
  van Voort