
Introduction
Hello my fellow CoH2 enthusiasts!
My name is Sirlami, and in this tutorial I will talk about NIS tool within in Relic's CoH2 WorldBuilder, and how you can use it to make a small scene to a great piece of an animated film like the ones Relic made.
For better comprehension, I would list steps in numbers and a corresponding image.
My name is Sirlami, and in this tutorial I will talk about NIS tool within in Relic's CoH2 WorldBuilder, and how you can use it to make a small scene to a great piece of an animated film like the ones Relic made.
For better comprehension, I would list steps in numbers and a corresponding image.
1. Basic Setup
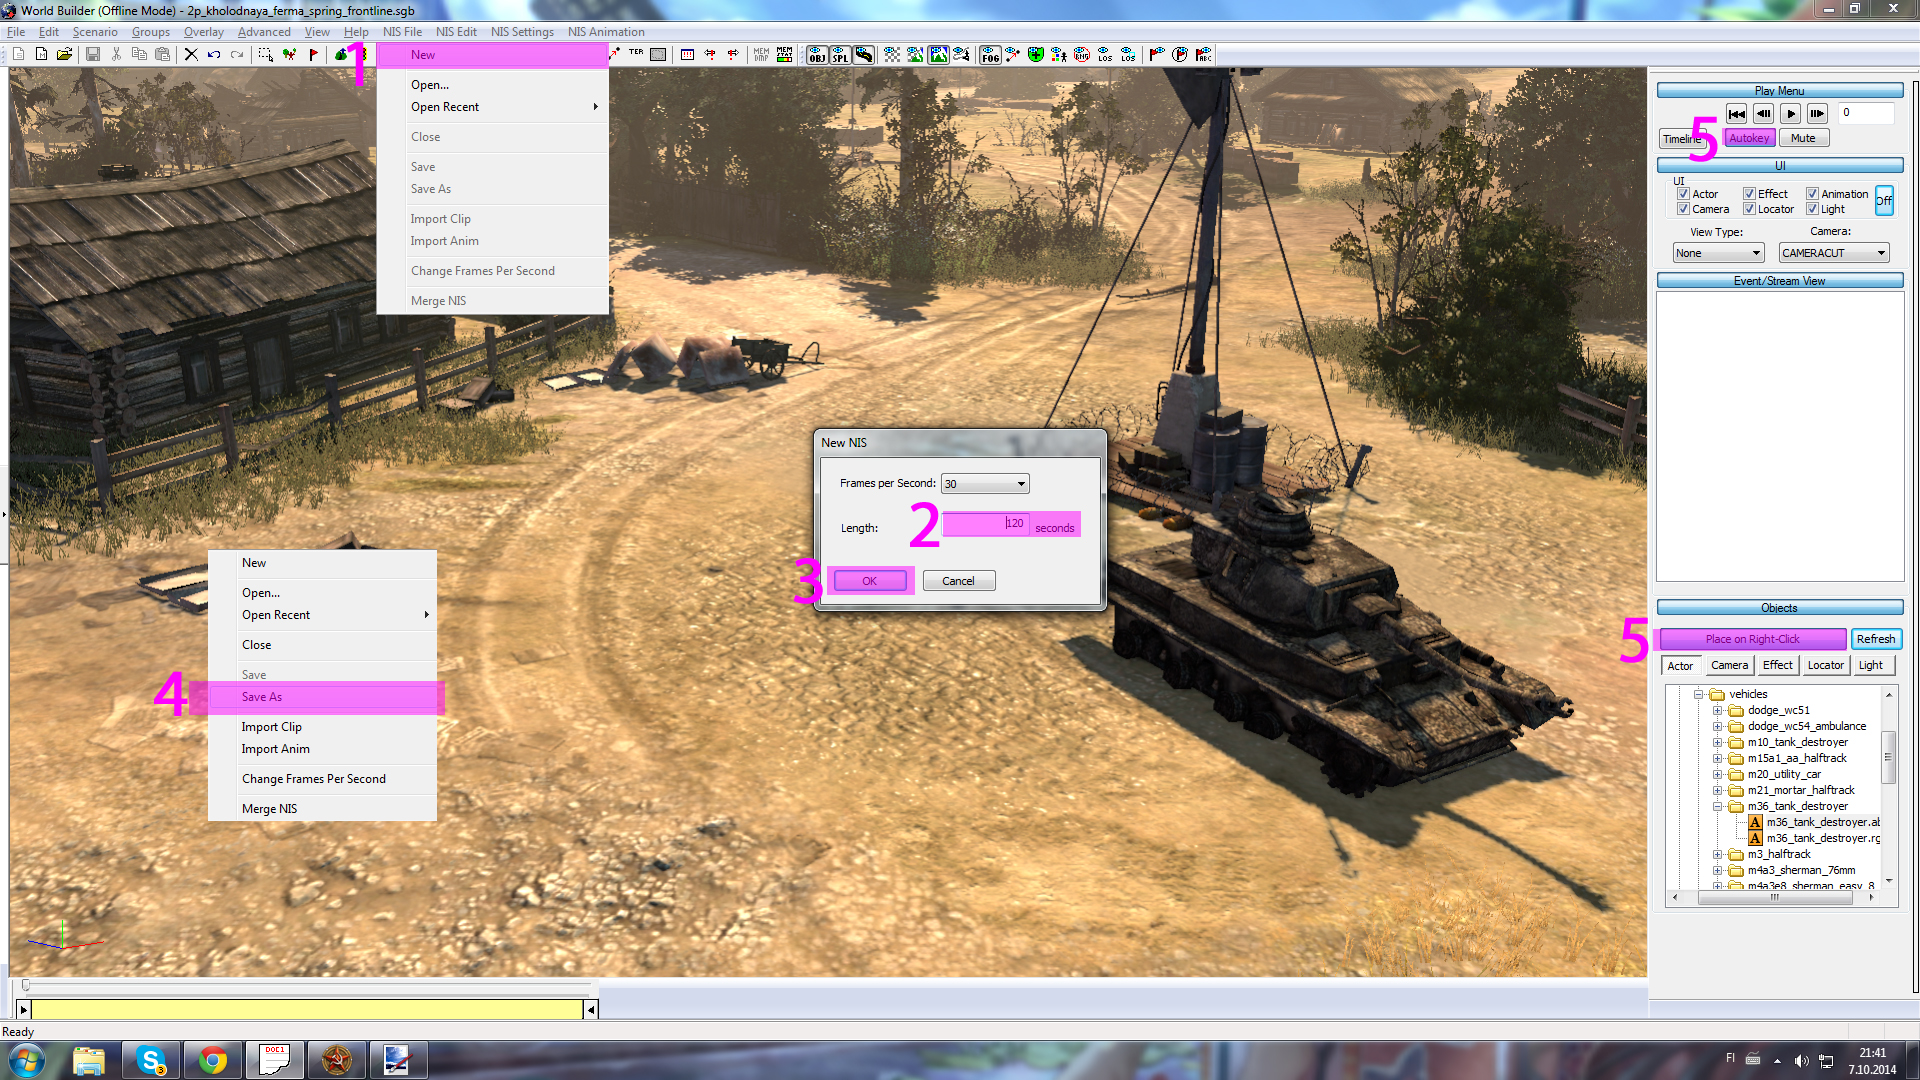
1. First make a new NIS file.
2. Then give it a length, I would recommend 120 seconds.
3. Click ok.
4. Save the file.
5. Click Autokey and Place on Right-Click. This allows you to add units and use the timeline better. You need to do this every time you exit and re-enter the NIS mode.
2. Then give it a length, I would recommend 120 seconds.
3. Click ok.
4. Save the file.
5. Click Autokey and Place on Right-Click. This allows you to add units and use the timeline better. You need to do this every time you exit and re-enter the NIS mode.
figure 1
2. Adding Units and Giving Them Tasks
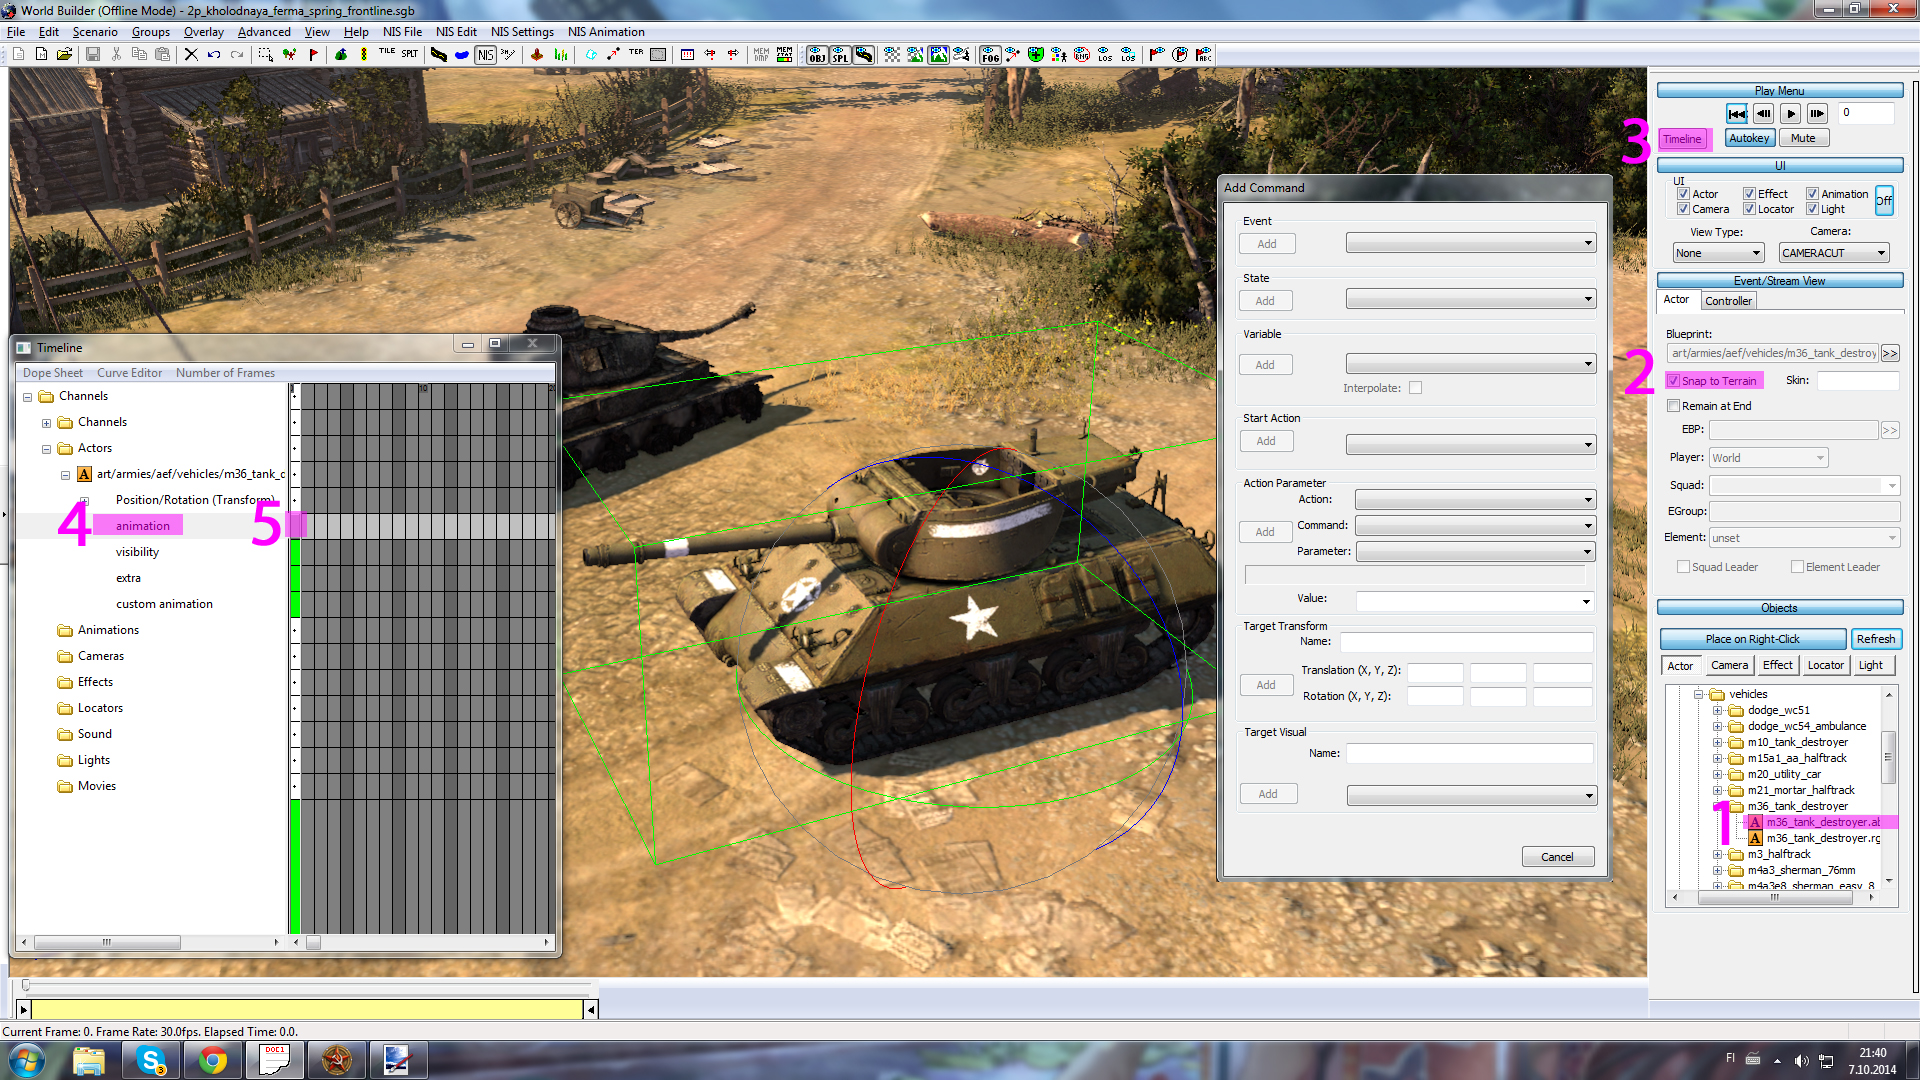
1. Select a unit of your choice from the directories and right click on where you want to put it; you must always use files that have abp extension.
2. Click Snap to terrain, this makes the unit, M36 in this case, 'snap' to the terrain and not hover above it. If you want to rotate the tank you need to press "R" on your keyboard. Press "M" to return back.
3. Click on the timeline.
4. Get to the animation directory.
5. Click on the timeline and press "Insert/Ins" on your keyboard.
From here you can give the tank various things to do, like rotating the turret, firing, exploding and much more.
figure2
2.1. Giving Units Tasks
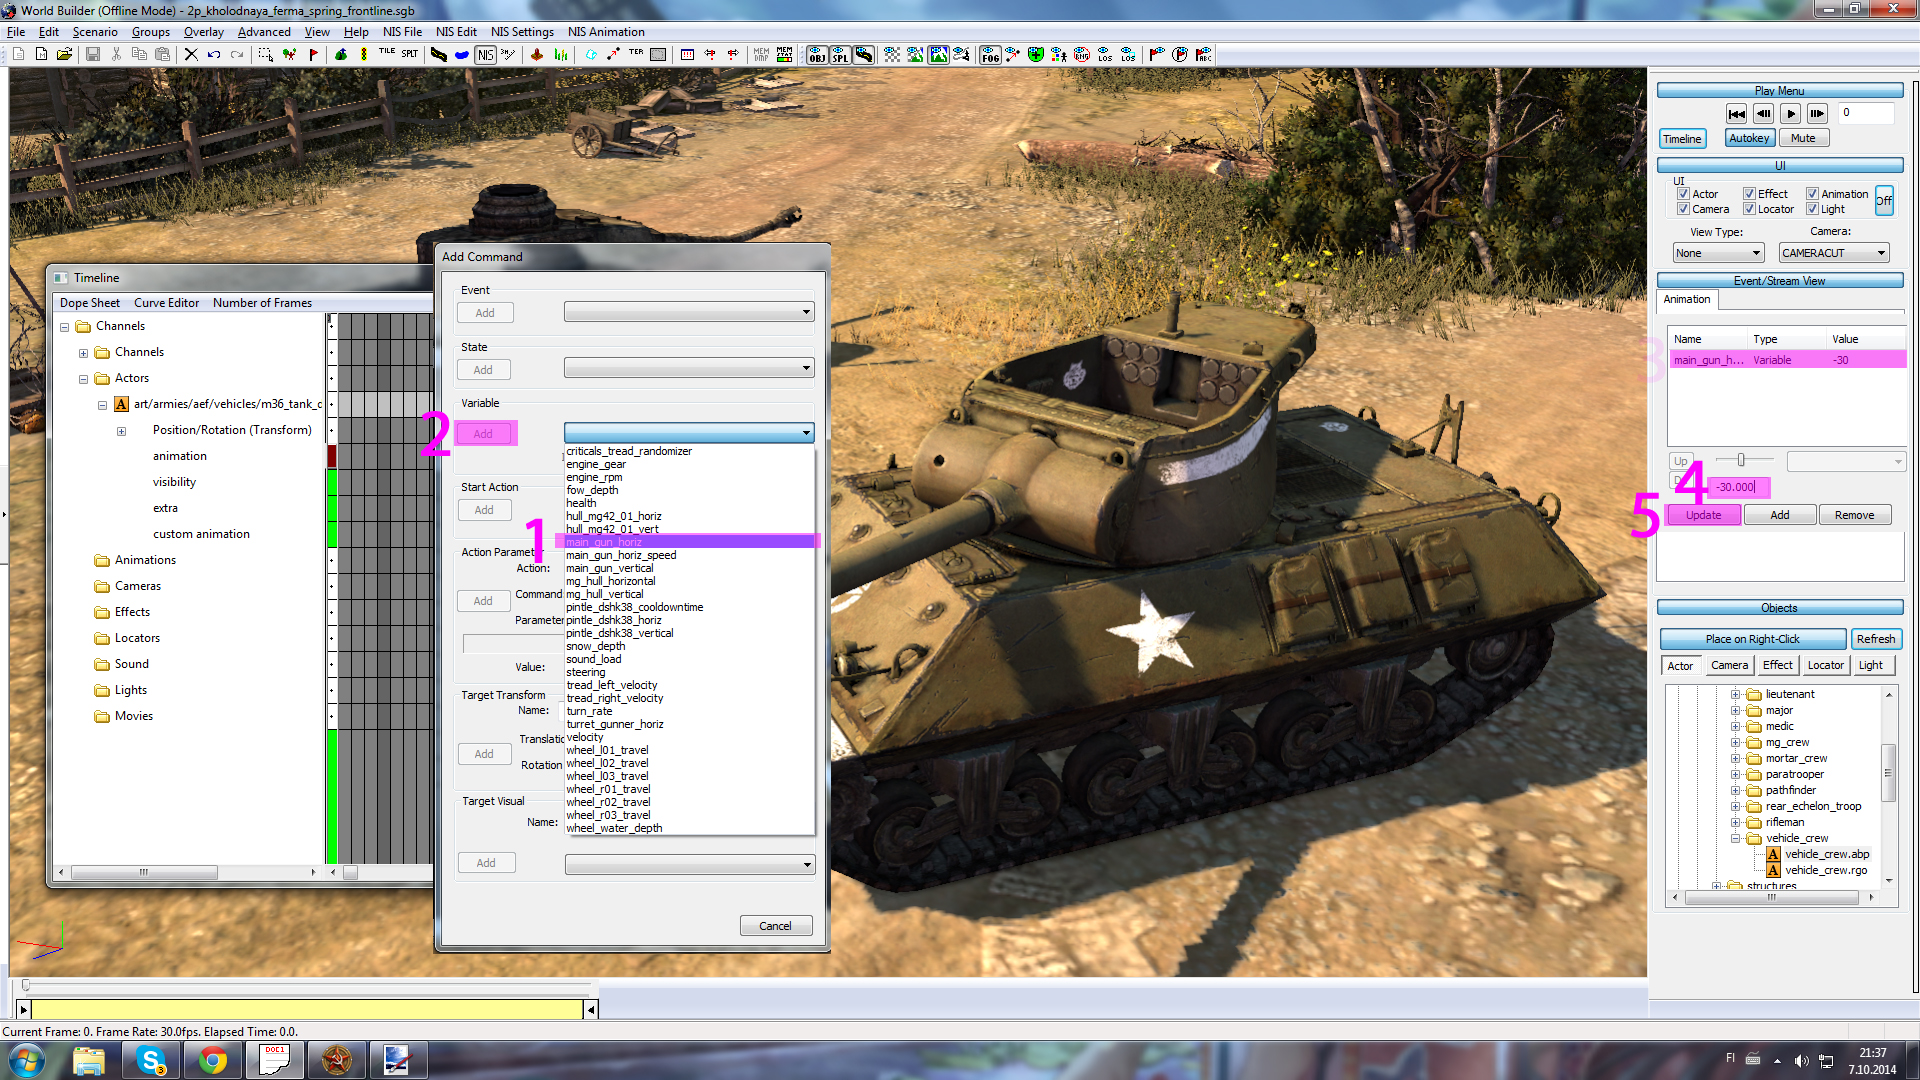
1. Select a task.
2. Click add.
3. Select the task.
4. Give it a number, - or +.
5. Press update to confirm it.
Press the '<<' button on the top right corner to reset the animation. Now the turret should be rotated.
If you want to make it rotate in the animation just make the starting position with zero frames with zero rotation then make another animation at 20 frames with a rotation value of 30. Now the turret has 20 frames to rotate from 0 to 30.
figure3
2.2. Adding a Crew
1. Select the crew and add it to the field.
2. Go to the crew animation and click insert.
3. Write 'vehicle_target' and select M36 from the list. Do this to the second crew member also.
4. Then go to start action.
5. Select the 'attach_gunner_m36 right' and add it, do the same with the second crew but this time, select 'attach_gunner_m36 left'.
Press '<<' to reset the animation.
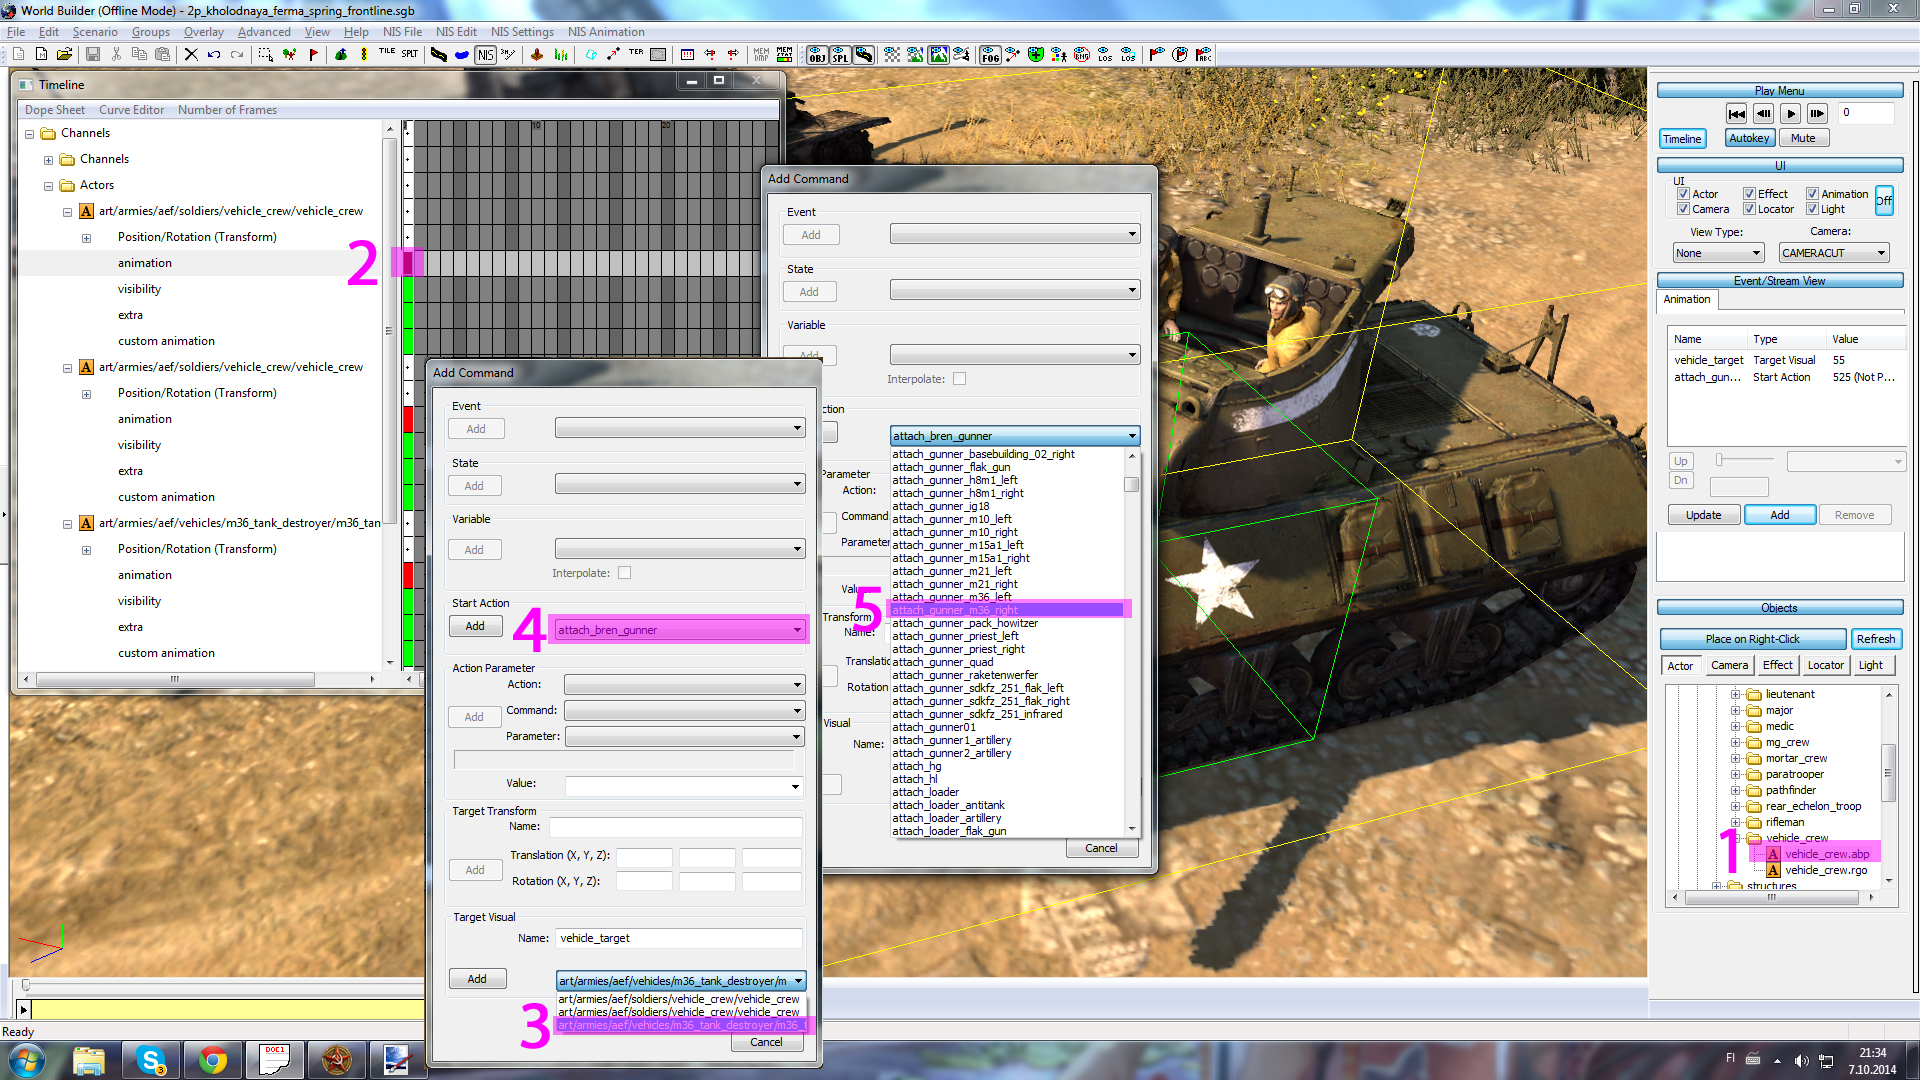
When you are adding the start action to different units, use common sense when wondering what they could be, but you can always ask me if you don't know how to do it.
Here are the commands for the target visuals:
'vehicle_target'
'mortar_target'
'artillery_target'
'heavymachinegun_target'
'antitank_target'
Please inform me if you remember more of them.
2. Go to the crew animation and click insert.
3. Write 'vehicle_target' and select M36 from the list. Do this to the second crew member also.
4. Then go to start action.
5. Select the 'attach_gunner_m36 right' and add it, do the same with the second crew but this time, select 'attach_gunner_m36 left'.
Press '<<' to reset the animation.
figure4
When you are adding the start action to different units, use common sense when wondering what they could be, but you can always ask me if you don't know how to do it.
Here are the commands for the target visuals:
'vehicle_target'
'mortar_target'
'artillery_target'
'heavymachinegun_target'
'antitank_target'
Please inform me if you remember more of them.
2.3. Adding a Gunner/Spotter
1. First get your tank/light vehicle and gunner. Place them next to each other. I have added the
needed commands to the image. Tanks generally use 'attach_gunner', but as you can see
the soviet IS2 uses 'attach_pintle' instead.
2. To add a spotter just change the 'attach_gunner' or 'attach_pintle' to 'attach_spotter'.
3. Add 'turret_mg42_hatch' and 'turret_spotter_state' to German tanks and set them to opened and on.
For soviets use 'turret_spotter_state' and 'kv2commander_state' or 'focused_sight'. For T70 you just need to add 'turret_spotter'.
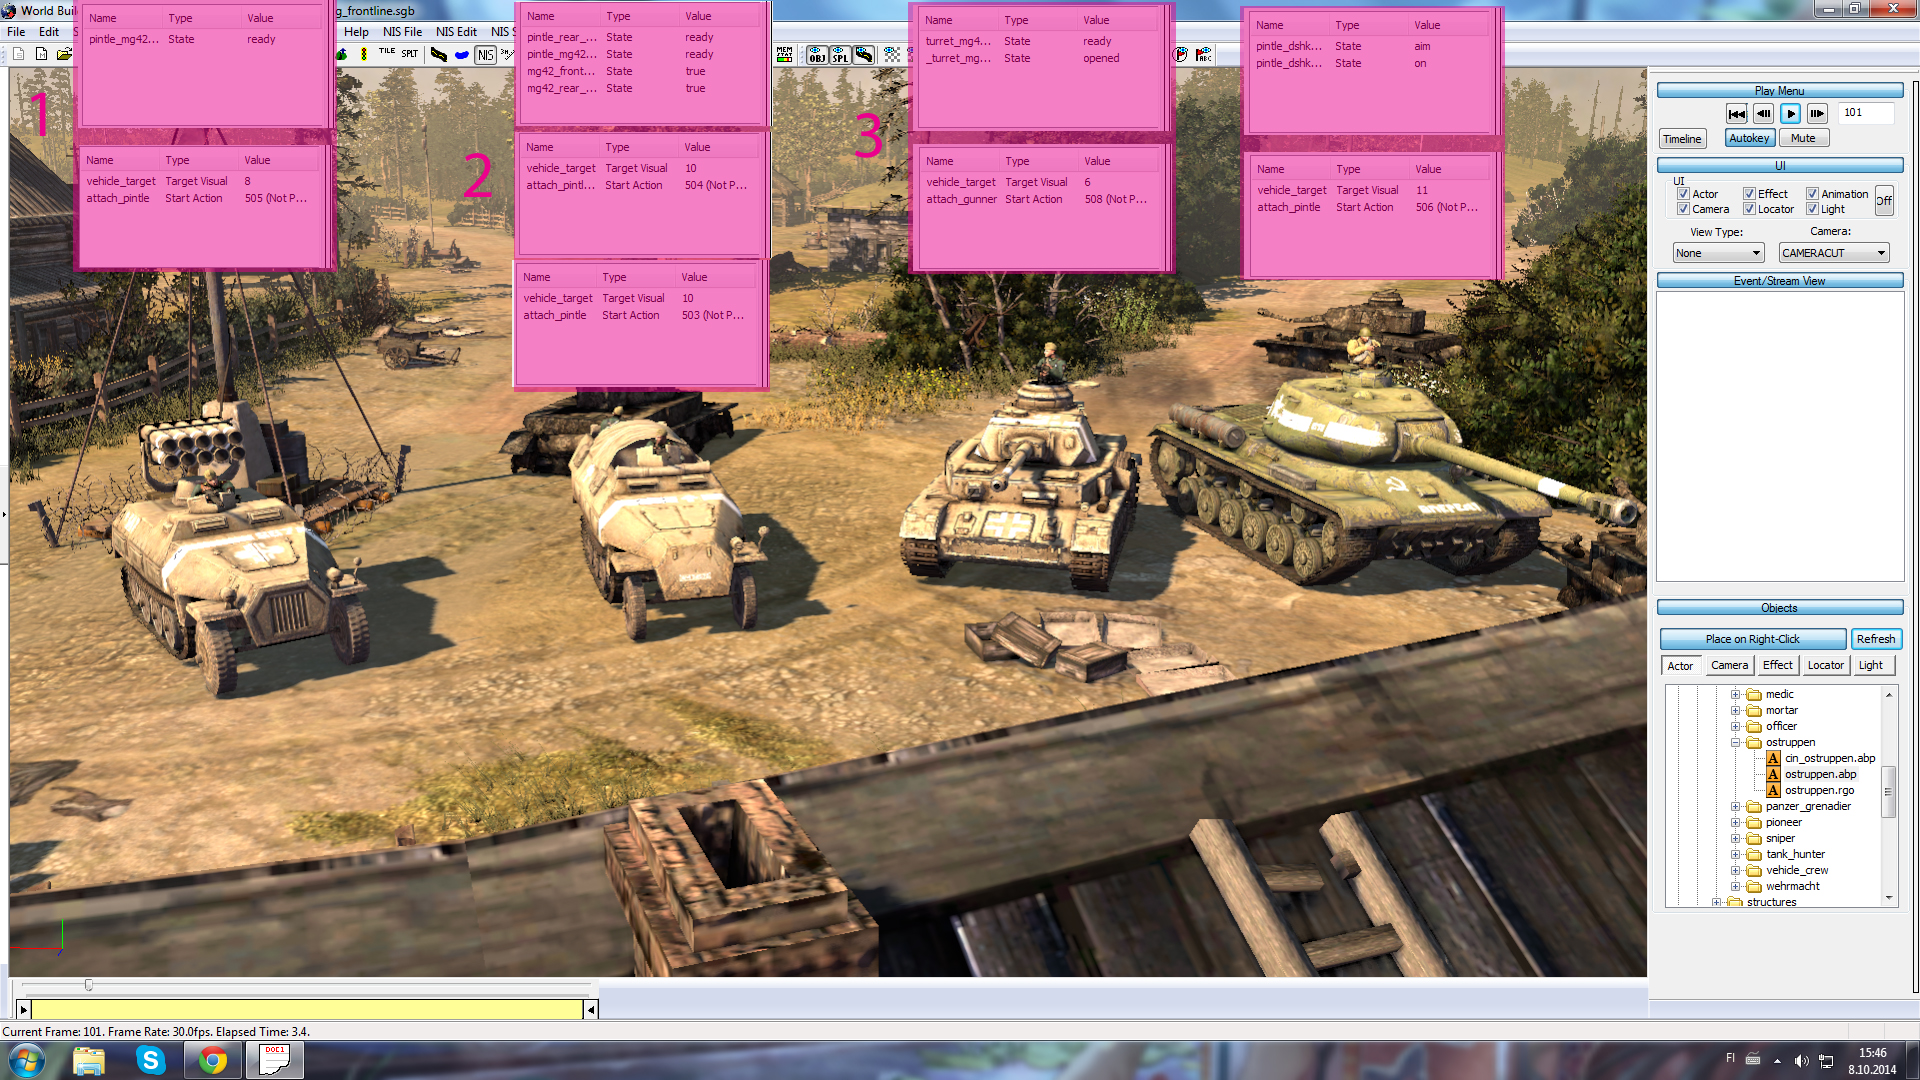
Now some of the soviet tanks can't have a spotter, like IS2, T34 series, SU76 and KV1.
needed commands to the image. Tanks generally use 'attach_gunner', but as you can see
the soviet IS2 uses 'attach_pintle' instead.
2. To add a spotter just change the 'attach_gunner' or 'attach_pintle' to 'attach_spotter'.
3. Add 'turret_mg42_hatch' and 'turret_spotter_state' to German tanks and set them to opened and on.
For soviets use 'turret_spotter_state' and 'kv2commander_state' or 'focused_sight'. For T70 you just need to add 'turret_spotter'.
figure14
Now some of the soviet tanks can't have a spotter, like IS2, T34 series, SU76 and KV1.
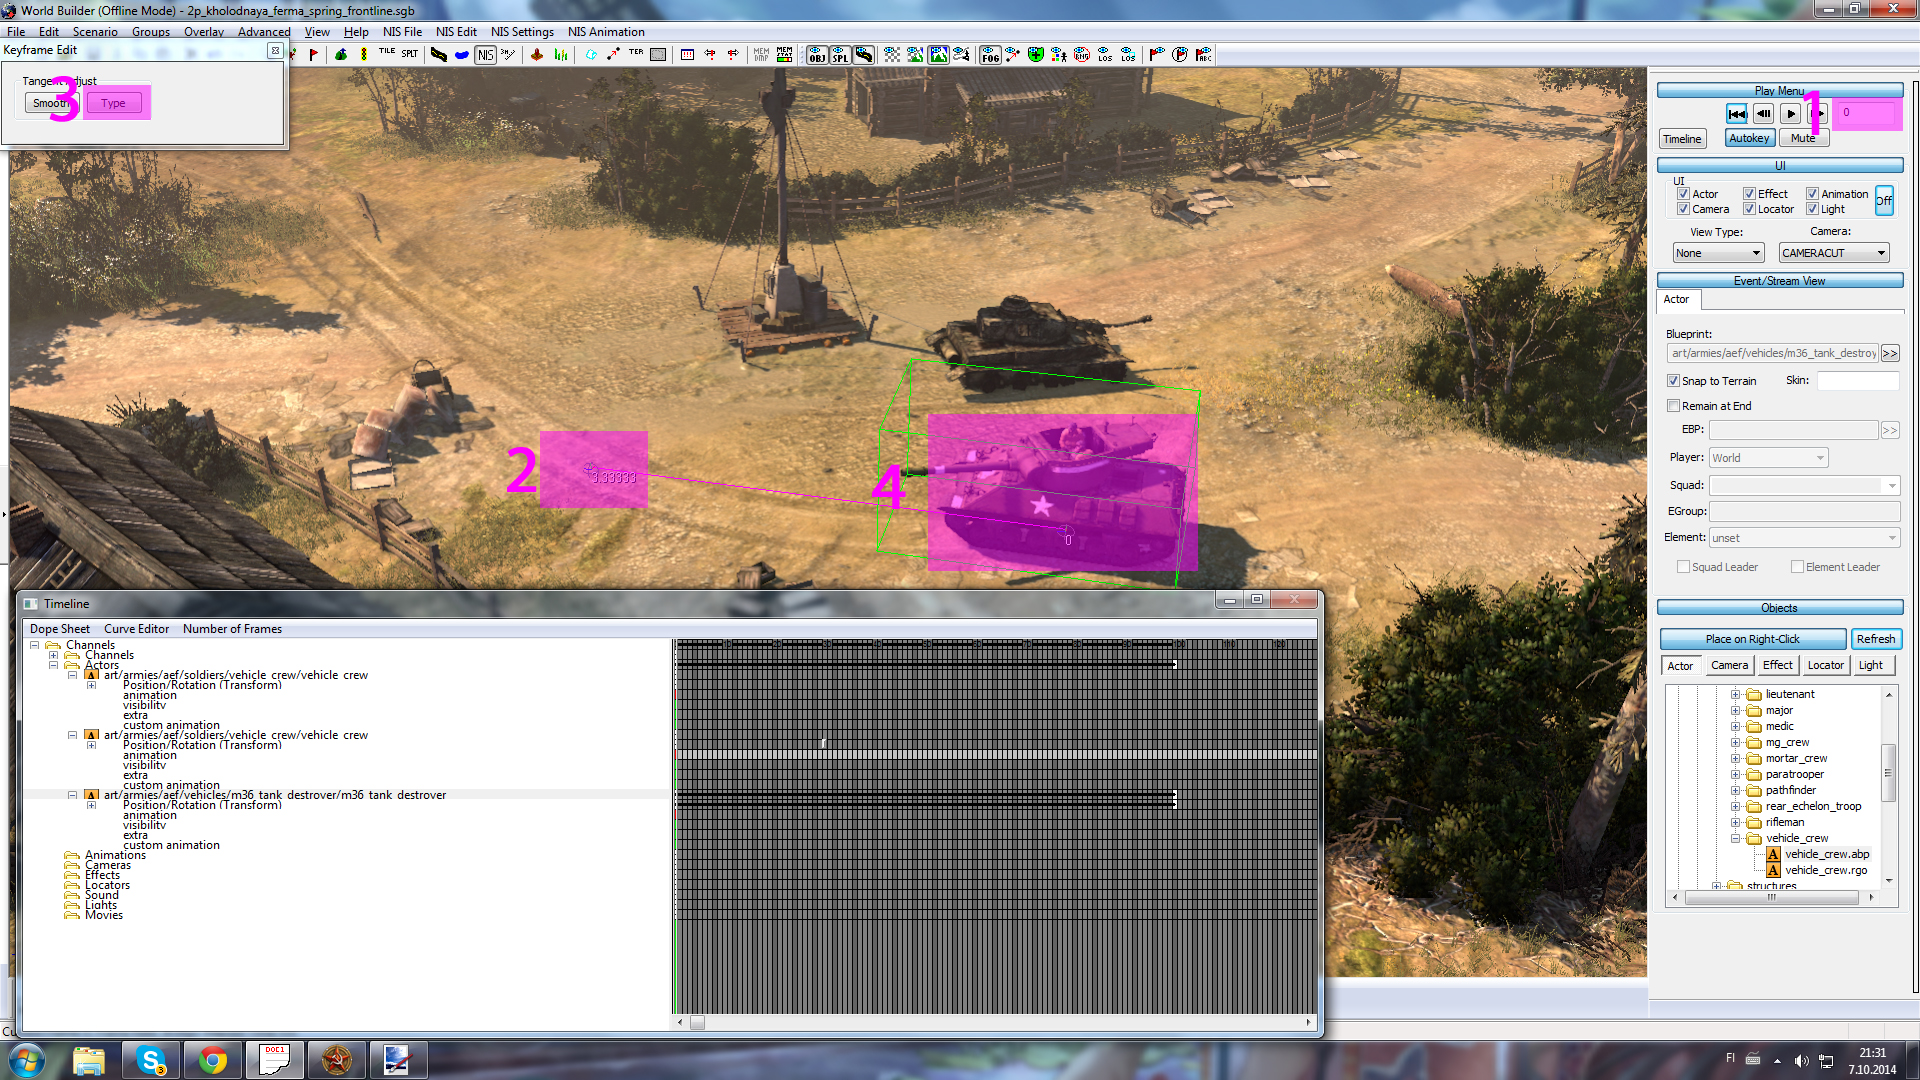
2.4. Making the Tank move
When you add your object it will automatically tie its first position at 0 frames.
1. Now set the time to 100 frames and press enter
2. Move the tank forward by "right clicking"; you should see a line on ground that shows the path of the tank.
3. Press 'space' to enter the keyframe edit. With this you can delete the positions where your tank is going. Press space to exit the keyframe edit.
4. For example, if select and delete the left ball on the line (the position at 100 frames where I set it) the tank will not go there anymore. You can also select them both and click smooth on the tangent adjust to make the entity (in this case vehicle) move at a constant speed without acceleration.
Press '<<' to reset the animation.
figure5
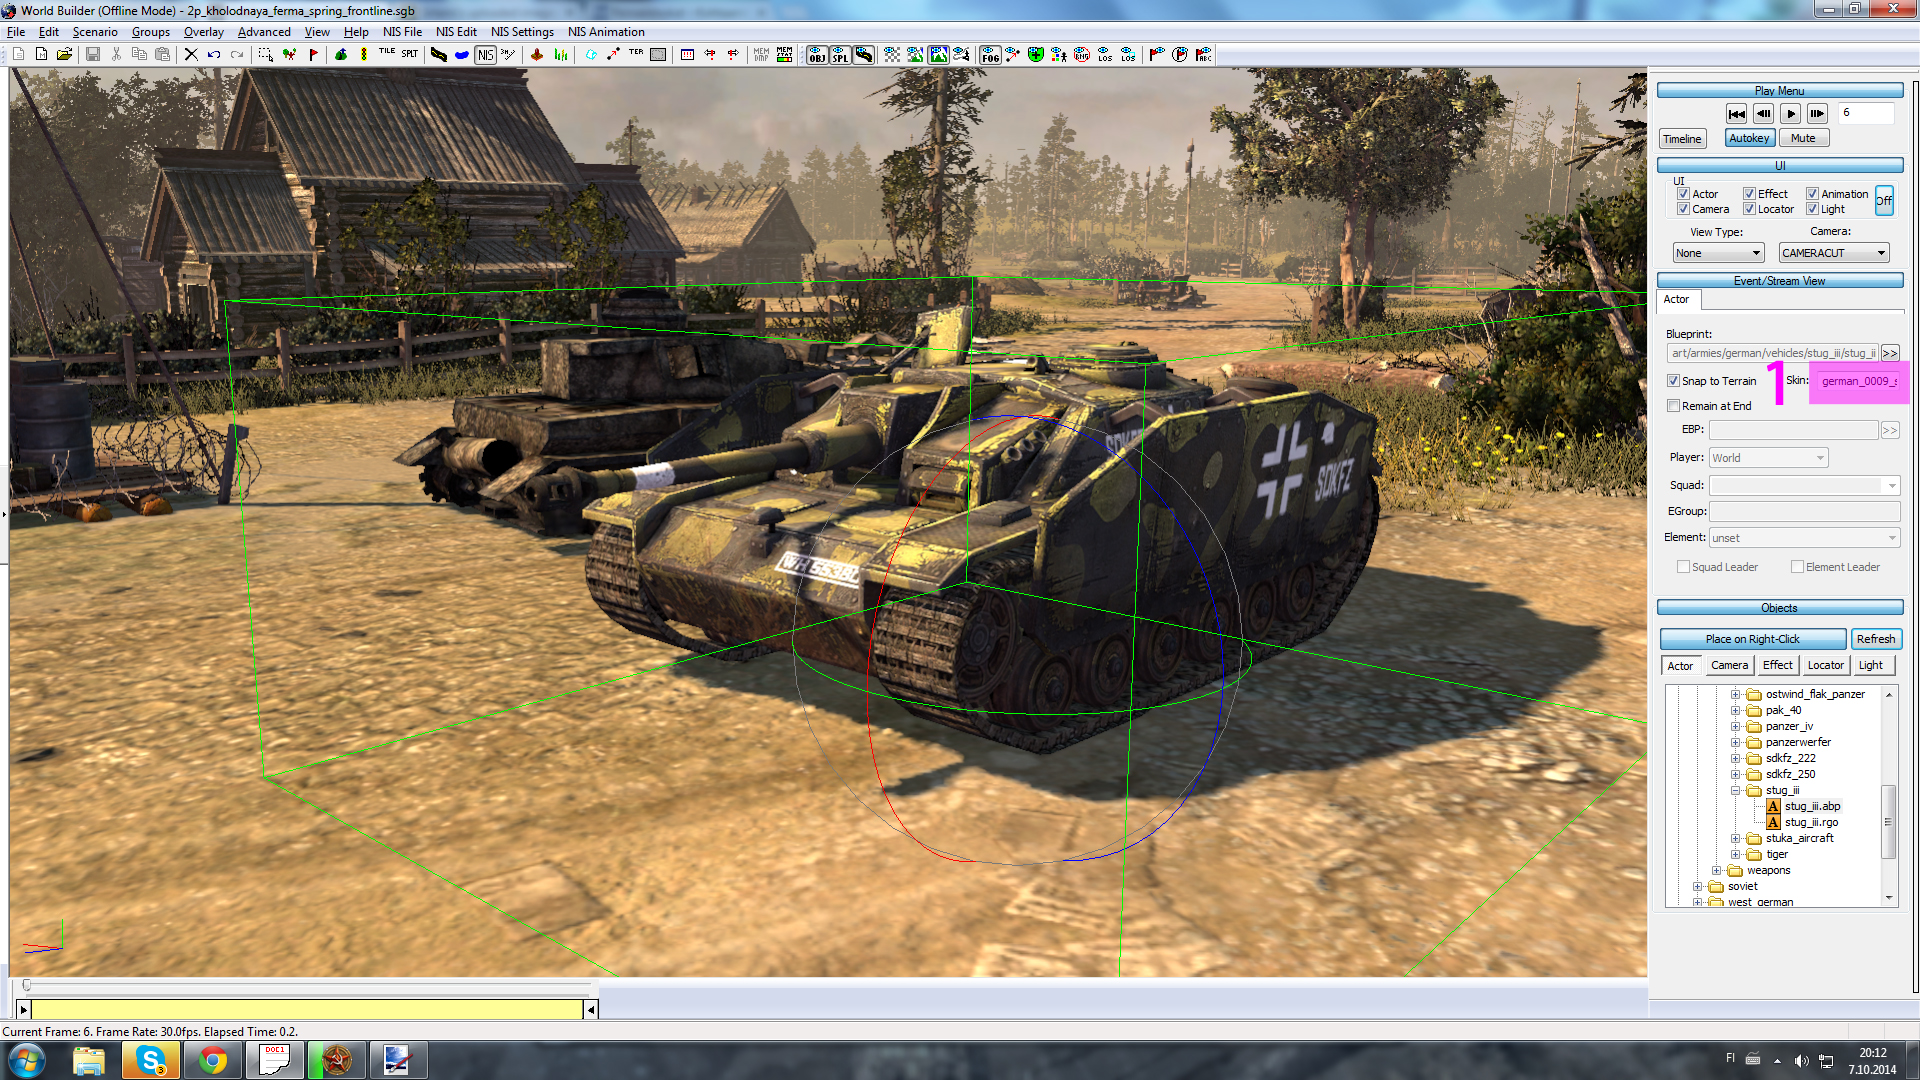
2.5. Adding Vehicle-Skins
1. Paste the skin you want to use on the skin box.
US vehicles:
'us_0001_summer'
'us_0001_winter'
'us_0002_summer'
'us_0002_winter'
'us_0003_summer'
'us_0003_winter'
'winter'
OKW vehicles:
'okw_0001_summer'
'okw_0001_winter'
'okw_0002_summer'
'okw_0002_winter'
'okw_0003_summer'
'okw_0003_winter'
'winter'
Soviet vehicles:
'soviet_0001_summer'
'soviet_0002_winter'
'soviet_0003_summer'
'soviet_0004_winter'
'soviet_0005_summer'
'soviet_0006_summer'
'soviet_0007_summer'
'soviet_0008_winter'
'soviet_0009_winter'
'soviet_0010_summer'
'soviet_0011_summer'
'winter'
Ostheer vehicles:
'german_0001_summer'
'german_0002_winter'
'german_0003_summer'
'german_0004_summer'
'german_0005_summer'
'german_0006_summer'
'german_0007_winter'
'german_0008_winter'
'german_0009_summer'
'german_0010_summer'
'german_0011_winter'
'tiger_ace_summer'
'tiger_ace_winter'
'winter'
figure8
US vehicles:
'us_0001_summer'
'us_0001_winter'
'us_0002_summer'
'us_0002_winter'
'us_0003_summer'
'us_0003_winter'
'winter'
OKW vehicles:
'okw_0001_summer'
'okw_0001_winter'
'okw_0002_summer'
'okw_0002_winter'
'okw_0003_summer'
'okw_0003_winter'
'winter'
Soviet vehicles:
'soviet_0001_summer'
'soviet_0002_winter'
'soviet_0003_summer'
'soviet_0004_winter'
'soviet_0005_summer'
'soviet_0006_summer'
'soviet_0007_summer'
'soviet_0008_winter'
'soviet_0009_winter'
'soviet_0010_summer'
'soviet_0011_summer'
'winter'
Ostheer vehicles:
'german_0001_summer'
'german_0002_winter'
'german_0003_summer'
'german_0004_summer'
'german_0005_summer'
'german_0006_summer'
'german_0007_winter'
'german_0008_winter'
'german_0009_summer'
'german_0010_summer'
'german_0011_winter'
'tiger_ace_summer'
'tiger_ace_winter'
'winter'
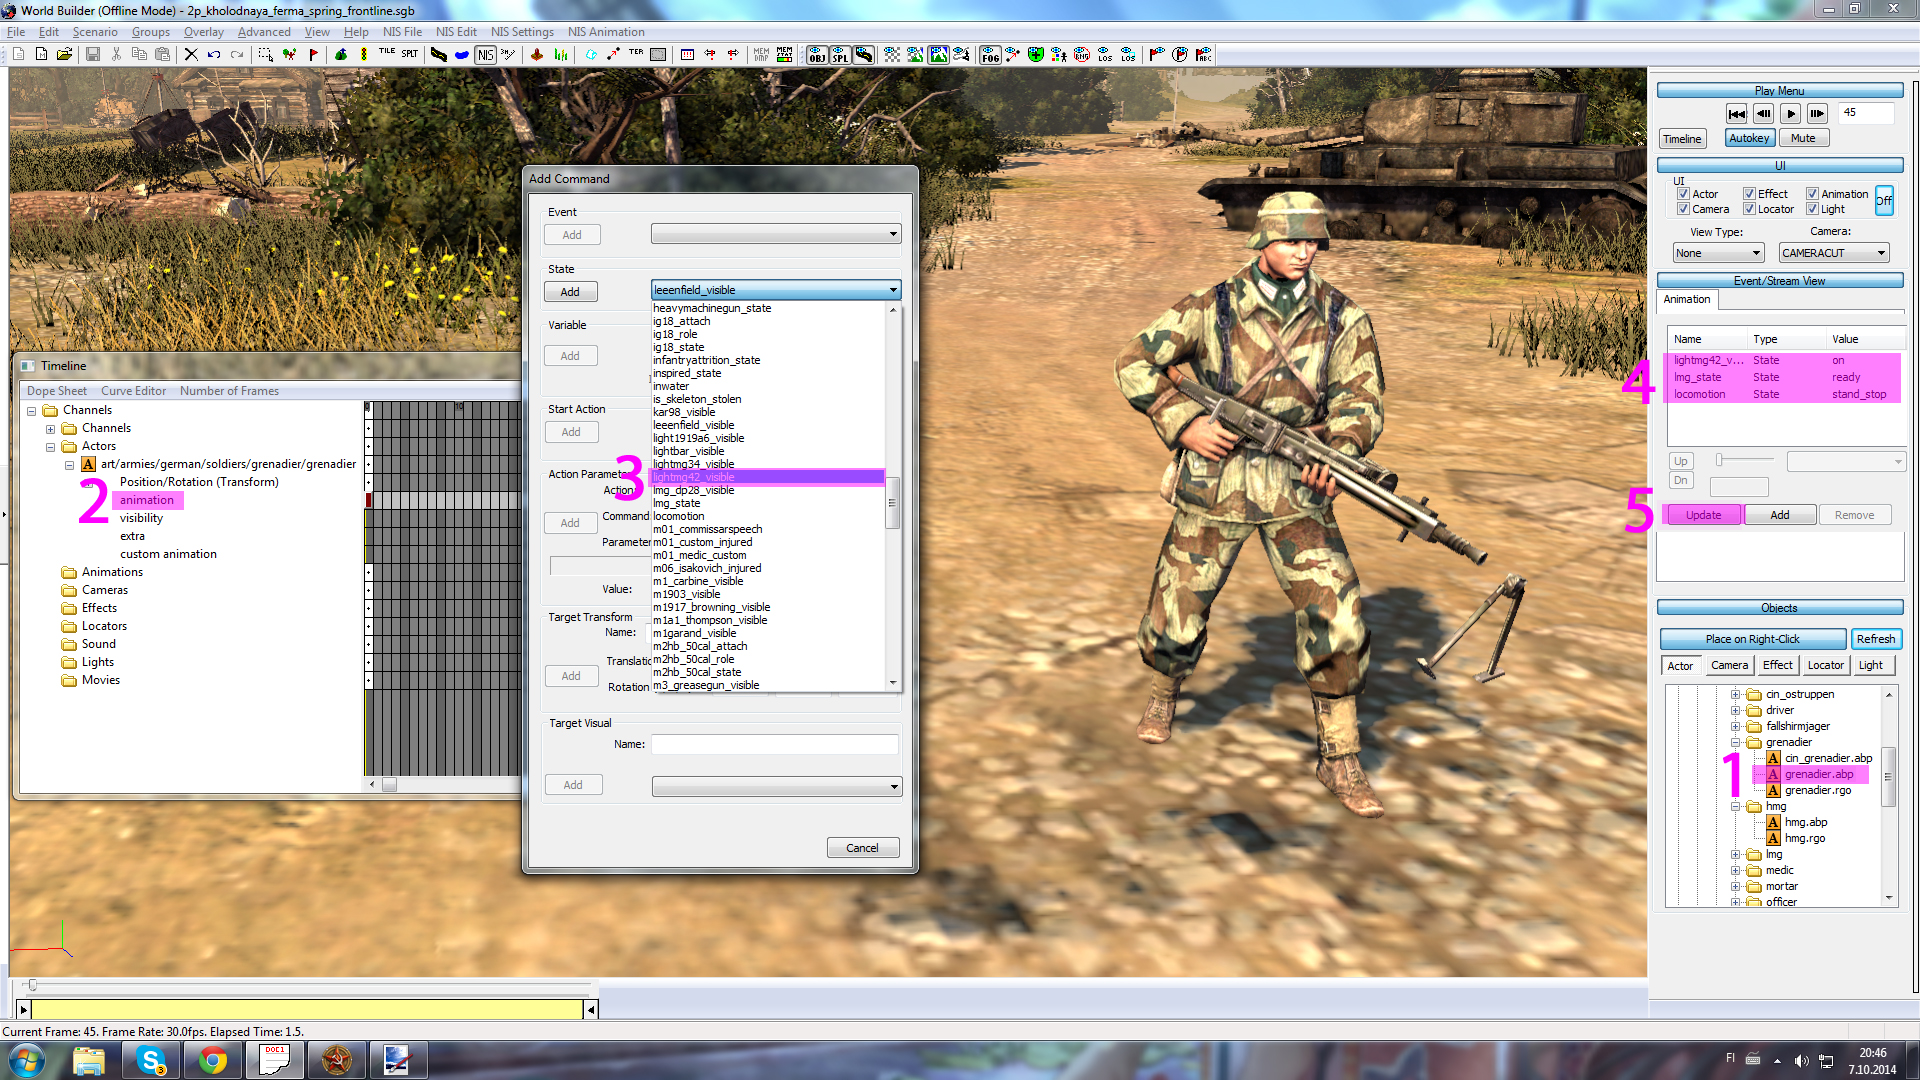
3. Giving Infantry Weapons and Movements
1. Select a unit and put it on the field.
2. Go to the animation and press "insert".
3. In state you will find 'lmg_state', add this (with this you can make it fire, aim, reload...) and then add 'lightmg42_visible' (the visuals). Last but not least, add locomotion (movement).
4. Put the 'lightmg42_visible' on and locomotion to 'stand_stop' and 'lmg_state' to ready.
Change the settings to suit whatever you want.
Now if you are using rifles you need to add 'rifle_state' to aim first and then fire on the next frame; just adding fire and then fire after five frames won't work.
5. Always remember to update and press '<<'!
figure6
3.1. Adding Heavy Machine Guns
Add the crew and the HMG first.
1. Use 'heavymachinegun_target' to attach the mg crew to the weapon and also add 'hmg_attach_skeleton' from start action.
2. Add these for the mg from state: 'mg42_tripod_visible', 'heavymachinegun_state' and 'heavymachinegun_manned'.
3. To make the HMG to be ready faster, you can set heavymachinegun state to 'offhand' and set it to -10 frames to make the hmg deploy faster.
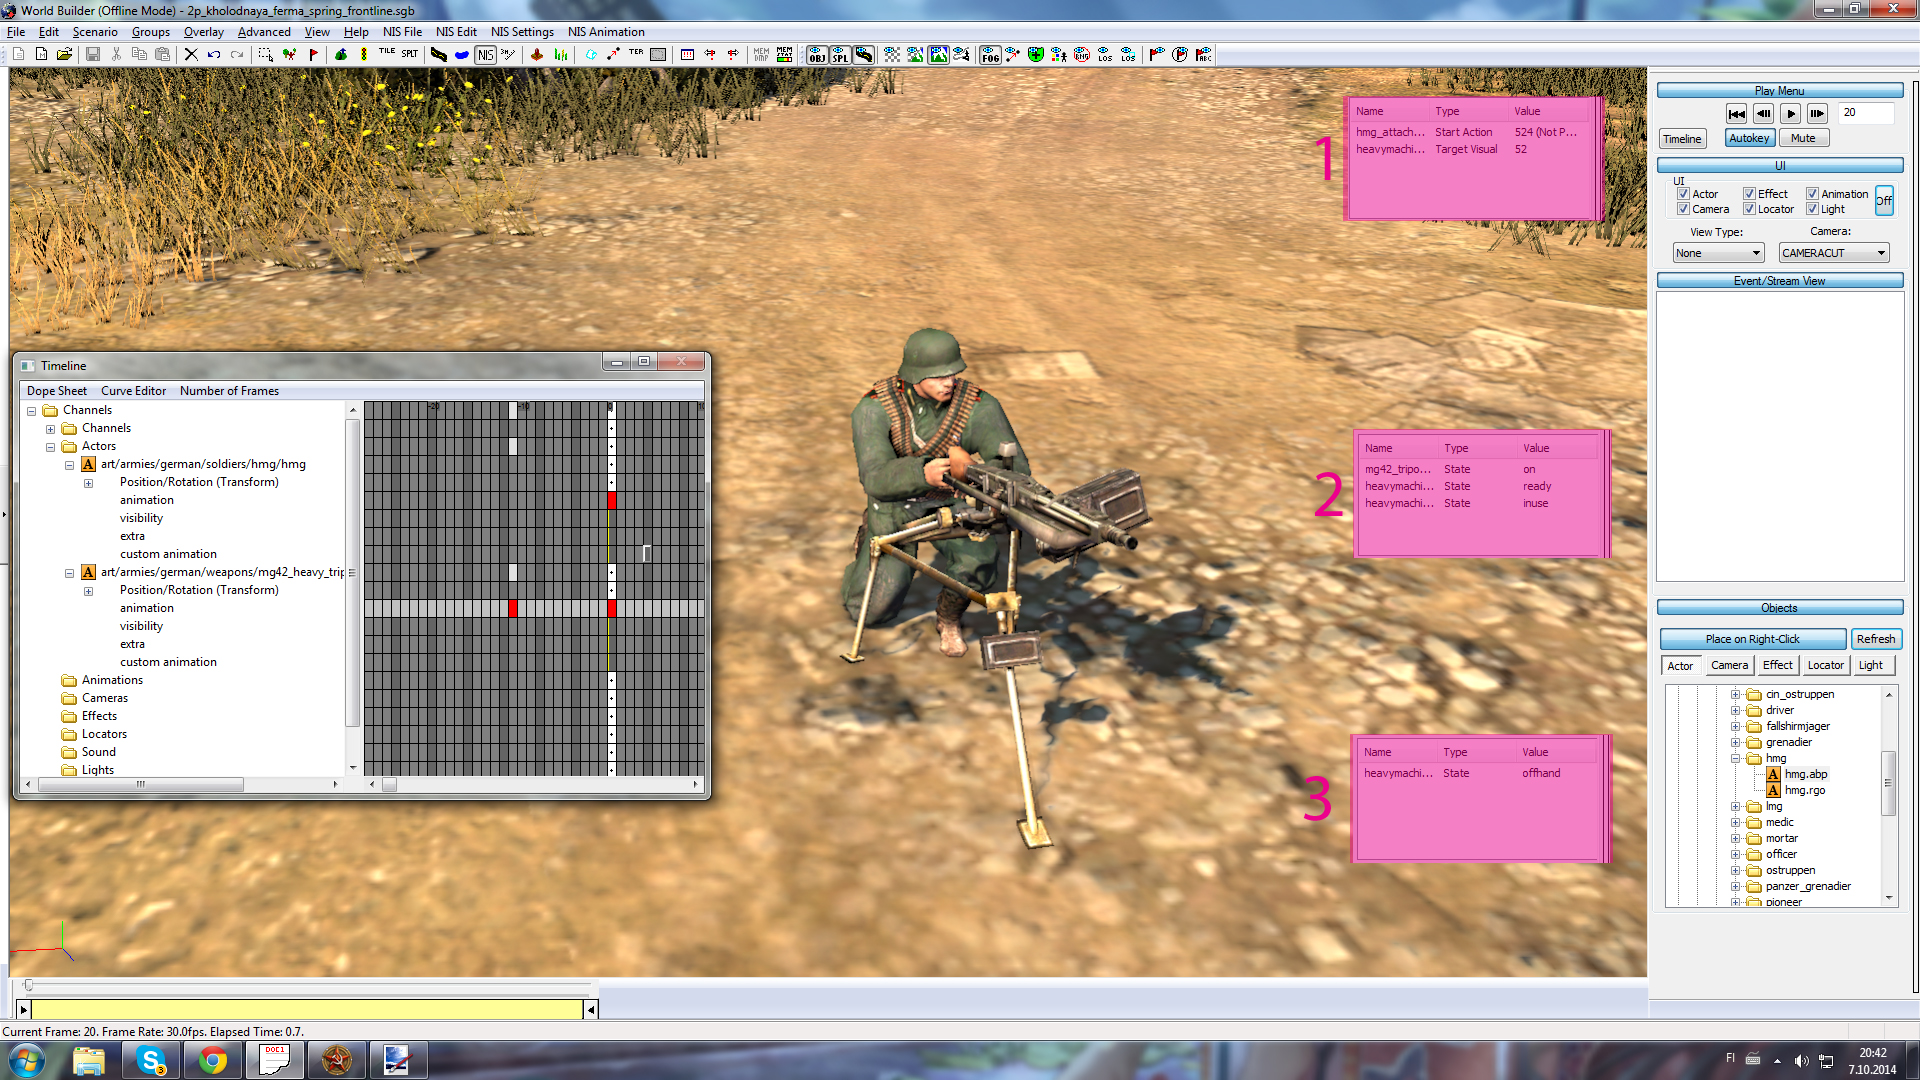
To get to the 'negative frames' you can hold the "middle mouse" and drag it to the right
To move an animation you can click it. Then hold "shift" and drag it. The green time thing cannot be on top of the frame that you want to move.
Copying also works. Click on a single animation or select multiple and press "ctrl+c" and to paste "ctrl+v". You can use gun animations for one grenadier and then copy it to other grenadiers.
1. Use 'heavymachinegun_target' to attach the mg crew to the weapon and also add 'hmg_attach_skeleton' from start action.
2. Add these for the mg from state: 'mg42_tripod_visible', 'heavymachinegun_state' and 'heavymachinegun_manned'.
3. To make the HMG to be ready faster, you can set heavymachinegun state to 'offhand' and set it to -10 frames to make the hmg deploy faster.
figure7
To get to the 'negative frames' you can hold the "middle mouse" and drag it to the right
To move an animation you can click it. Then hold "shift" and drag it. The green time thing cannot be on top of the frame that you want to move.
Copying also works. Click on a single animation or select multiple and press "ctrl+c" and to paste "ctrl+v". You can use gun animations for one grenadier and then copy it to other grenadiers.
4. Special Units
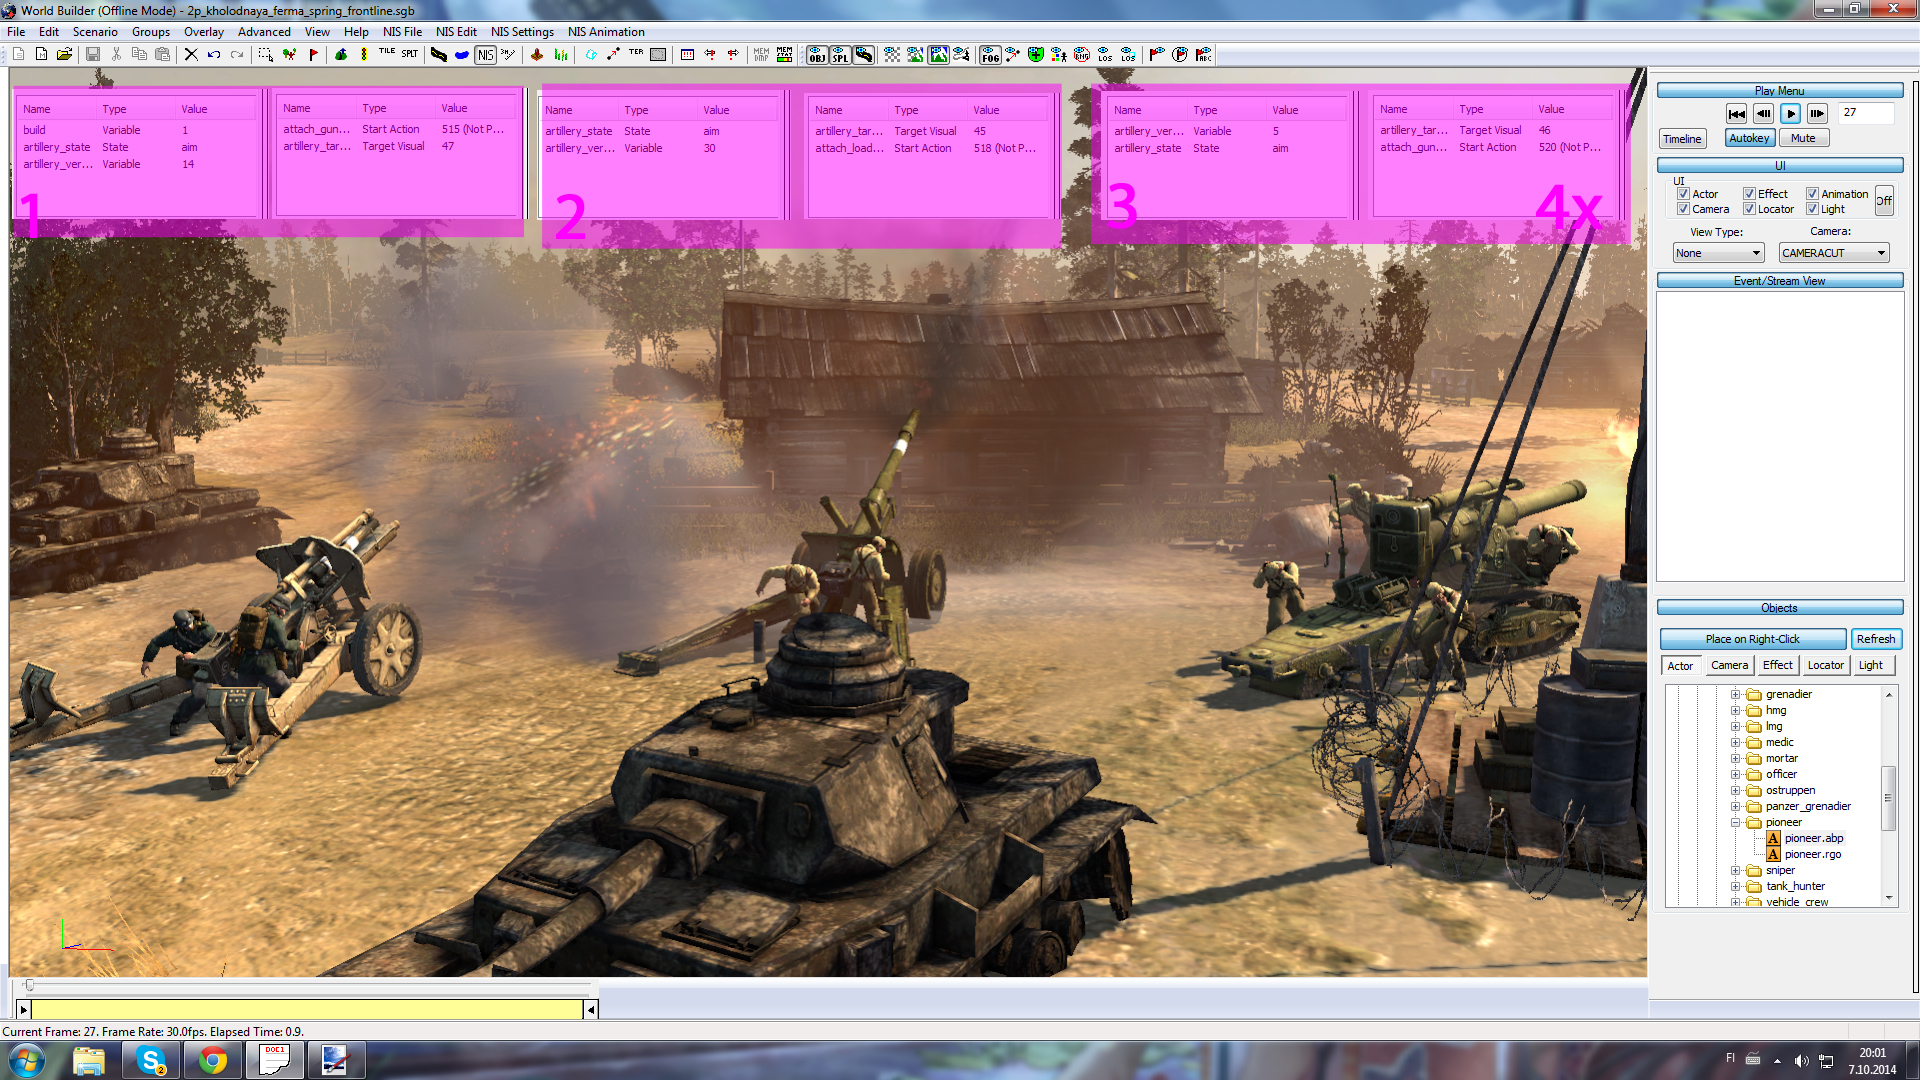
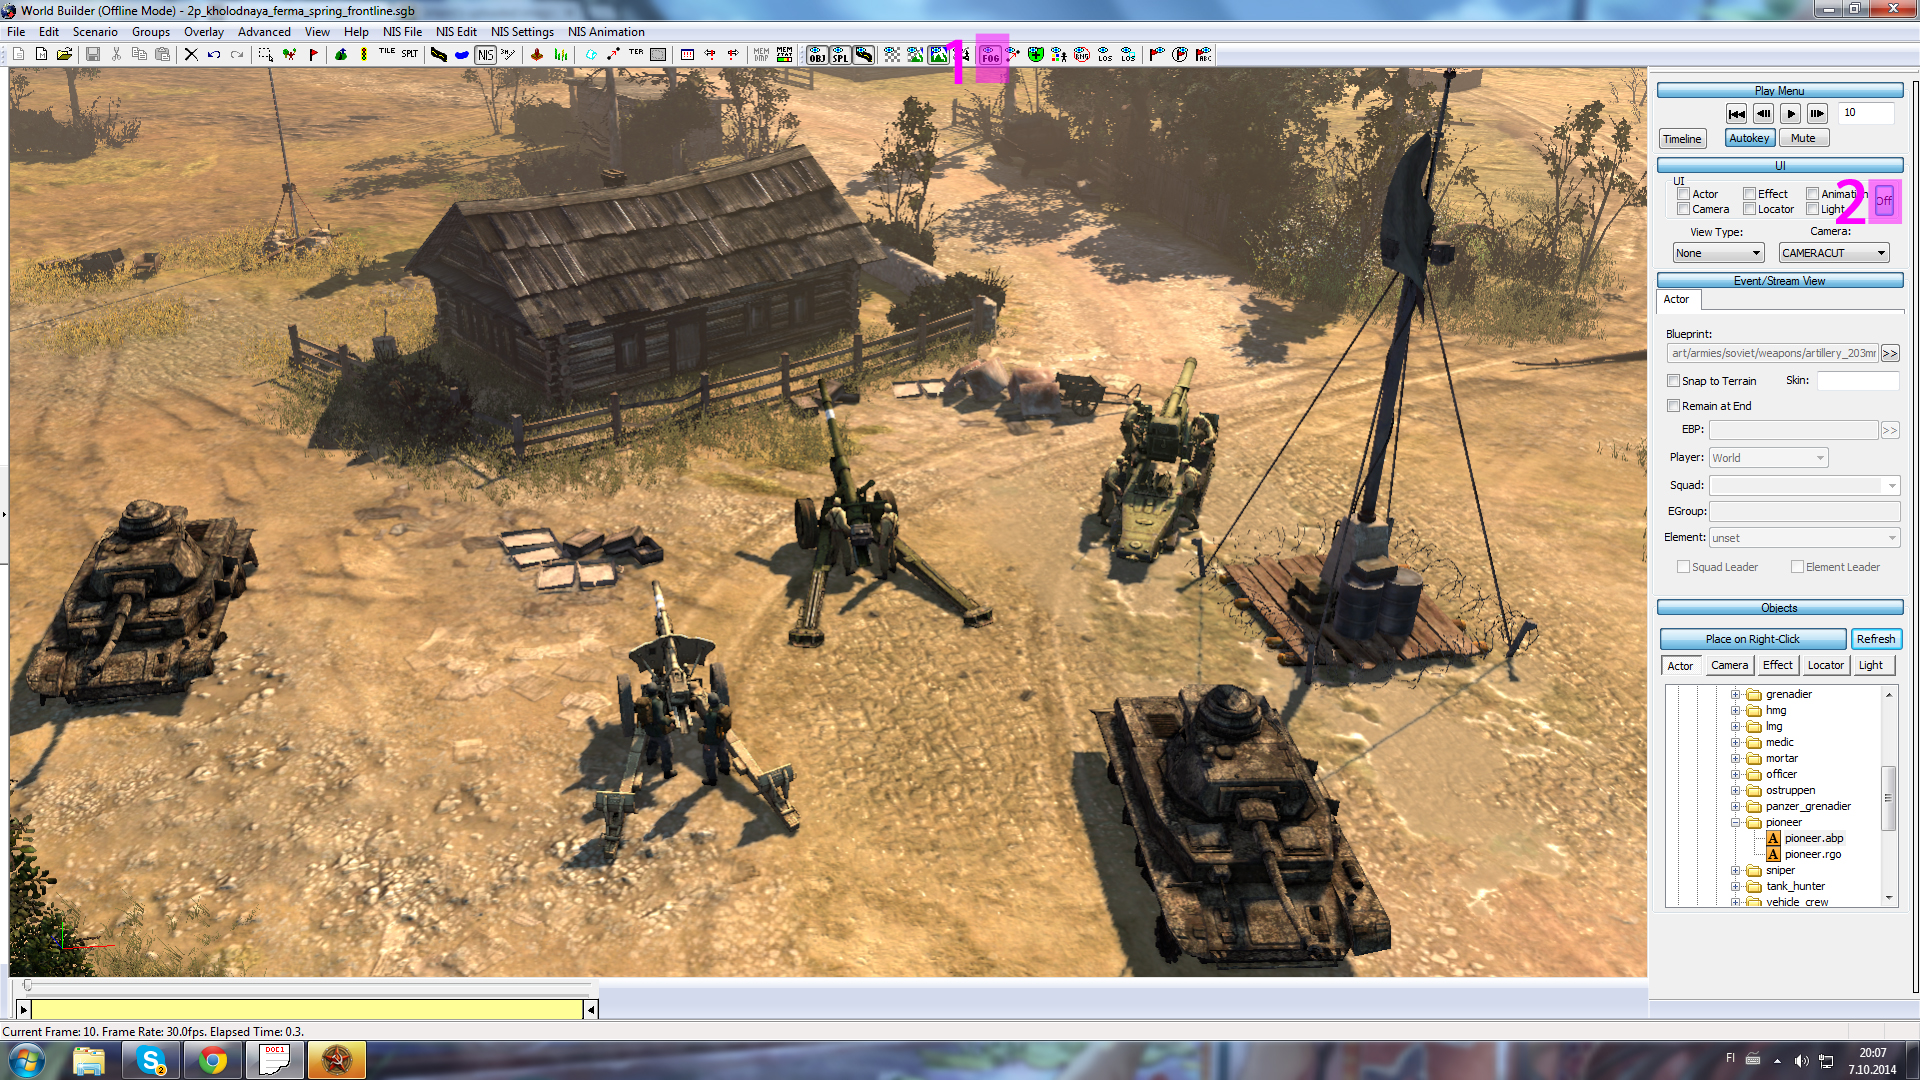
4.1. Artillery
1. You will need at least one lefh18 and two soldiers (mortar crew in this case)
Place the artillery and give it builds, 'artillery_state' and 'artillery_vertical' set the build to
one. You can choose what state and vertical number you want to use.
Add the crew by giving them a target visual, which is 'artillery_target' and set it to lefh18
Do this to both of the crew members. Now give the first one 'attach_gunner_artillery' from start action and then give 'attach_loader_artillery' to the second guy.
Now you have a functioning artillery piece. To make it fire, use this order for 'artillery_state'
in the timeline: 1 ready 2 aim 3 fire.
2. You will need one ml20 and two soldiers (engineers in this case).
You can drop the build variable from soviet arty pieces.
Place the artillery and give it 'artillery_state' and 'artillery_vertical'. You can choose what
state and vertical number you want to use.
Add the crew by giving them a target visual, which is 'artillery_target' and set it to ml20
Do this to both of the crew members. Now give the first one 'attach_gunner_artillery' from start
action and then give 'attach_loader_artillery' to the second guy.
3. You will need one B4 and four soldiers (engineers in this case).
Place the artillery and give it 'artillery_state' and 'artillery_vertical' you can choose what
state and vertical number you want to use.
Add the crew by giving them a target visual, which is 'artillery_target' and set it to b4
Do this to all of the crew members.
Now give the first and second engineers 'attach_gunner1_artillery' and 'attach_gunner2_artillery' from start action. Give the third and
fourth engineers 'attach_loader1_artillery' and 'attach_loader2_artillery'
figure10
4.2. Flamthrower and Repair Tools
1. Give the engineer 'blowtorch_state' and '_using_blowtorch' set them to on & active.
2. Give the engineer 'flamethrower_m2_visible' and 'flamethrower_state'.
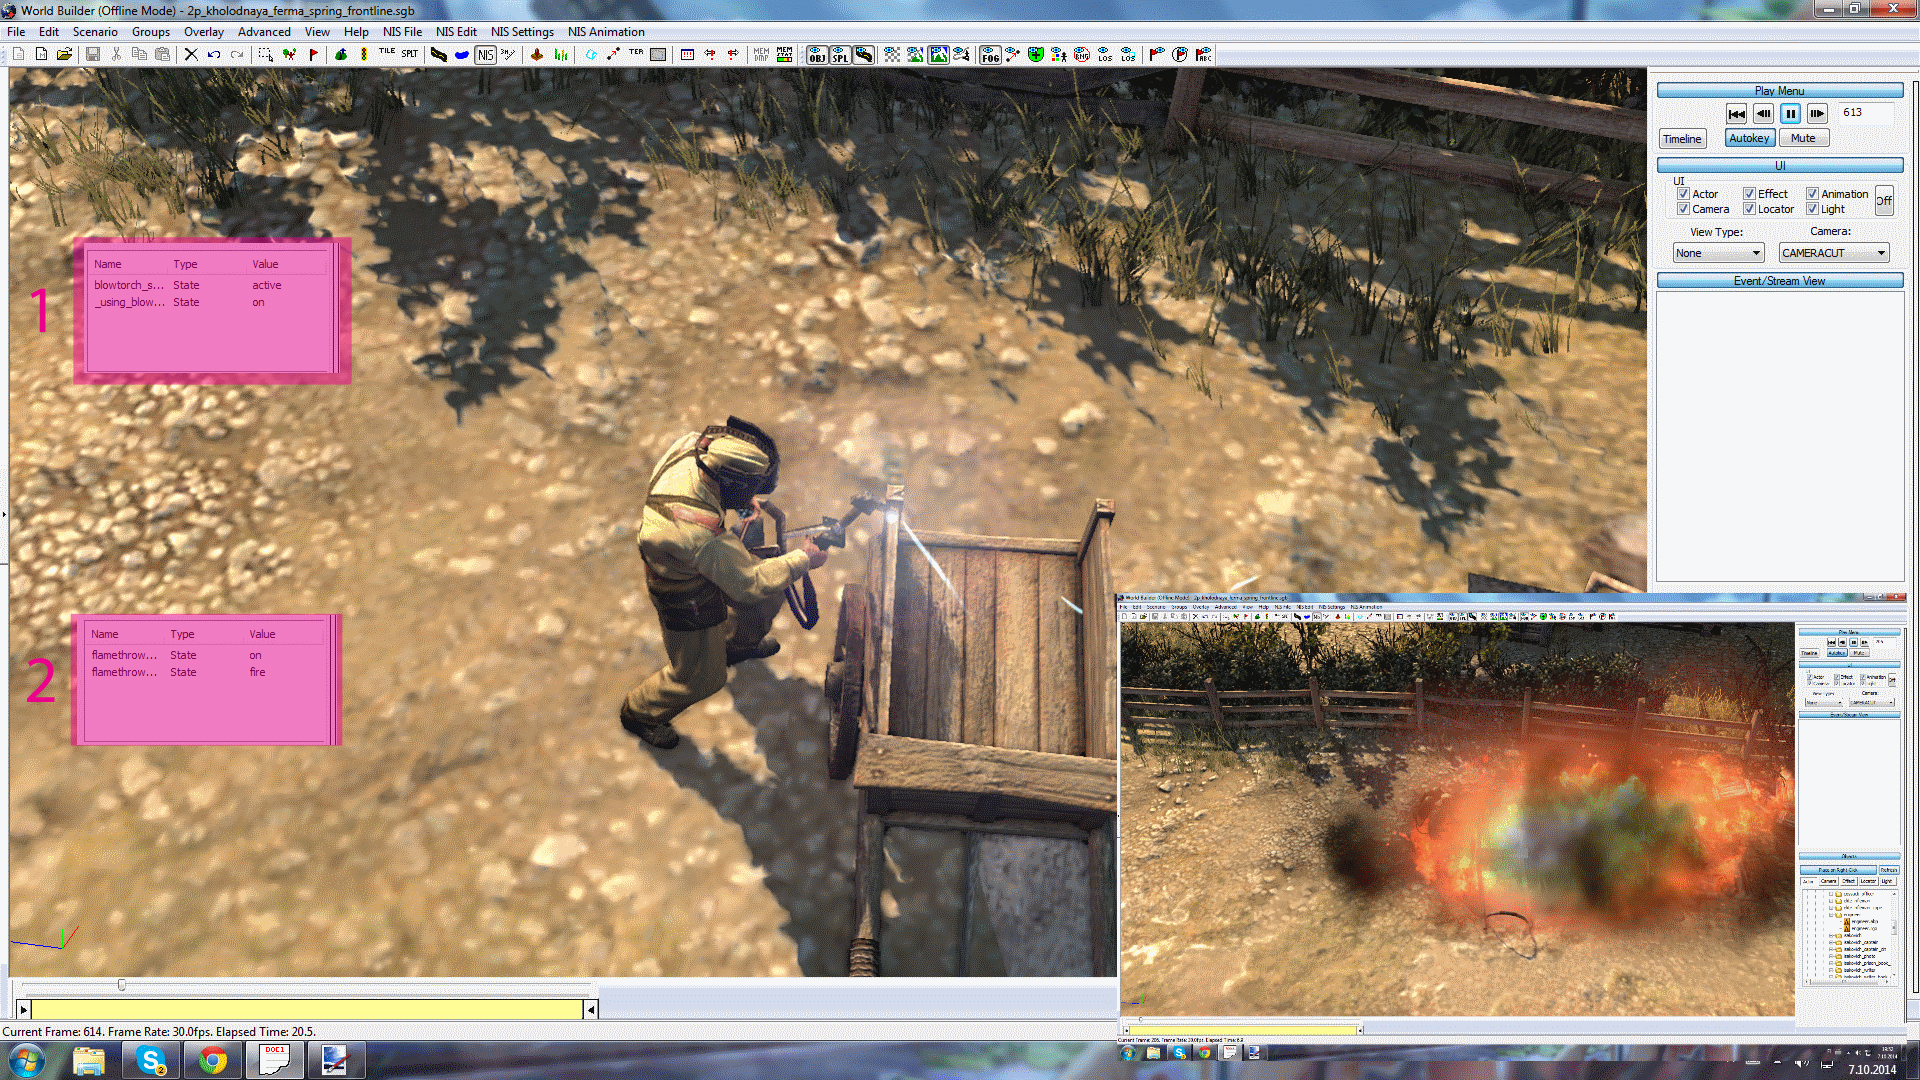
For some reason the flames come from the back of the engineer. I have not found a solution
to this, but you can add the flames from effects if you want to.
2. Give the engineer 'flamethrower_m2_visible' and 'flamethrower_state'.
figure11
For some reason the flames come from the back of the engineer. I have not found a solution
to this, but you can add the flames from effects if you want to.
4.3. Mortars
1. Give the mortar 'mortar_state', '60mm_visible' and 'mortar_manned'.
2. Give the two crew members 'mortar_target' and 'mortar_gunner_attach' and 'mortar_loader_attach'.
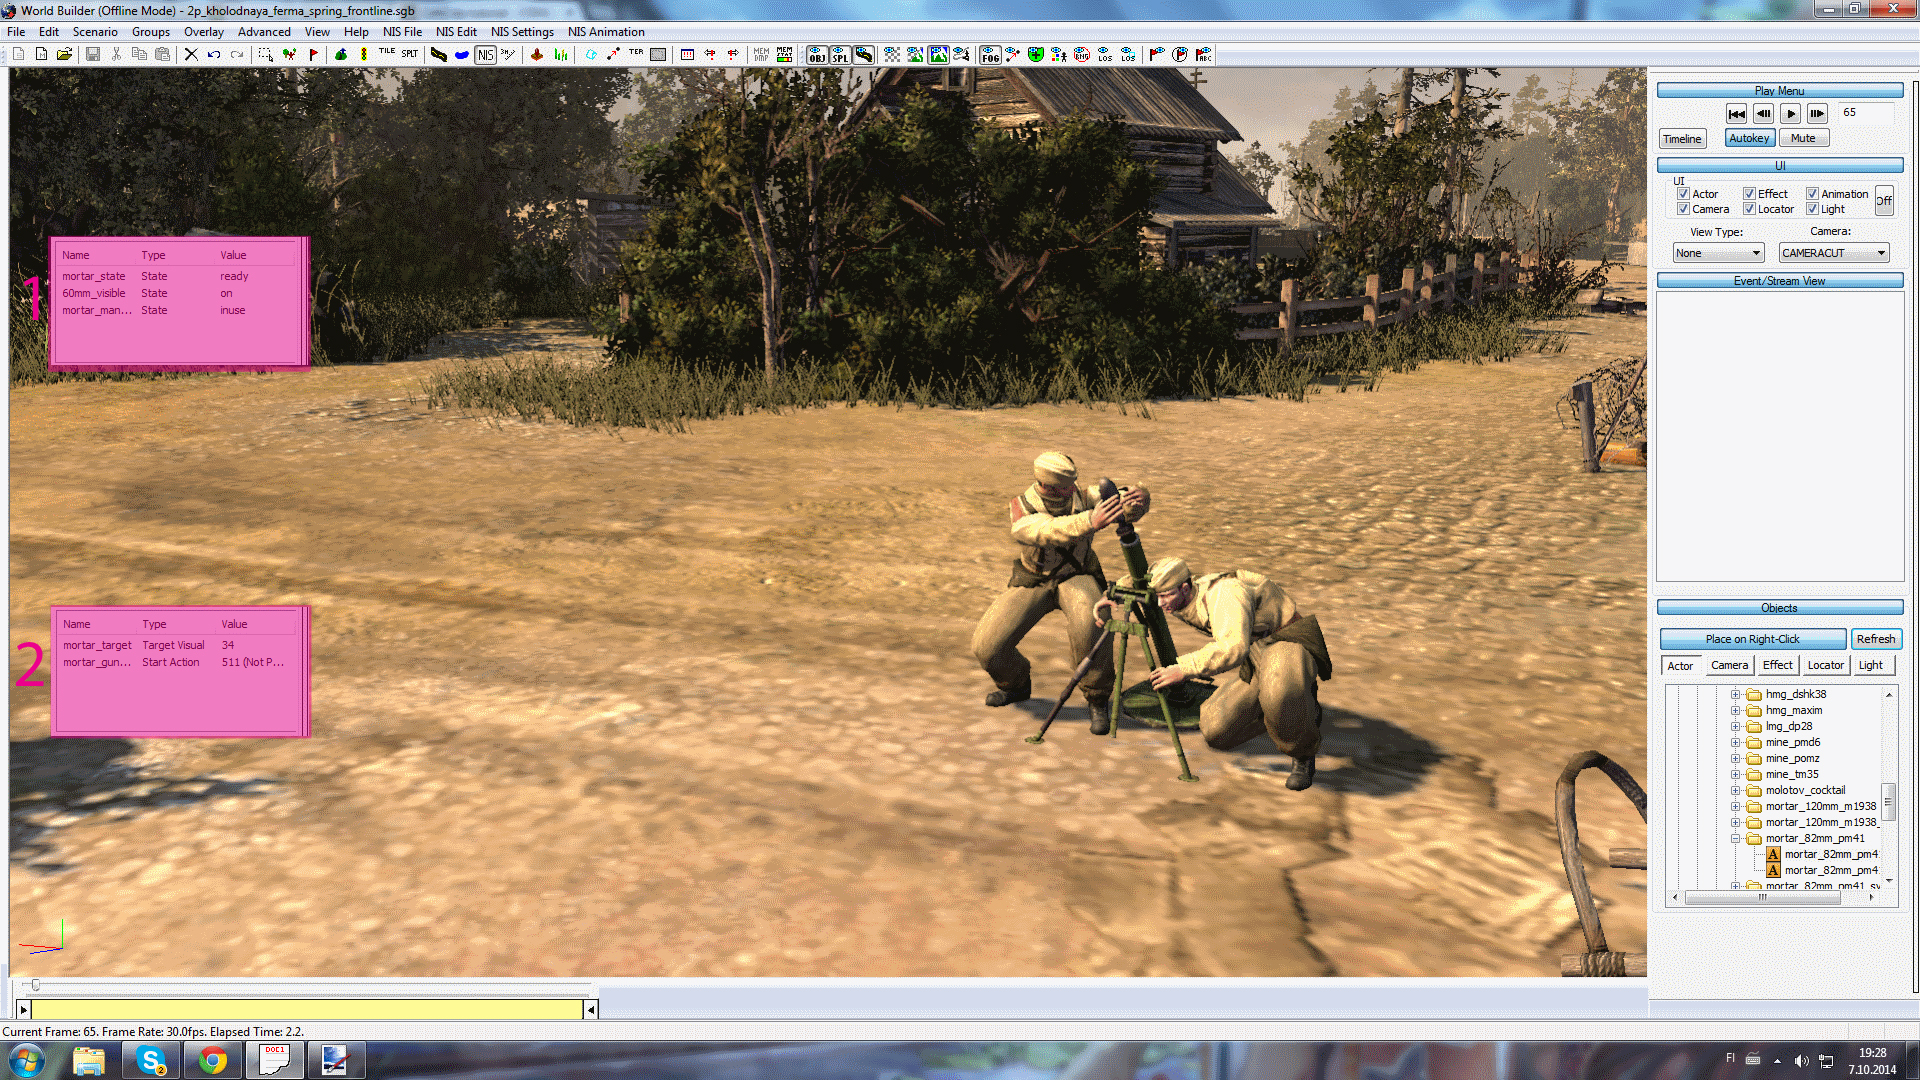
2. Give the two crew members 'mortar_target' and 'mortar_gunner_attach' and 'mortar_loader_attach'.
figure12
4.4. AT-Guns
1. Add 'antitankgun_state'.
2. Give 'antitank_target' for both of the crew members and then add 'attach_gunner_antitank' and 'attach_loader_antitank'.

2. Give 'antitank_target' for both of the crew members and then add 'attach_gunner_antitank' and 'attach_loader_antitank'.
figure13
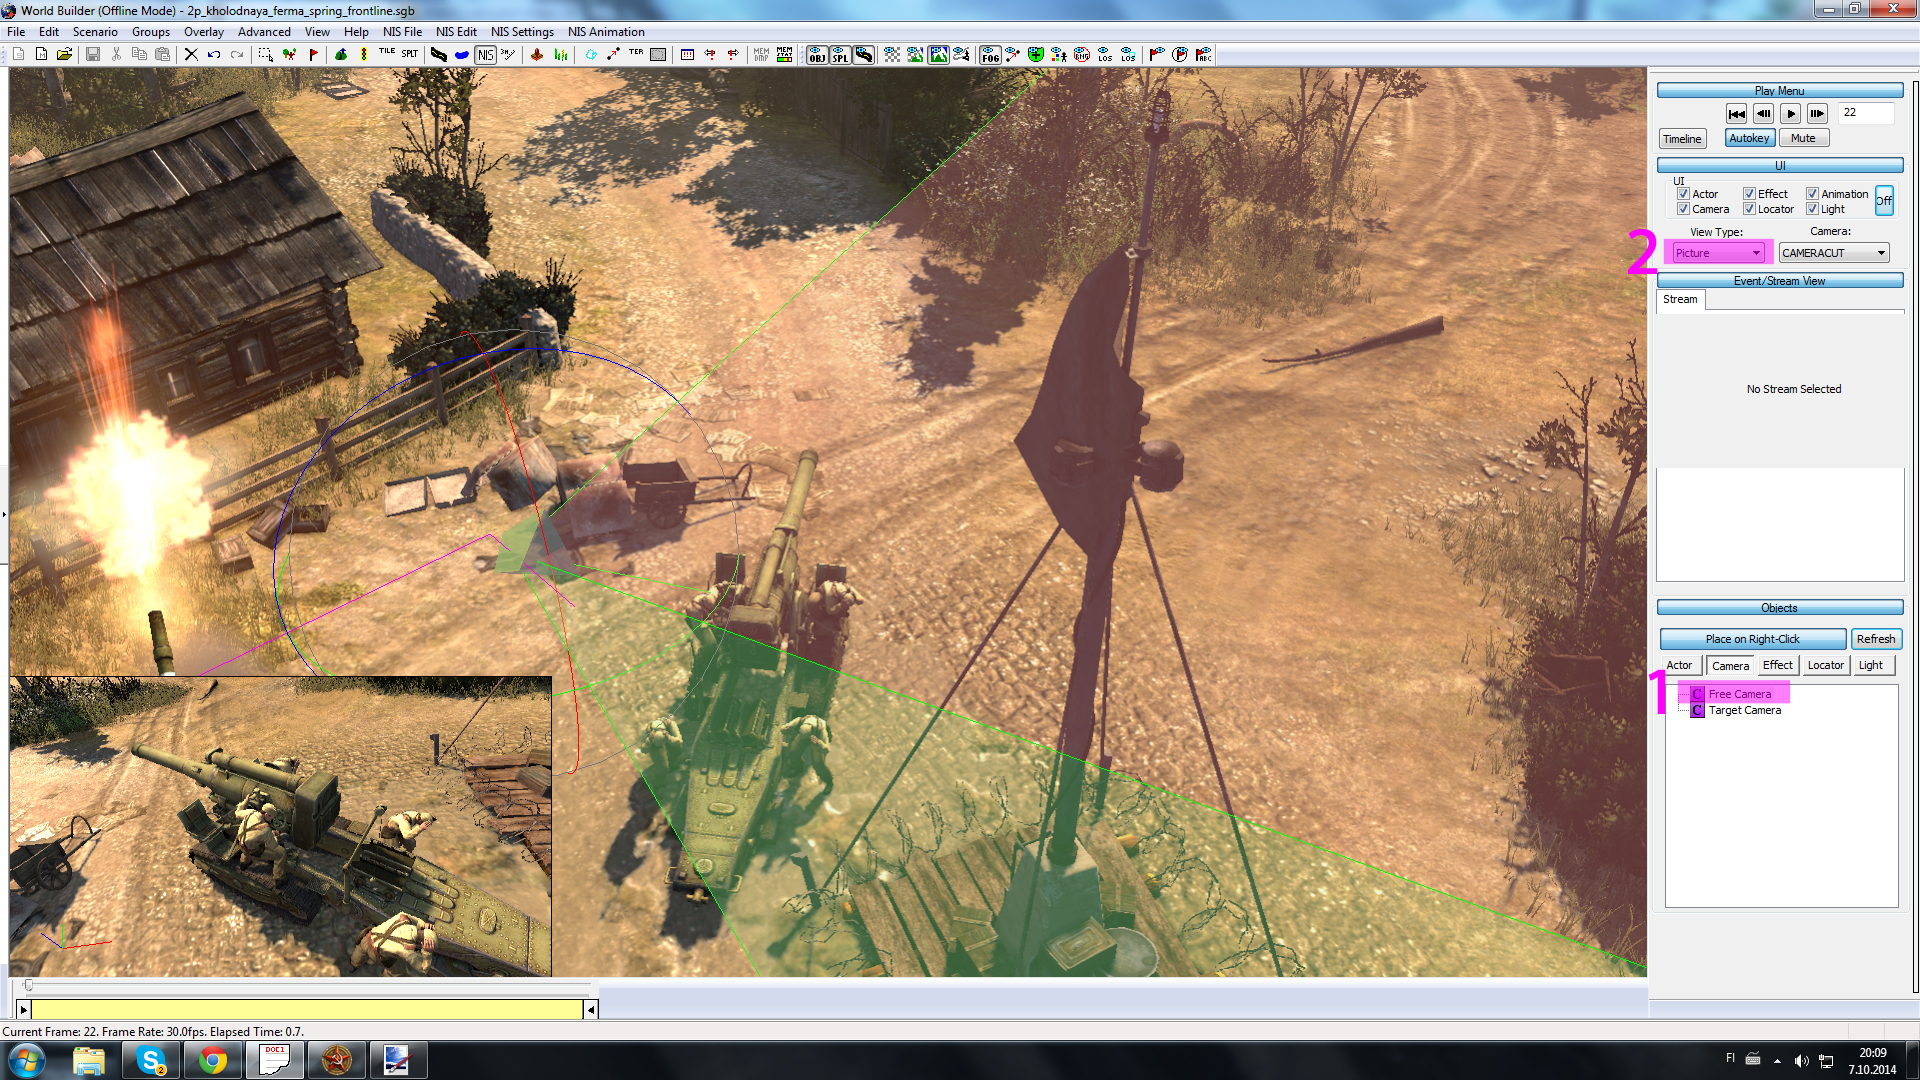
5. Camera
1. Place a camera.
2. Click on picture or fullscreen to view the camera picture.
For recording you need to use your own recording software, like fraps or bandicam.
Remember to: 1. turn fog of war back on, 2. turn the ui off and go fullscreen.
2. Click on picture or fullscreen to view the camera picture.
figure9.1
For recording you need to use your own recording software, like fraps or bandicam.
Remember to: 1. turn fog of war back on, 2. turn the ui off and go fullscreen.
figure9.2
Extra Note:
The order of the animations on will sometimes matter. So if your animation is not working, be sure to check the order of your animations.
I'm sure that I forgot to explain something, so just ask/leave a comment if you have a problem with something.
I'm sure that I forgot to explain something, so just ask/leave a comment if you have a problem with something.
 Sirlami
  tengen
  pigsoup
  FichtenMoped