
WorldBuilder TotW#12: Capturable Area
Welcome back, ladies and gents, to the WorldBuilder Tip of the Week. This week, the crew here at COH2.ORG are continuing to provide you with little hints and tips to help you use the WorldBuilder tool efficiently and effectively. Hopefully, helping to improve and ease your mapping experience!
In this week's Tip of the Week, we'll be looking at an addition to Company of Heroes 2, and something that all maps feature. That is Capturable Areas.
These areas which surround territory points are designed to allow units to control areas without having to traditionally stand around a flag like they've having a private conversation. With this in mind, it also allows units to defend themselves while they are capturing, thus massively increasing the possibility for new and interesting tactics.
To get started, once you have painted your territory on a map, open up the "Ter" button and use the territory painting view.
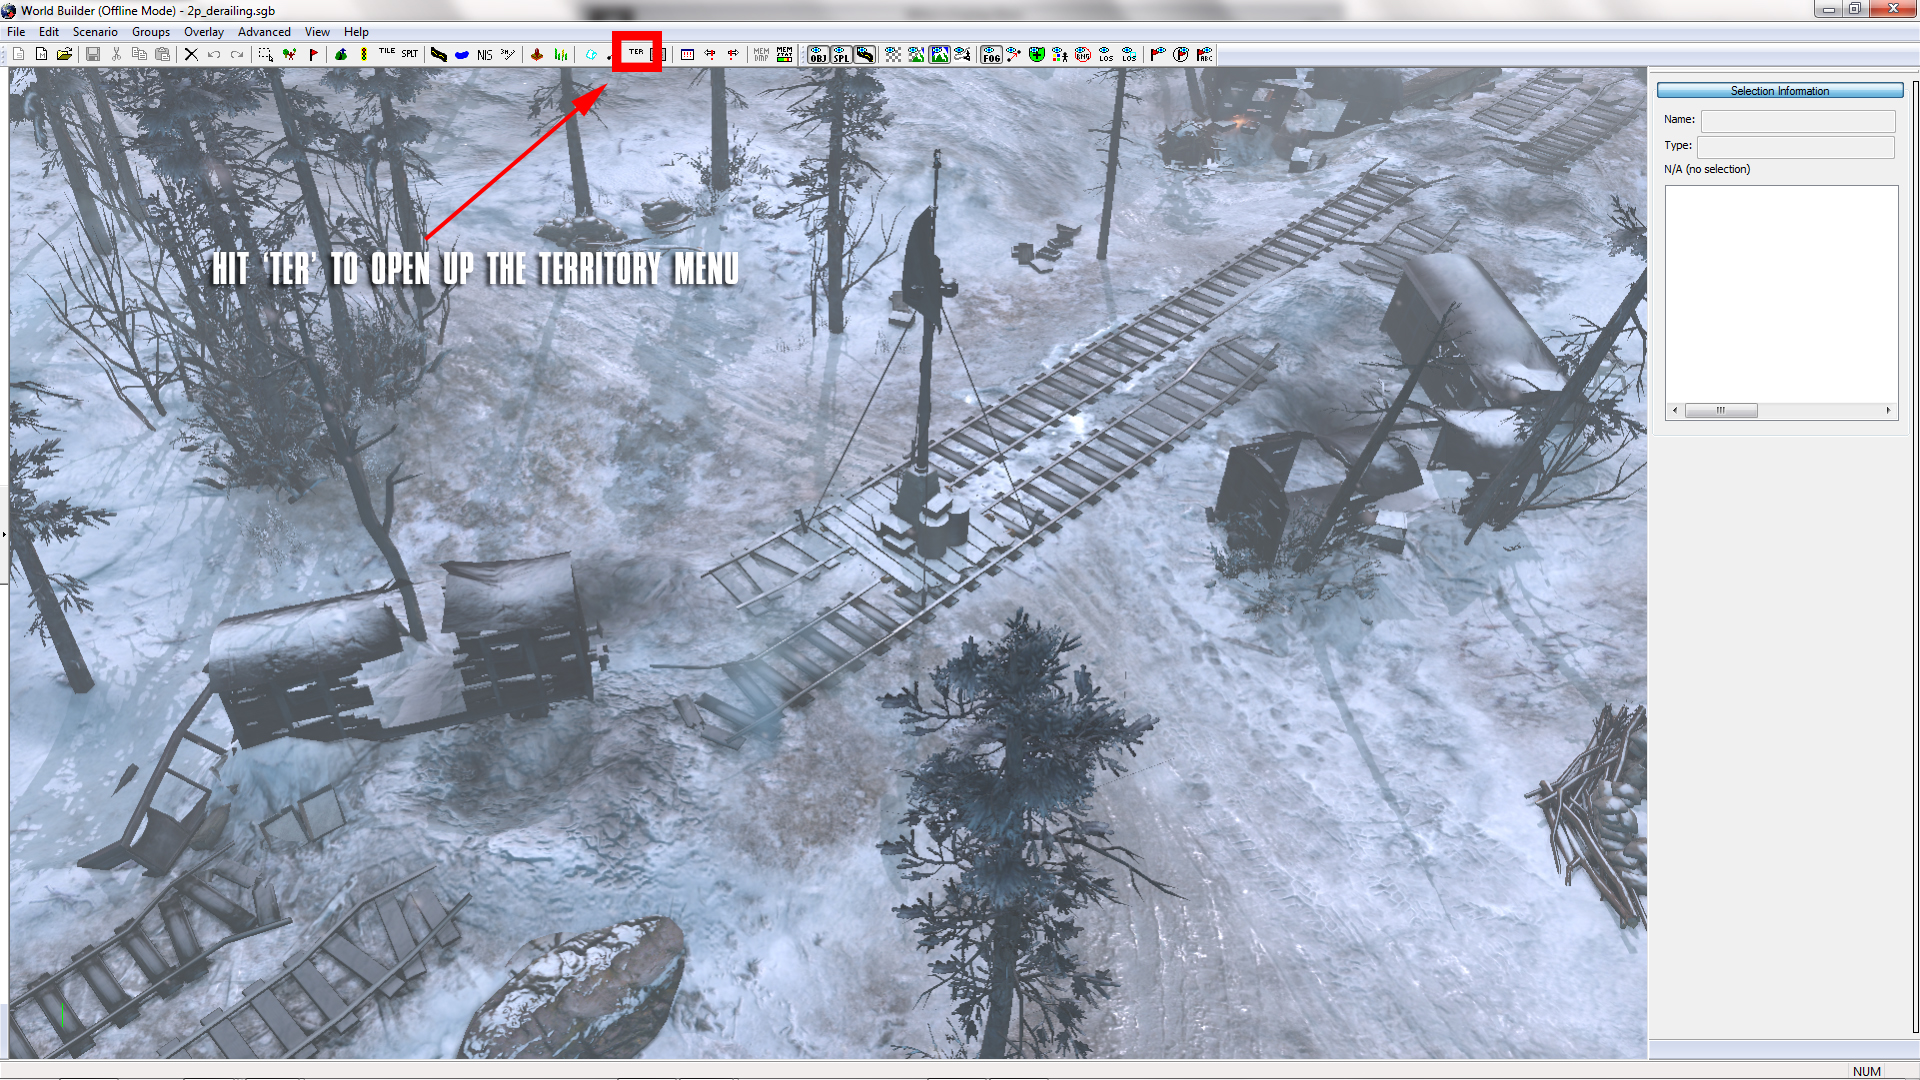
In this view, territory sectors appear in different colours, with the Capturable Area in a lighter shade. Once you have clicked "Paint Capturable", after having sampled a sector, you can change the generic shape and size of the Capturable Area.
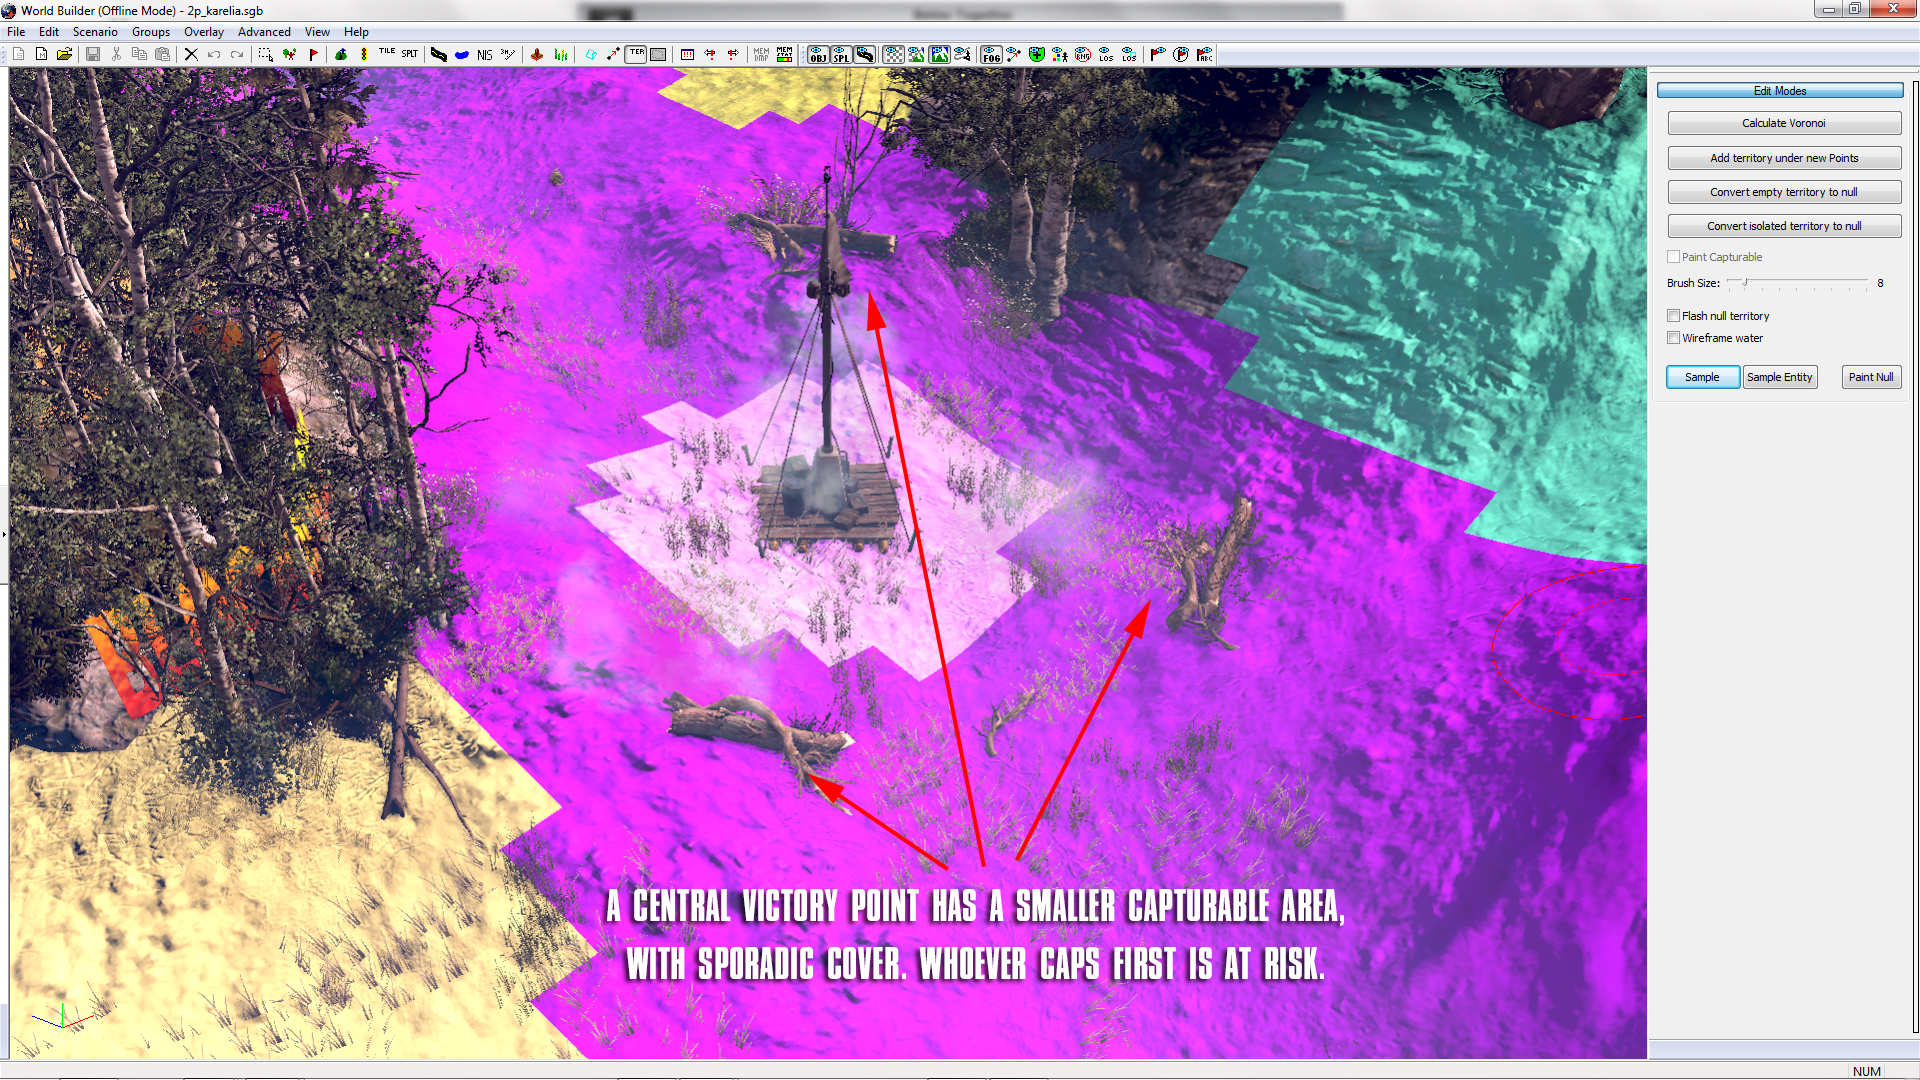
What is unique about custom maps is the territory layout that you give them, and at the end of the day, territory can make or break a map. In this example, the Victory Point in the centre of the map is uniquely challenging, with blocking objects to the flanks, and a distinct lack of cover within the Capturable Area. In turn, this allows units outside of the area to have a clear advantage over units who are attempting to take the territory.
Areas of competitive layouts are a must in every map, and Victory Points are ideal locations to utilise this.
In the same map, however, I have created a situation very different to the former Victory Point. In this corner Victory Point the cover is plentiful around the point, however none of it forms a direct advantage to the attacker. Instead, defenders can easily use strong cover to hold their position. To counter this, use walls or shot-blocking objects such as buildings to allow attackers to flank.

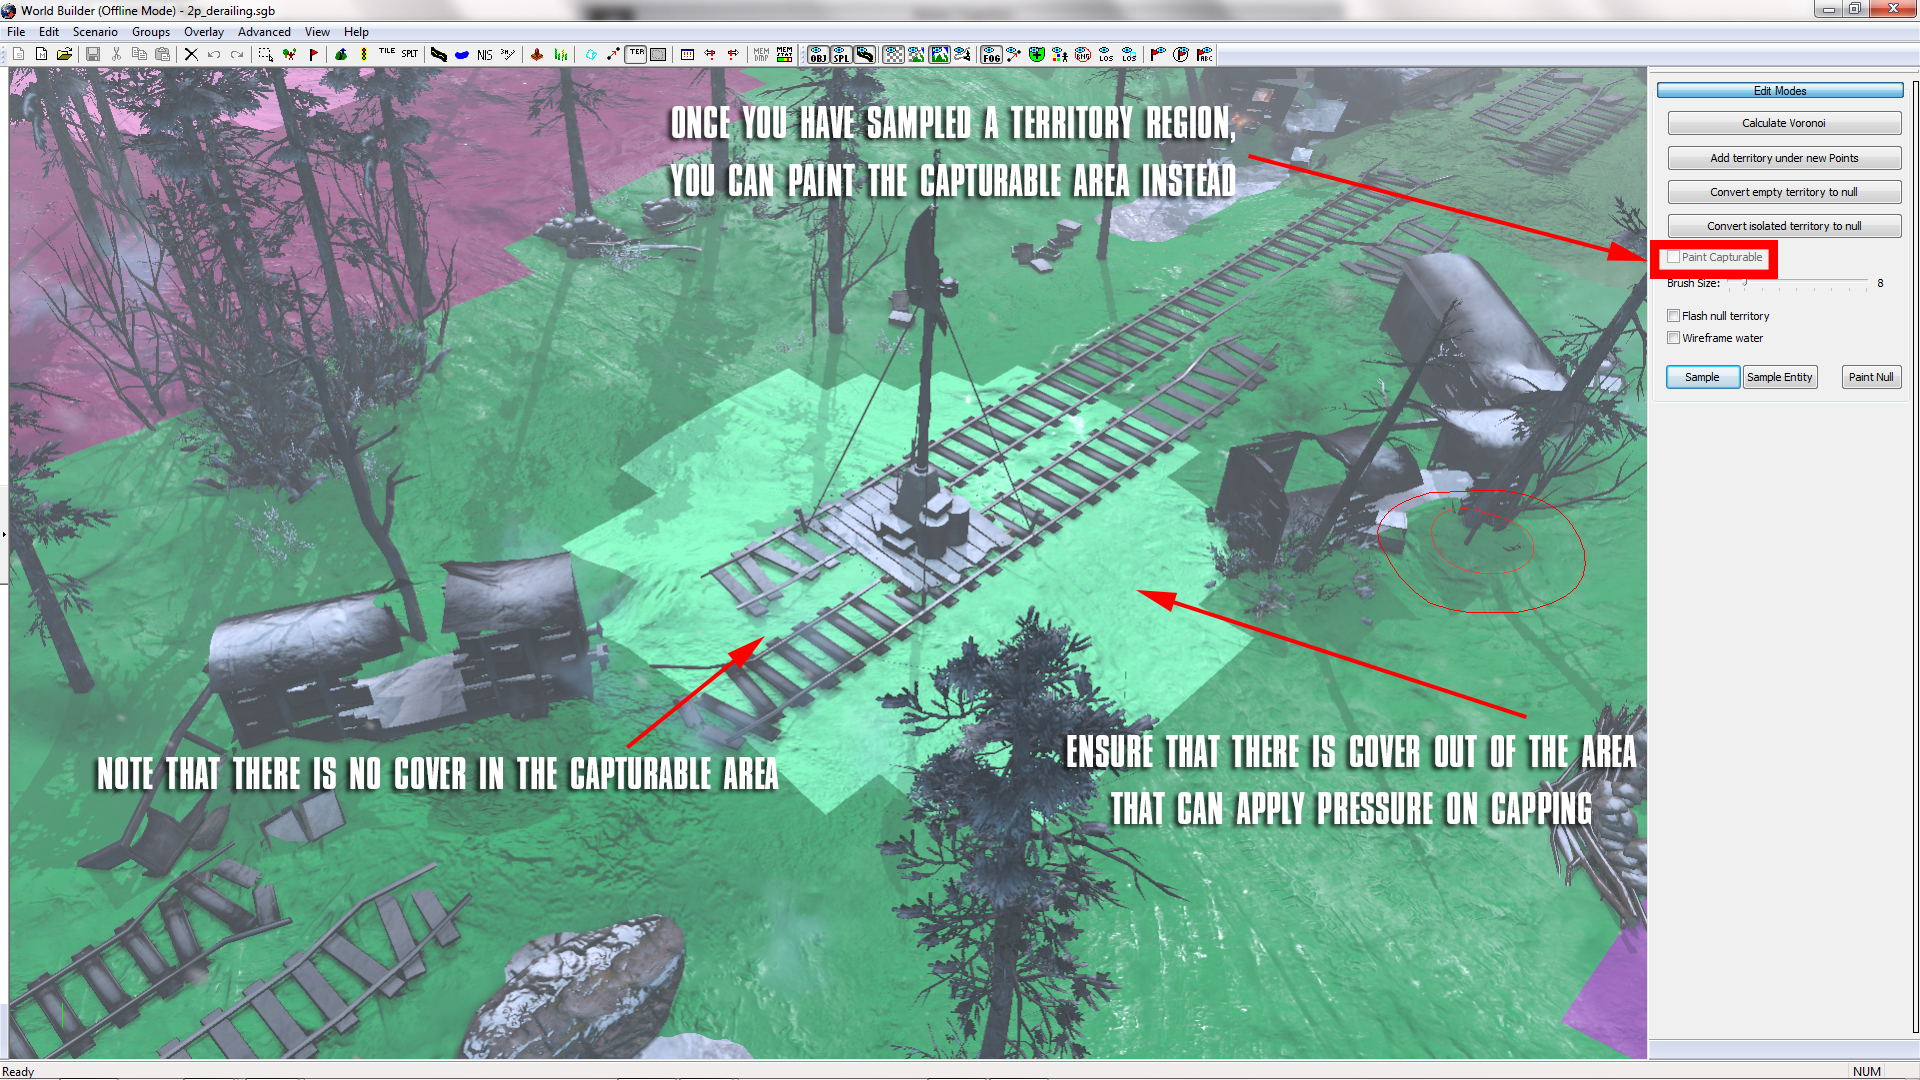
In another map, you may encounter the situation in Figure 4. Here we see two Munitions Points that are within sight of each other. By using impass to cut movement between the two points (rocks in this example), we can instead use heavy cover near each point to allow them to be defended. However at the same time, ultimately preventing them from having an advantage over the other point. Instead, these two points have flanking routes around them both which entitle a certain level of risk.
Once again, in the same map, we have another central Victory Point. In this case, the Capturable Area is far smaller with small collections of cover nearby. In essence, if units rush for this point at the same time, whoever enters the Capturable Area first is without protection and is at risk. Thus, they must either retreat or advance (at loss) to find cover again. In doing so, they leave the Capturable Area and suffer accordingly.
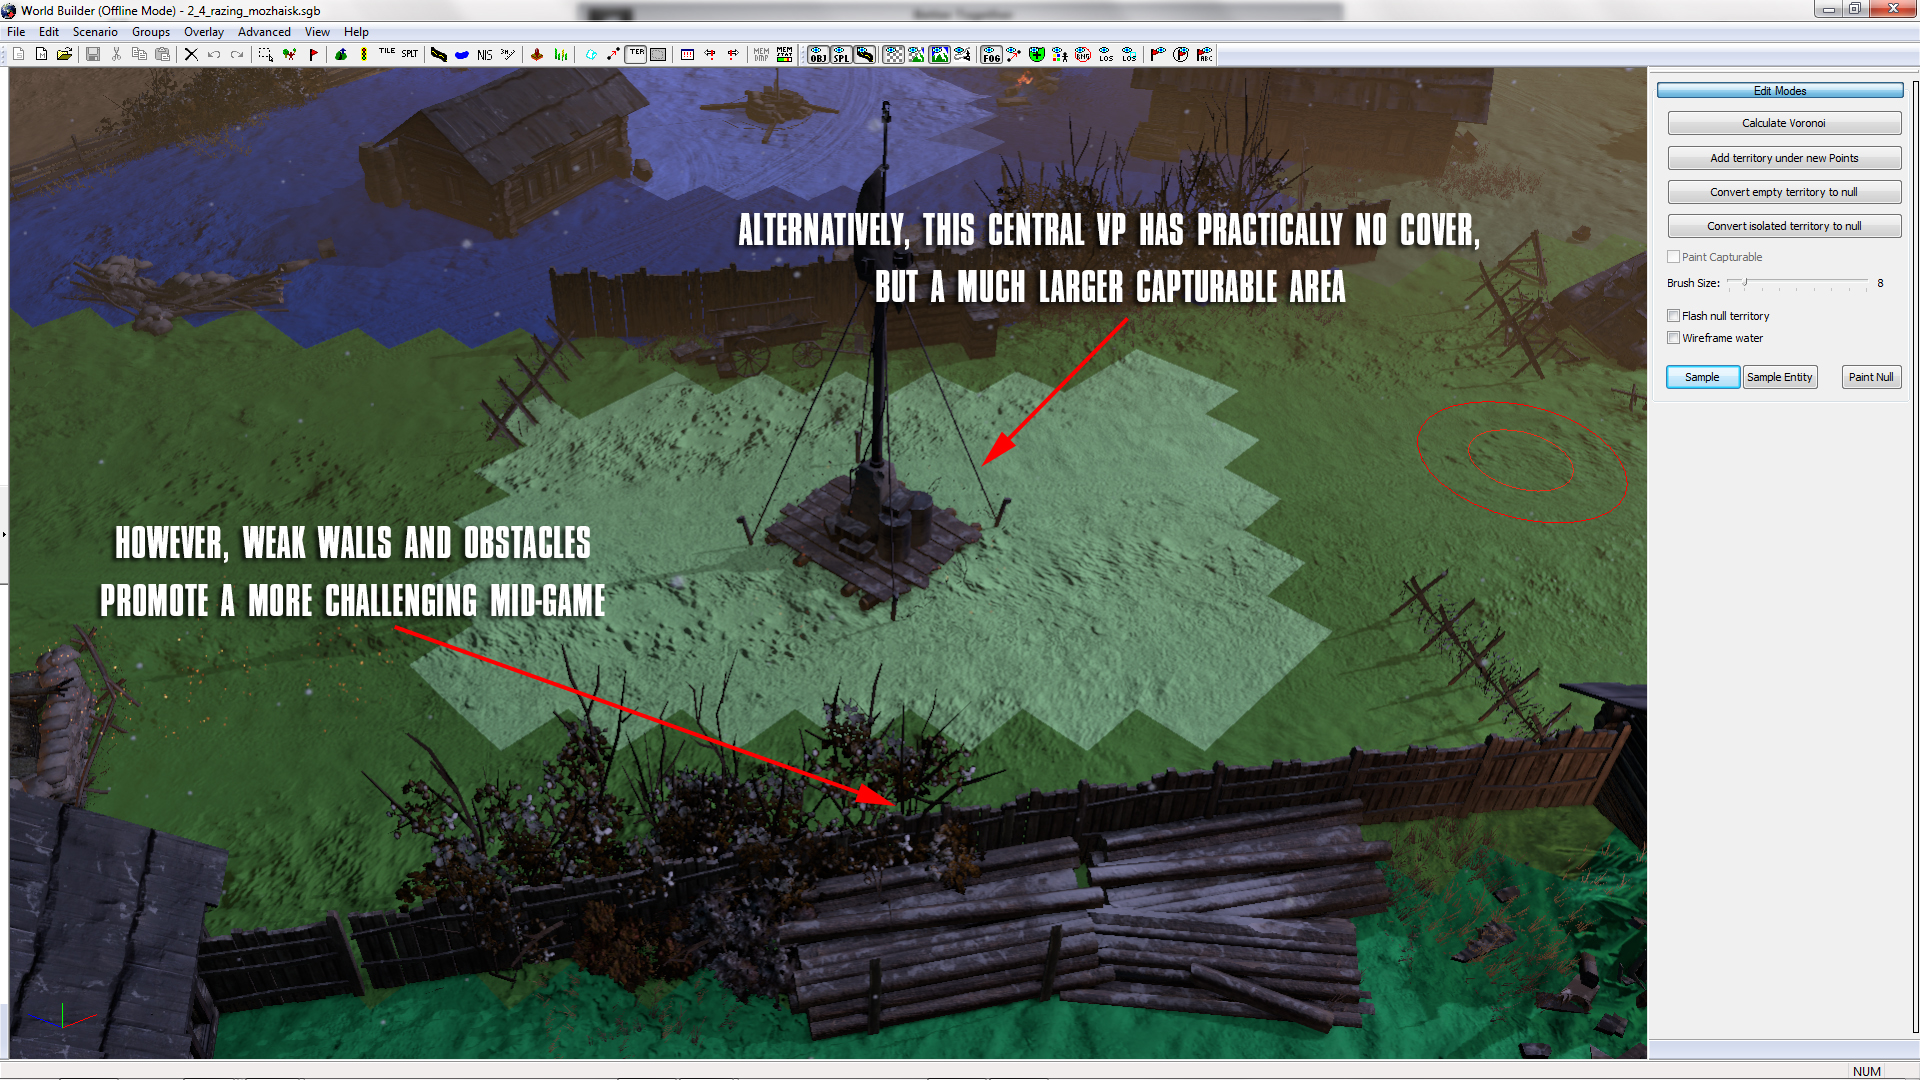
In another example, we have a rare occurrence. In (2 - 4) Razing Mozhaisk, the central Victory Point has practically no cover what so ever, but an exceptionally large Capturable Area. The idea behind this area shows that contact in this street is lethal during the early-game, and combined tactics are required to take it and hold it effectively. However, fences on the flanks can be taken down with mid-game weaponry, thus allowing flanking options to open up.
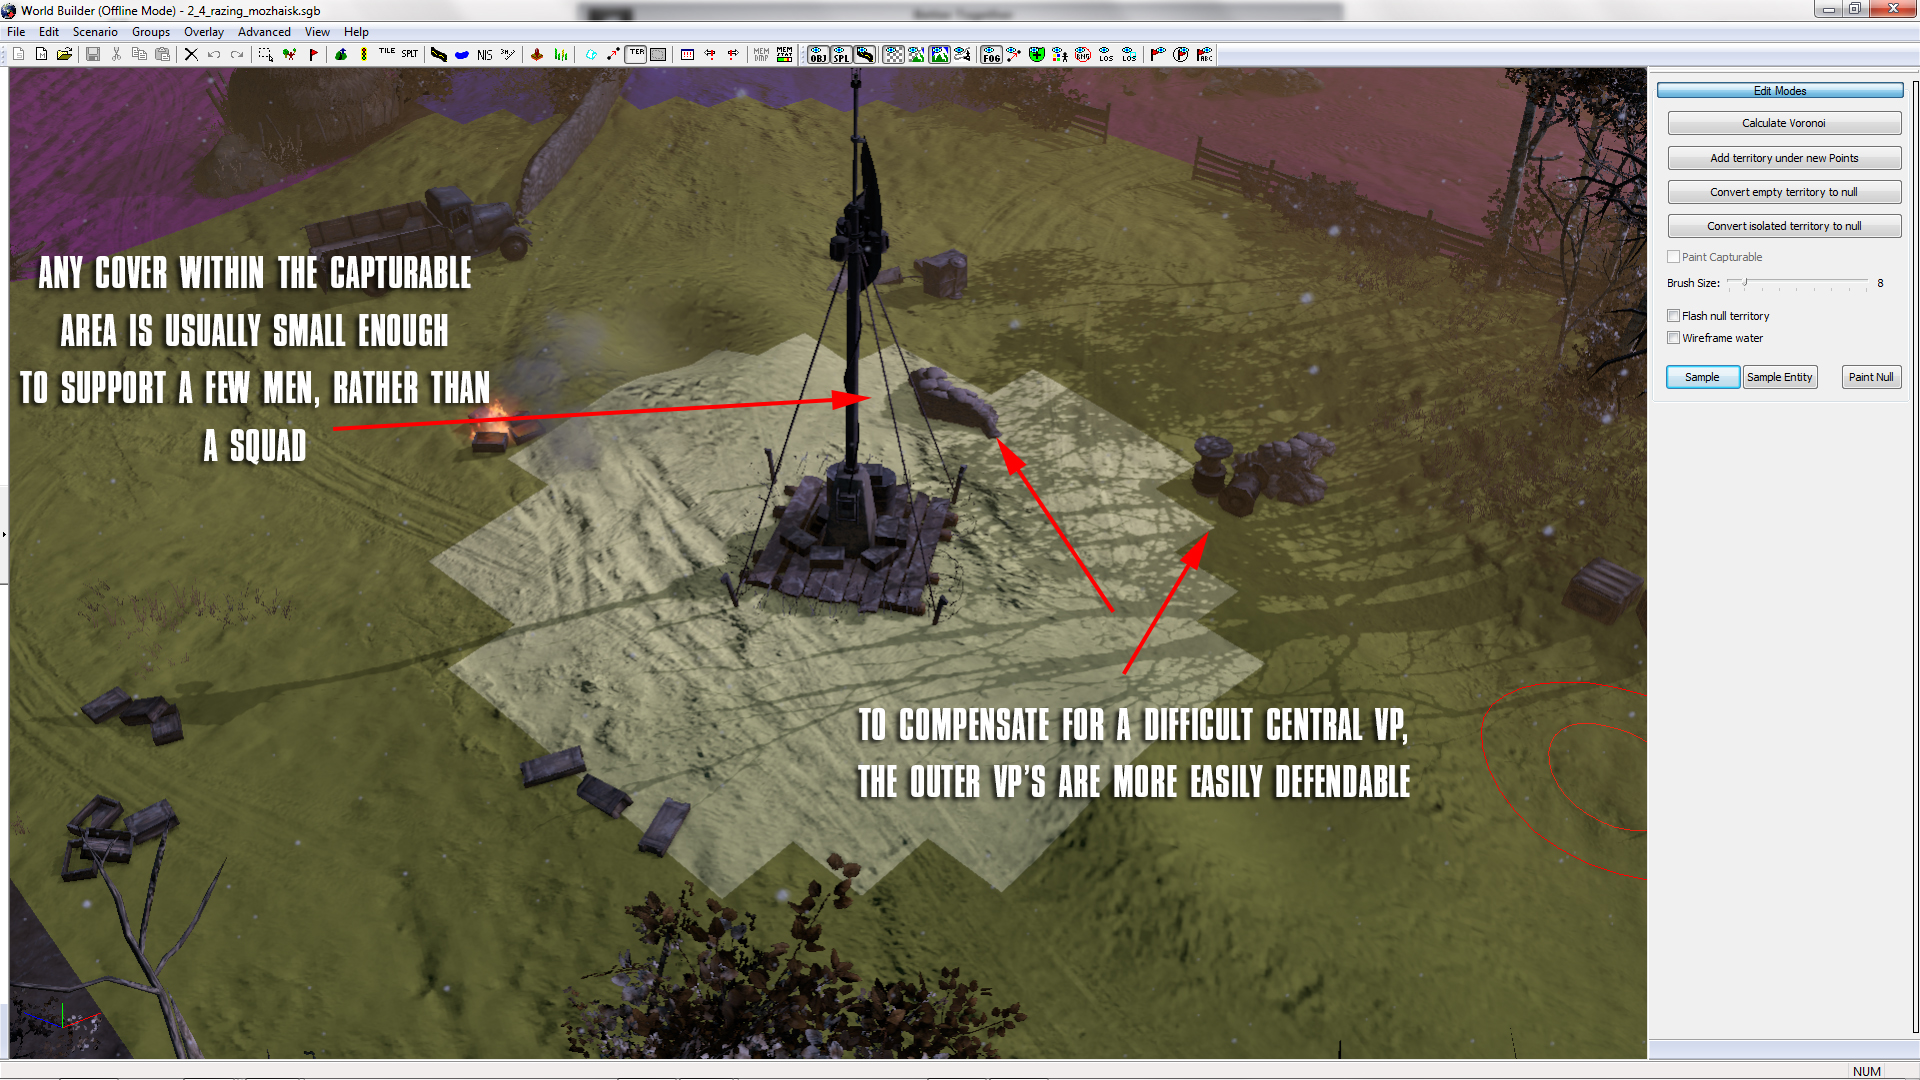
To compensate for such a difficult Victory Point, the remaining Victory Points instead use cover within their Capturable Areas to allow infantry to survive longer in early engagements (unlike the central Victory Point, where engagements are short-lived). However, to balance the use of cover within the Capturable Area, I have ensured that it is only minor cover, large enough for only a few men at a time.
By using "easier" Victory Points, combat is shifted to the edges of the map, where players have a greater chance to advance over their opponents. I would also recommend that near Victory Points, you consider "building room", where bunkers, walls and other defences can easily be built. Allowing the creation of a fair, balanced sector.

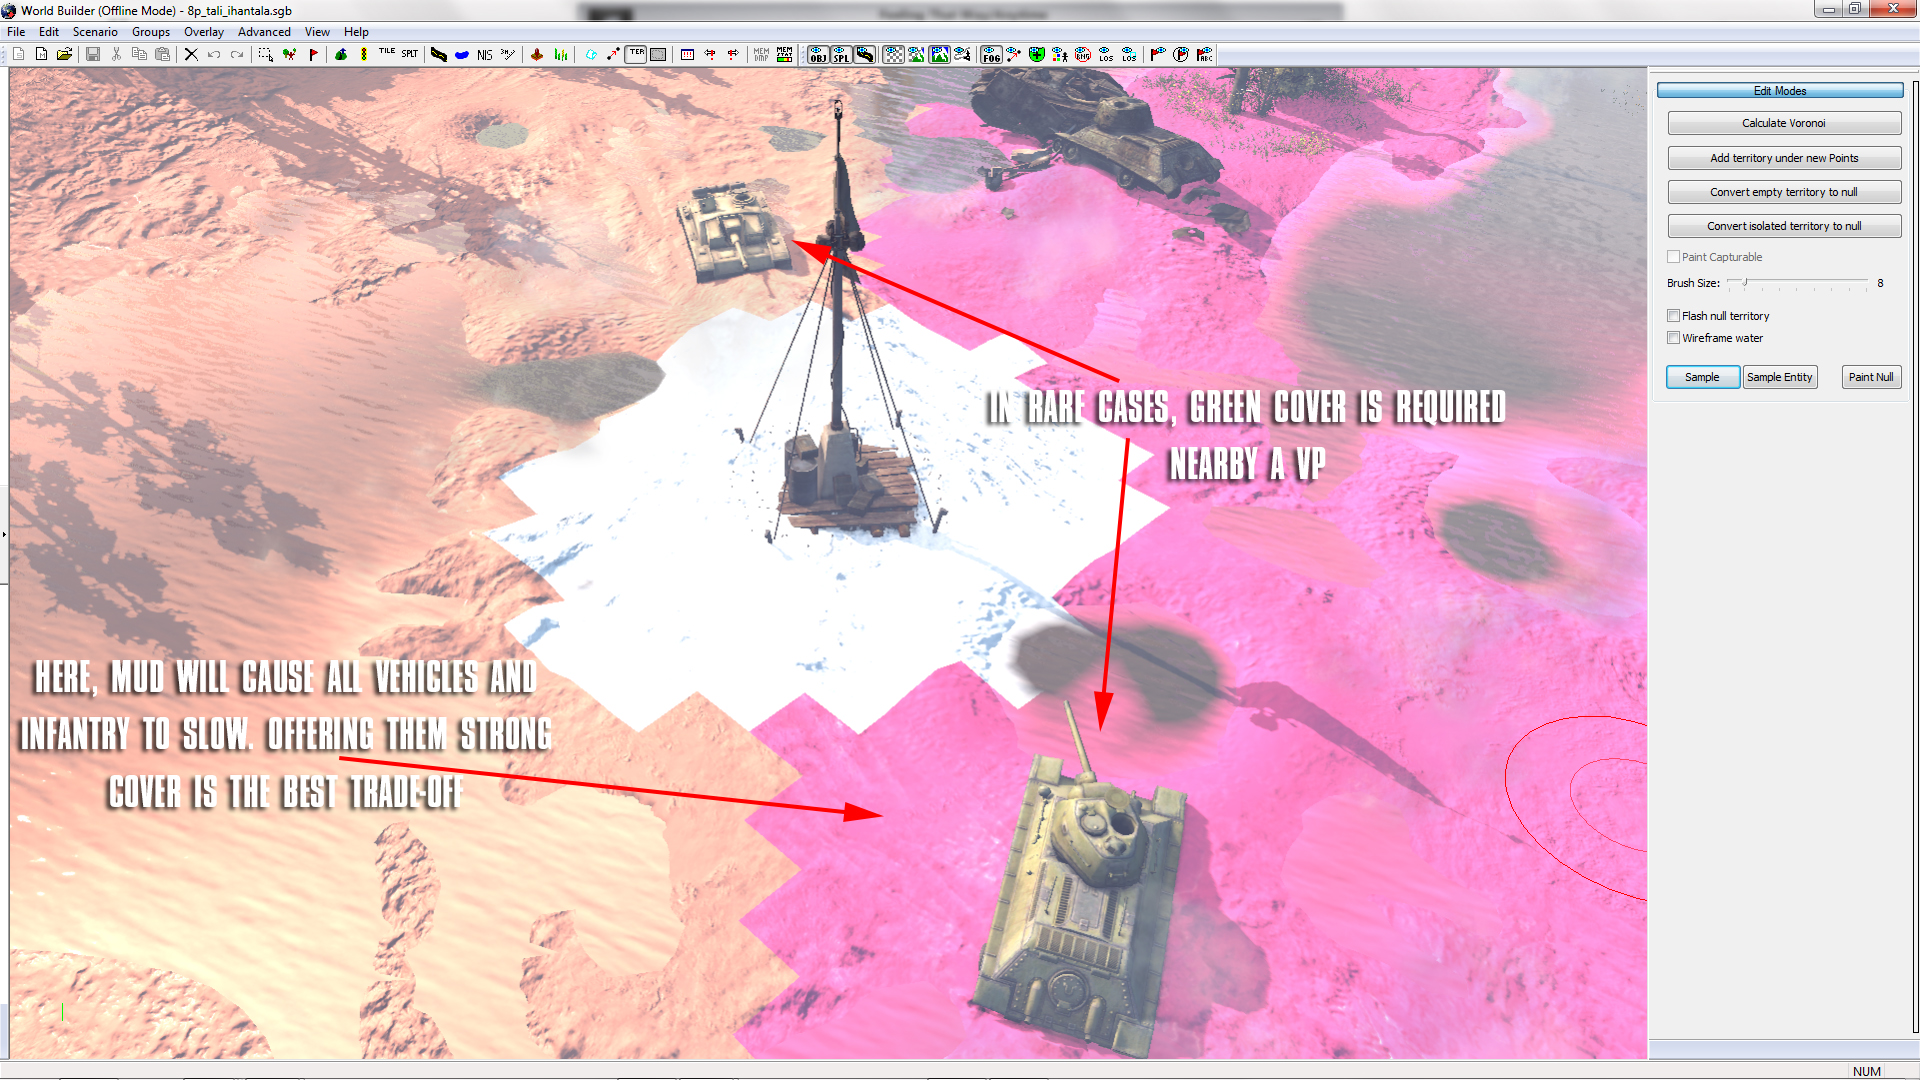
Finally, in certain circumstances, serious cover is required where Capturable Areas are extremely difficult to hold. In Figure 9, mud and water create a dangerous zone, requiring green cover nearby to allow either team a chance to take it and hold for any length of time.
While these designs are always a work in progress, I urge you to try some for yourself. Or if you're feeling upto it, design your own and post them in the comments section.
Fancy seeing these in practice?
The maps used in these examples include:
(2 - 4) Razing Mozhaisk
(2 - 4) Derailing the DR-K320
(2 - 4) Karelia Summer
(6 - 8) Tali-Ihantala
Please check back next week, when we will provide you with a new WorldBuilder Tip of the Week. But until then, keep mapping!
In this week's Tip of the Week, we'll be looking at an addition to Company of Heroes 2, and something that all maps feature. That is Capturable Areas.
These areas which surround territory points are designed to allow units to control areas without having to traditionally stand around a flag like they've having a private conversation. With this in mind, it also allows units to defend themselves while they are capturing, thus massively increasing the possibility for new and interesting tactics.
To get started, once you have painted your territory on a map, open up the "Ter" button and use the territory painting view.
Figure 1
In this view, territory sectors appear in different colours, with the Capturable Area in a lighter shade. Once you have clicked "Paint Capturable", after having sampled a sector, you can change the generic shape and size of the Capturable Area.
Figure 2
What is unique about custom maps is the territory layout that you give them, and at the end of the day, territory can make or break a map. In this example, the Victory Point in the centre of the map is uniquely challenging, with blocking objects to the flanks, and a distinct lack of cover within the Capturable Area. In turn, this allows units outside of the area to have a clear advantage over units who are attempting to take the territory.
Areas of competitive layouts are a must in every map, and Victory Points are ideal locations to utilise this.
In the same map, however, I have created a situation very different to the former Victory Point. In this corner Victory Point the cover is plentiful around the point, however none of it forms a direct advantage to the attacker. Instead, defenders can easily use strong cover to hold their position. To counter this, use walls or shot-blocking objects such as buildings to allow attackers to flank.
Figure 3
In another map, you may encounter the situation in Figure 4. Here we see two Munitions Points that are within sight of each other. By using impass to cut movement between the two points (rocks in this example), we can instead use heavy cover near each point to allow them to be defended. However at the same time, ultimately preventing them from having an advantage over the other point. Instead, these two points have flanking routes around them both which entitle a certain level of risk.
Figure 4
Once again, in the same map, we have another central Victory Point. In this case, the Capturable Area is far smaller with small collections of cover nearby. In essence, if units rush for this point at the same time, whoever enters the Capturable Area first is without protection and is at risk. Thus, they must either retreat or advance (at loss) to find cover again. In doing so, they leave the Capturable Area and suffer accordingly.
Figure 5
In another example, we have a rare occurrence. In (2 - 4) Razing Mozhaisk, the central Victory Point has practically no cover what so ever, but an exceptionally large Capturable Area. The idea behind this area shows that contact in this street is lethal during the early-game, and combined tactics are required to take it and hold it effectively. However, fences on the flanks can be taken down with mid-game weaponry, thus allowing flanking options to open up.
Figure 6
To compensate for such a difficult Victory Point, the remaining Victory Points instead use cover within their Capturable Areas to allow infantry to survive longer in early engagements (unlike the central Victory Point, where engagements are short-lived). However, to balance the use of cover within the Capturable Area, I have ensured that it is only minor cover, large enough for only a few men at a time.
Figure 7
By using "easier" Victory Points, combat is shifted to the edges of the map, where players have a greater chance to advance over their opponents. I would also recommend that near Victory Points, you consider "building room", where bunkers, walls and other defences can easily be built. Allowing the creation of a fair, balanced sector.
Figure 8
Finally, in certain circumstances, serious cover is required where Capturable Areas are extremely difficult to hold. In Figure 9, mud and water create a dangerous zone, requiring green cover nearby to allow either team a chance to take it and hold for any length of time.
Figure 9
While these designs are always a work in progress, I urge you to try some for yourself. Or if you're feeling upto it, design your own and post them in the comments section.
Every map is different, but they all deserve a well-designed territory layout.
Fancy seeing these in practice?
The maps used in these examples include:
(2 - 4) Razing Mozhaisk
(2 - 4) Derailing the DR-K320
(2 - 4) Karelia Summer
(6 - 8) Tali-Ihantala
Please check back next week, when we will provide you with a new WorldBuilder Tip of the Week. But until then, keep mapping!
 MonolithicBacon
  OnkelSam
  Pheenyx