
Obtaining the tools
This tutorial will guide you through the steps of creating a modification with the official Company of Heroes 2 modding tools. In this tutorial we will focus on creating tuning packs which are mainly focused on changing attributes. This includes, but is not limited to:
This tutorial makes sure you get your tools set up with all the necessary components so that you won't run into issues later on by having missing parts.
- Adding new units
- Adding new abilities
- Adding new icons for units
- Creating your very own balance mod
This tutorial makes sure you get your tools set up with all the necessary components so that you won't run into issues later on by having missing parts.
Installing the tools
The first step of getting started with modding Company of Heroes 2 using the official tools is to get them.
To find the tools, move your mouse over "Library" and then select "Tools" from the dropdown menu. Then find "Company of Heroes 2 Tools" from the list. It should be located at the top part of the list. Once you've found it, right click it and select Install.
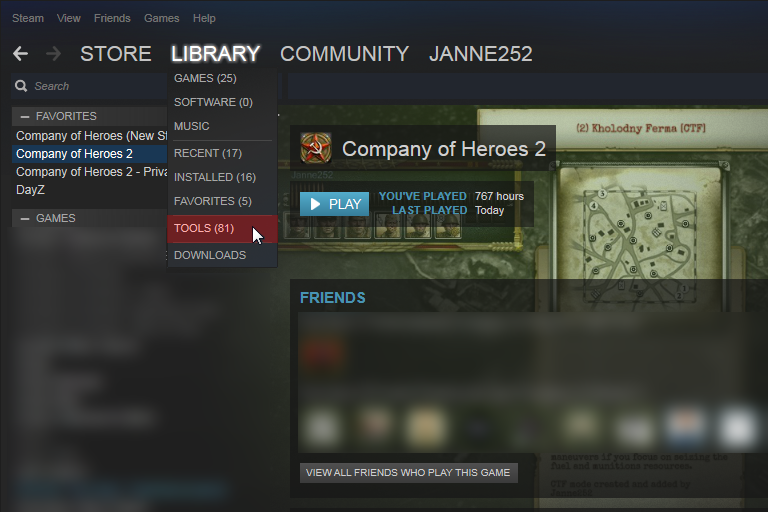
Figure 1: How to access tools on Steam Library
Running the tools and Configuration
Once the installation process of the Company of Heroes 2 Tools is finished, go ahead and open the tools, by double-clicking them the tools list. Pro-tip: Add Company of Heroes 2 Tools to your favorites. This way you can quickly access them via your favorites as seen in the figure 1. The window opening up is the COH2 Mod Builder which is used to build the mod and set most of its parameters like mod's name and description.
The first thing you should do is to open the Options window. You can do that by moving your mouse over "Tools" and then by selecting "Options..".
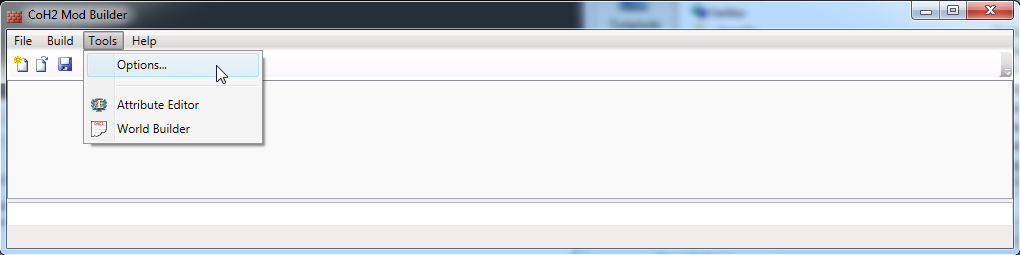
Figure 2: Opening the Options window
You should set these values:
Wait a second. What Flex SDK? No worries. Just head to this place and download Adobe Flex 4.6 SDK or newer version. It's a zip archive with a size of 328 MB. Once you've finished downloading it, you should extract it to a folder which you will then link to the Company of Heroes 2 Modding Tools as seen below:
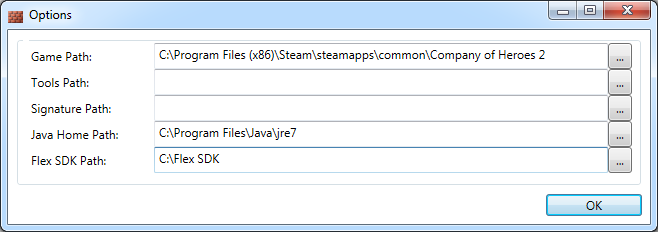
Figure 3: Correctly filled in values in the Options Window
Once you've set all the necessary paths (currently only 3) you are ready to proceed to the next step which is actually creating a new mod.
The first thing you should do is to open the Options window. You can do that by moving your mouse over "Tools" and then by selecting "Options..".

Figure 2: Opening the Options window
You should set these values:
- Game Path: Path to your Company of Heroes 2 Installation directory, for example C:\Program Files (x86)\Steam\steamapps\common\Company of Heroes 2
- Java Home Path: Path to your Java installation directory, for example C:\Program Files\Java\jre7\
- Flex SDK Path: Path to the folder you extracted Flex SDK, for example C:\Flex SDK
Wait a second. What Flex SDK? No worries. Just head to this place and download Adobe Flex 4.6 SDK or newer version. It's a zip archive with a size of 328 MB. Once you've finished downloading it, you should extract it to a folder which you will then link to the Company of Heroes 2 Modding Tools as seen below:

Figure 3: Correctly filled in values in the Options Window
Once you've set all the necessary paths (currently only 3) you are ready to proceed to the next step which is actually creating a new mod.
The first mod
To create a new mod, click the "New" button.
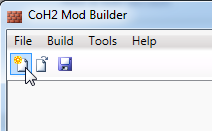
Figure 4: New mod
Then select "PropertyBagGroupPack" from the type list. PropertyBagGroupPack means the same thing as tuning pack.

Figure 5: Selecting Mod type
Click OK.

Figure 4: New mod
Then select "PropertyBagGroupPack" from the type list. PropertyBagGroupPack means the same thing as tuning pack.

Figure 5: Selecting Mod type
Click OK.
Property Bag Group Wizard
Creating new mods is easy. Just fill in the values as shown below:
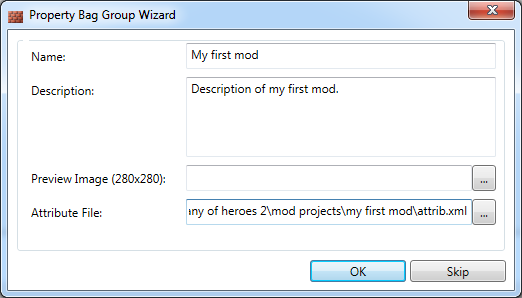
Figure 6: Filling the Property Bag Group Wizard
I would recommend saving your mod projects to C:\Users\**YOUR NAME**\Documents\my games\company of heroes 2\mod projects
Also remember to use sub folders for each mod so that it's easier to maintain multiple mods.

Figure 6: Filling the Property Bag Group Wizard
- Name: Name of your mod
- Description: Description of your mod
- Preview Image (280x280): If you happen to already have a preview image for your mod, you should select it with the open file dialog by clicking the button "...". Note: The preview image has to be in .tga format. Any other format will break your mod and it will not be available in-game.
I would recommend saving your mod projects to C:\Users\**YOUR NAME**\Documents\my games\company of heroes 2\mod projects
Also remember to use sub folders for each mod so that it's easier to maintain multiple mods.
- Attribute File: Click the button "..." and browse to C:\Users\***YOUR NAME***\Documents\my games\company of heroes 2\mod projects and create a new folder for your modification. If you don't have the folder "mod projects", create it. You could name your mod's sub-folder as "my first mod". Once you've created the necessary folders, you can finally choose a name for your attrib file. I would recommend naming it as "attrib". Click Save.
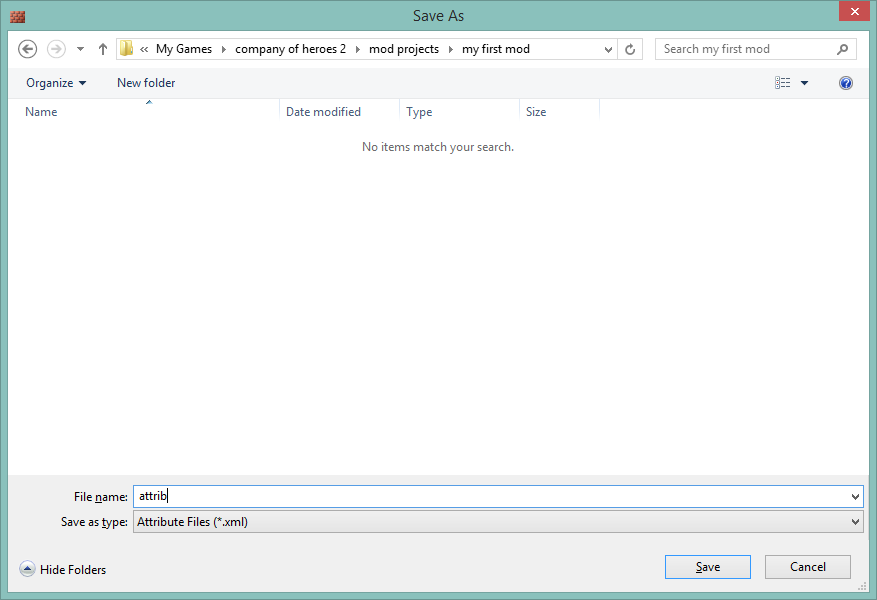
Figure 7: Saving the Attrib file to your mod's own sub folder
Once you've set all three fields (or four if you already had that preview image laying around), click OK and precede by saving your mod, either by clicking the save icon or by pressing Control+S on your keyboard.
Use the opening Save As window to save your mod's .mod file to your mod's sub-folder. You could save it as "my first mod".
Once that's done, we are ready to do some attribute editing.

Attribute changes
The main and most visible parts of a Tuning pack mod are the Attribute changes. These are done with a tool called Attribute Editor (AE in short). Attribute files define pretty much everything you can see in the game, from weapon damage to squad upgrades. It would be a waste of time to list everything you can do with Attribute files as it's better to explore yourself.
Launching the Attribute Editor
Now that we have a working set of tools and a mod to build content on, we are ready do the first Attribute changes.
To start editing the Attributes you will first have to launch the AE. You can do that by browsing to your attrib file in the treeview, right-click it and select "Edit...".
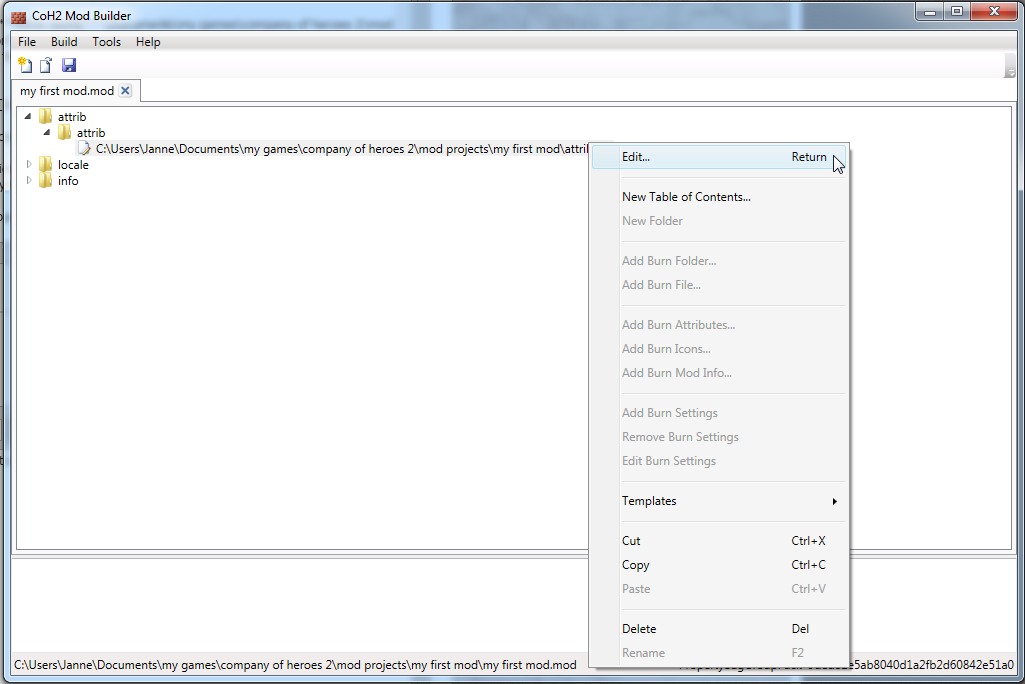
Figure 8: Launching the Attribute editor
AE will load for a while so be patient. Once it's loaded, you should see something like this:
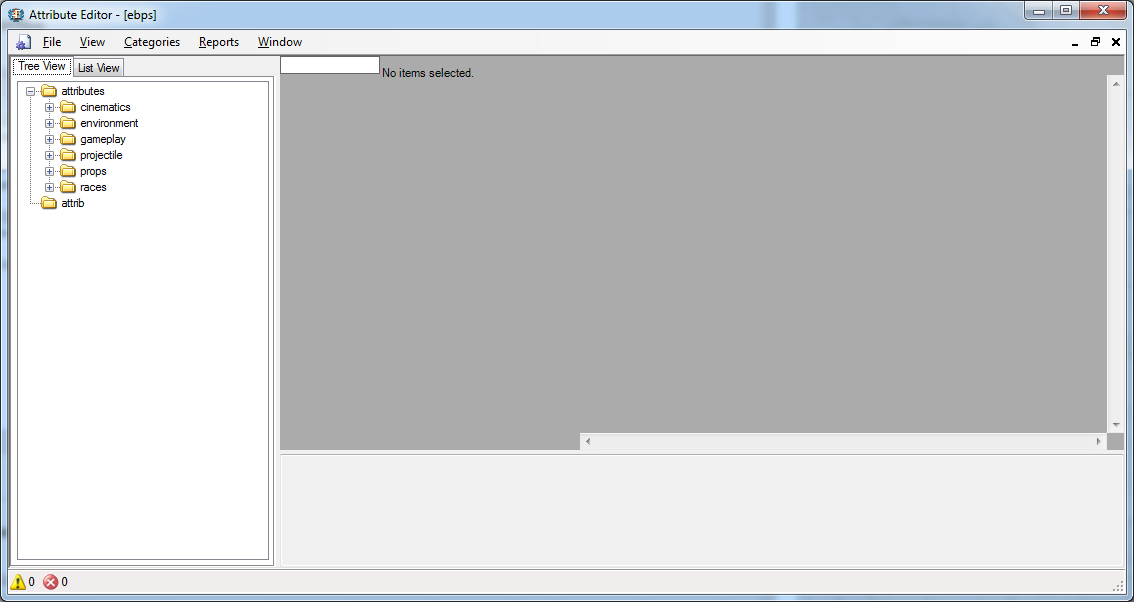
Figure 9: Freshly loaded Attribute Editor
In AE different kinds of Attribute files are divided into categories. You can quickly swap between categories by using the menu "Categories".
In this tutorial we are interested in the category "sbps", which you should now select from the categories.
Here's a list of some of the most common categories:
As you can see, these are quite obvious. It won't take you long to realize what a category is about.
Take a look at the screenshot above. There is this empty folder called "attrib" at the bottom of the treeview. This indicates that you can mod the currently selected category. If you'd select "commander" from the category list you would see that this folder is missing. Currently, you can't mod commanders or intelligence bulletins. A missing folder indicates that you can't mod the currently selected category.
To start editing the Attributes you will first have to launch the AE. You can do that by browsing to your attrib file in the treeview, right-click it and select "Edit...".

Figure 8: Launching the Attribute editor
AE will load for a while so be patient. Once it's loaded, you should see something like this:

Figure 9: Freshly loaded Attribute Editor
In AE different kinds of Attribute files are divided into categories. You can quickly swap between categories by using the menu "Categories".
In this tutorial we are interested in the category "sbps", which you should now select from the categories.
Here's a list of some of the most common categories:
- ebps - Entities. For example a Sturmpioneer squad consists of 4 Sturmpioneer entities.
- sbps - Squads
- Abilities - abilities
- Upgrades - upgrades
- Weapons - weapons
As you can see, these are quite obvious. It won't take you long to realize what a category is about.
Take a look at the screenshot above. There is this empty folder called "attrib" at the bottom of the treeview. This indicates that you can mod the currently selected category. If you'd select "commander" from the category list you would see that this folder is missing. Currently, you can't mod commanders or intelligence bulletins. A missing folder indicates that you can't mod the currently selected category.
First Attribute edit
It's time to perform the first Attribute edit. In this tutorial we are going to tweak the Sturmpioneer squad a bit. If you don't have Oberkommando West faction, you could edit the Ostheer Pioneers instead.
From now on it's important to remember that the faction names are a bit different in the Attribute file system:
Browse to the unit you'd like to edit, right click it and select "Clone..".

Figure 10: Cloning a unit
The next part is important so pay attention.
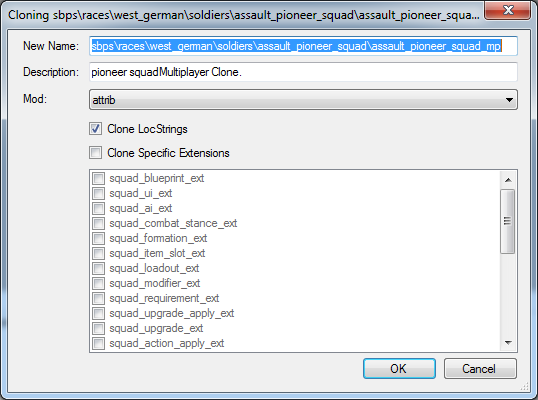
Figure 11: Cloning a unit
Click OK. You should now have the recently cloned unit in your mod's Attributes directory. It will be selected automatically. You can start expanding the extensions treeview which will contain all the data for the unit, such as the unit's loadout, abilities, upgrades, etc.
In this tutorial we are going to add an additional member to the squad by increasing the member count.
Browse to extensions/squad_loadout_ext/unit_list/1. loadout_data/num
This is the amount of members the squad has of this type. For Sturmpioneers, there's only one type of a type defined. For example Soviet Sniper squads have 2 entries in their loadout_data. You should check that for reference.
Change the value num from 4 to 5 and hit Control + S.

Figure 12: Editing the Squad loadout data for Sturmpioneers
From now on it's important to remember that the faction names are a bit different in the Attribute file system:
- aef = US Forces
- west_german = Oberkommando West
- soviet = soviet (really?)
- german = Ostheer
Browse to the unit you'd like to edit, right click it and select "Clone..".

Figure 10: Cloning a unit
The next part is important so pay attention.
- If you don't change the name of the unit while cloning it, the original unit which is being cloned will be overridden by this clone. This allows you to edit existing units.
- However, if you choose to change the name of the unit, a new unit will be created instead. In this tutorial we are not going to change the name of the unit.

Figure 11: Cloning a unit
Click OK. You should now have the recently cloned unit in your mod's Attributes directory. It will be selected automatically. You can start expanding the extensions treeview which will contain all the data for the unit, such as the unit's loadout, abilities, upgrades, etc.
In this tutorial we are going to add an additional member to the squad by increasing the member count.
Browse to extensions/squad_loadout_ext/unit_list/1. loadout_data/num
This is the amount of members the squad has of this type. For Sturmpioneers, there's only one type of a type defined. For example Soviet Sniper squads have 2 entries in their loadout_data. You should check that for reference.
Change the value num from 4 to 5 and hit Control + S.

Figure 12: Editing the Squad loadout data for Sturmpioneers
Building the Mod
Now that we've successfully created an Attribute Edit by cloning a squad and then changing its loadout data, we are ready to build the mod so that we can finally test it.
You don't have to exit AE for the build process. You can just leave it open in the background.
Switch back to the COH2 Mod Builder. Make sure you have saved all changes. If you happen to have the mod preview image now, you can also add it by doing the following:
Browse to the folder "info" in COH2 Mod Builder. Right-click on top of the folder and select "Add Burn File..". Browse to your mod preview image and select it. Note: The preview image has to be in .tga format. Any other format will break your mod and it will not be available in-game.
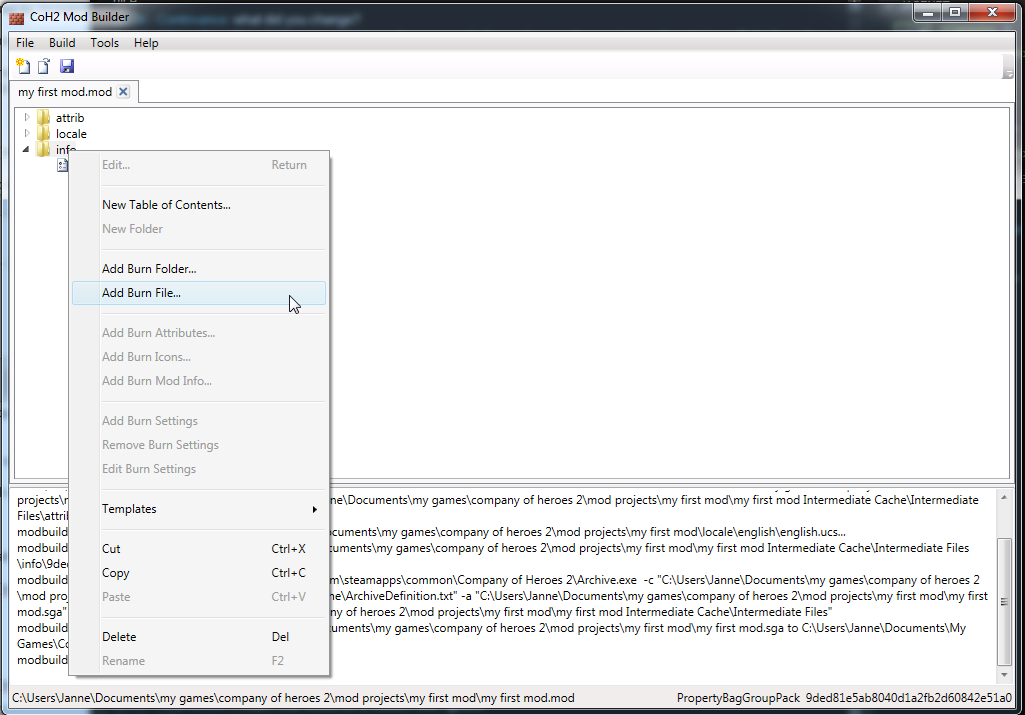
Figure 15: Adding the mod preview image afterwards
Save your changes and precede to the next step.
Build the mod by clicking "Build" and then by clicking "Build". Alternatively you can also press Control+B on you keyboard.
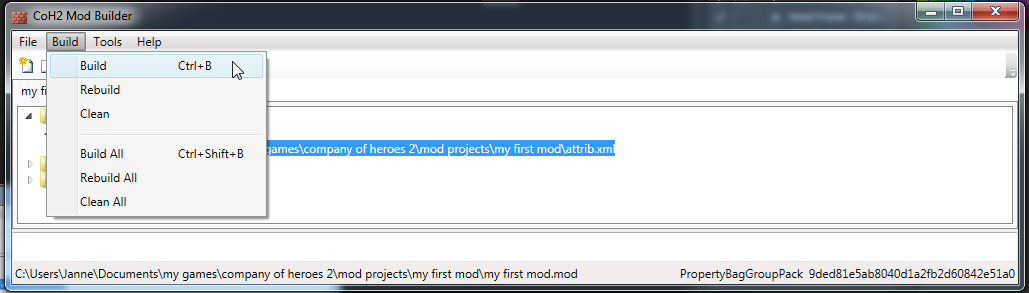
Figure 13: Building the mod
During the build process you see this window:
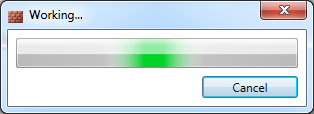
Figure 14: Build in progress
As long as it's visible you should wait patiently.
If everything was set correctly according to this tutorial, your mod should build without errors. However, if you get an error, it will be displayed in the console of the COH2 Mod Builder.
As the last message in the console you should see
Now it's time to move on by testing the mod.
You don't have to exit AE for the build process. You can just leave it open in the background.
Switch back to the COH2 Mod Builder. Make sure you have saved all changes. If you happen to have the mod preview image now, you can also add it by doing the following:
Browse to the folder "info" in COH2 Mod Builder. Right-click on top of the folder and select "Add Burn File..". Browse to your mod preview image and select it. Note: The preview image has to be in .tga format. Any other format will break your mod and it will not be available in-game.

Figure 15: Adding the mod preview image afterwards
Save your changes and precede to the next step.
Build the mod by clicking "Build" and then by clicking "Build". Alternatively you can also press Control+B on you keyboard.

Figure 13: Building the mod
During the build process you see this window:

Figure 14: Build in progress
As long as it's visible you should wait patiently.
If everything was set correctly according to this tutorial, your mod should build without errors. However, if you get an error, it will be displayed in the console of the COH2 Mod Builder.
As the last message in the console you should see
Code
modbuilder.exe Information: 0 : Built my first mod.mod.
Now it's time to move on by testing the mod.
Testing the Mod
Launch Company of Heroes 2, create a custom match. Select your mod as the Tuning pack in the Options and launch the game.
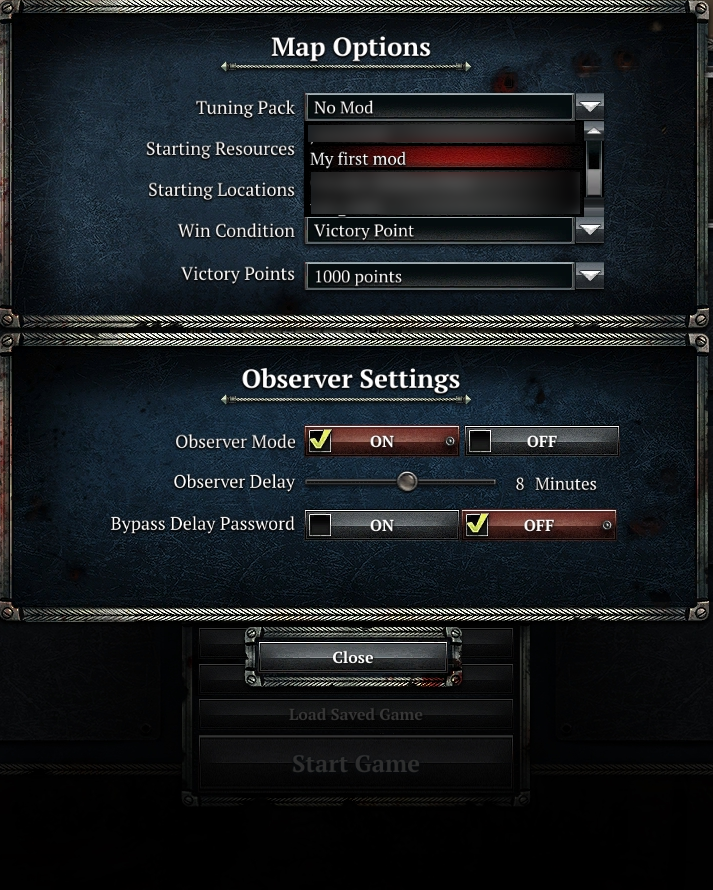
Figure 16: Selecting the Tuning pack
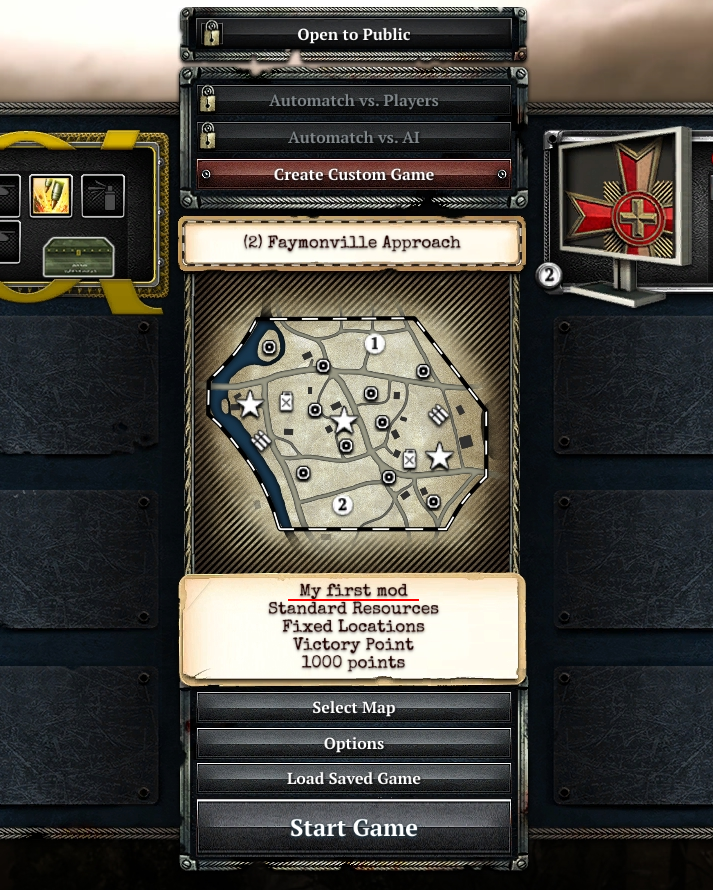
Figure 17: Selected Tuning pack visible in the lobby options
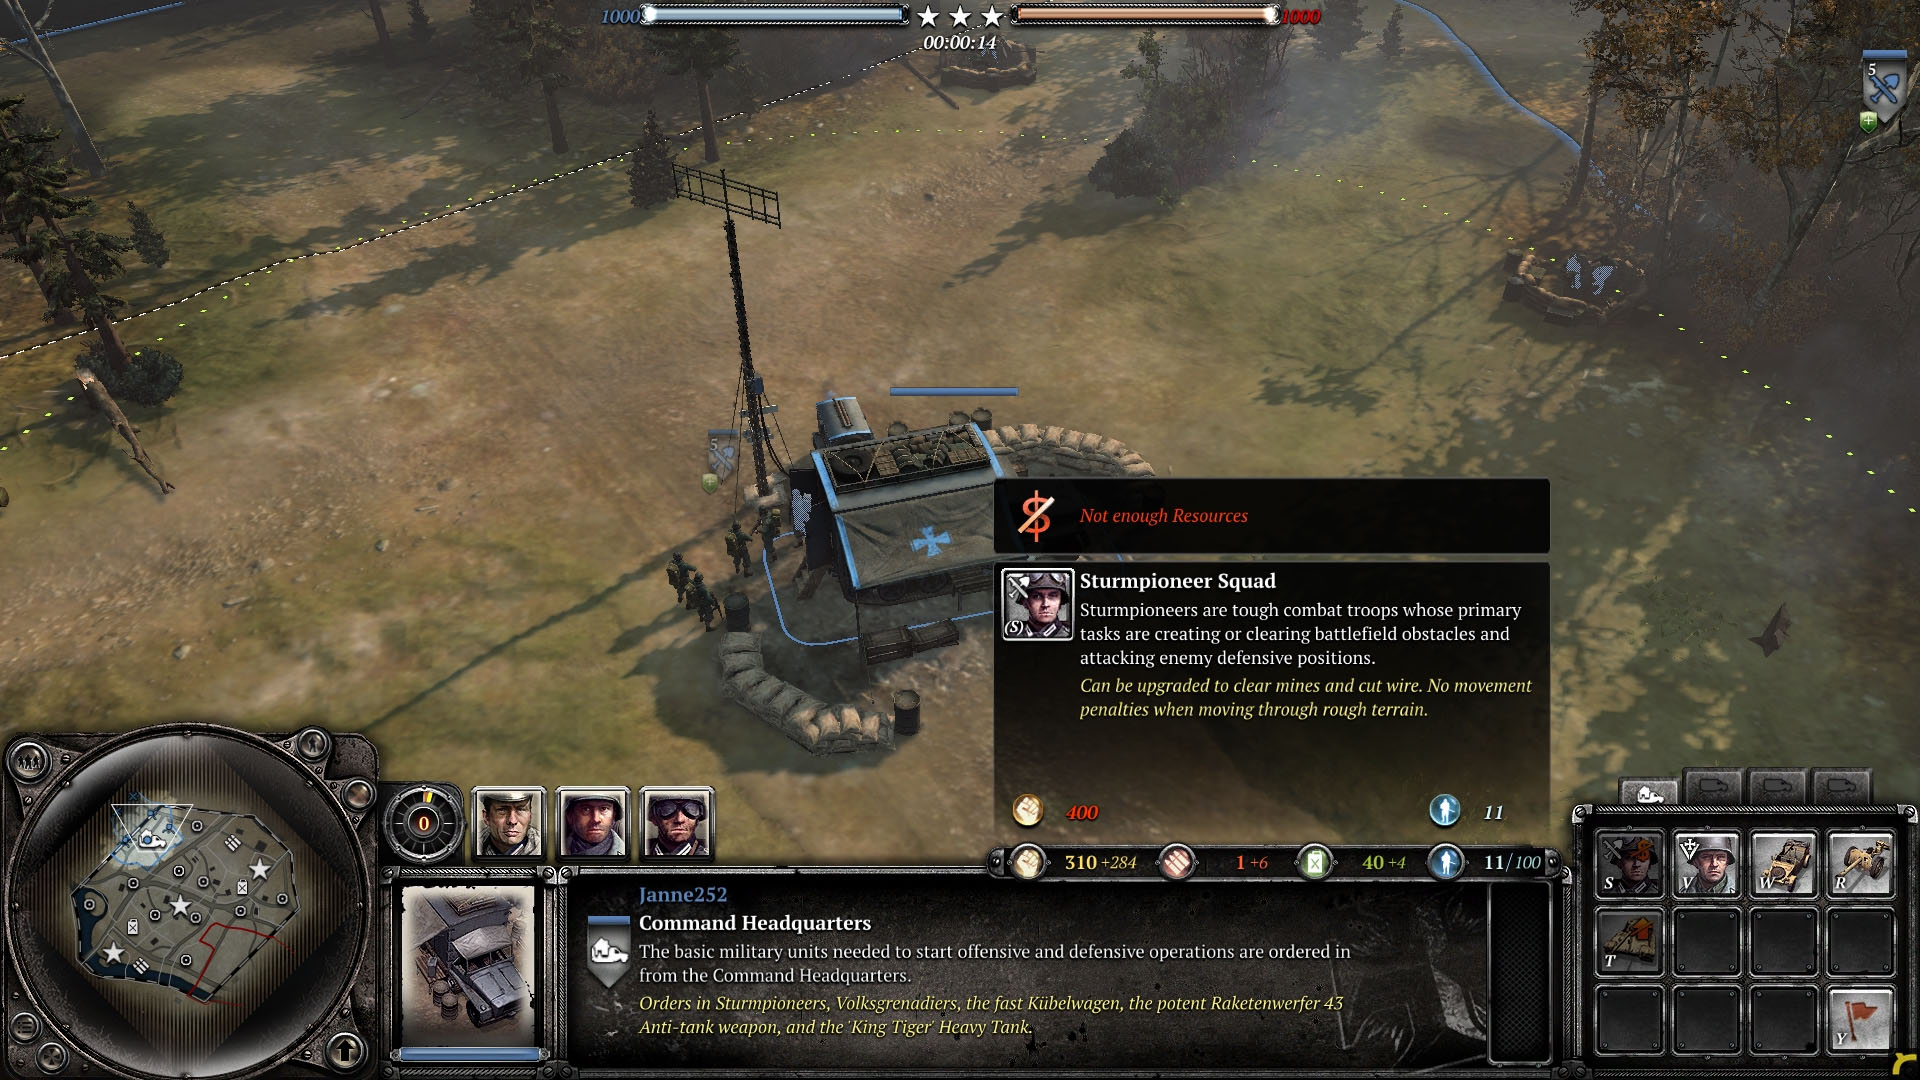
Figure 18: Changes visible in-game.
That's it. You've just created a working mod for Company of Heroes 2 which you can share with other players via the Steam Workshop. The process of publishing a mod to the Workshop is the same as for maps:
Select Workshop from the main menu, browse down to your mod and select Publish.
Closing words/Conclusions
As you can see, the unit costs are automatically calculated. You can take a look at the base values in ebps Category on AE. You can also clone ebps Attribute files to experiment with them. But why stop after sbps and ebps? You should move on cloning abilities and upgrades. See what you can do. Can you edit the cost of the Soviet satchel charge? Can you edit the cooldown of the ISU-152 dispatch ability?
If you have any questions, feel free to ask in this thread. If you get errors, make sure you've set everything according to this tutorial. If that doesn't help, post to this thread and I and the other modders will make our best effort at helping you.
Stay tuned for more modding related tutorials.
If you have any questions, feel free to ask in this thread. If you get errors, make sure you've set everything according to this tutorial. If that doesn't help, post to this thread and I and the other modders will make our best effort at helping you.
Stay tuned for more modding related tutorials.
 Janne252
  tengen
  computerheat