

Introduction
If you enjoy competitive gaming, chances are that you have watched a few streams. Company of Heroes has an active and enthusiastic streaming community, and it all starts right here at COH2.ORG. Whether you're a top player looking to showcase your stuff or a newbie hoping for some on-the-fly coaching, this is the place to begin your streaming career.
What do I need?
As with most good things in life, streaming isn't cheap. If you want a great-looking stream that doesn't kill your performance in the process, you're going to need some good hardware and a good internet connection. Most importantly, you're going to want a powerful CPU, since in some ways that can compensate for the lack of lightning-quick internet speeds. In order to stream in fairly high quality 720p without seriously impacting your performance I would recommend at least an i5 2400. Ideally, you're going to want an overclockable Intel quad-core (i5 2500k/3570k) and an internet connection with high upload bandwidth.
Setting up the game
First things first, we're going to have to configure Company of Heroes a bit. Most streaming clients don't like streaming full-screen games and those that do perform poorly or lack support for COH. Streaming clients like windowed mode, and luckily, Company of Heroes can be played in a window. Unluckily, that window is pretty ugly and isn't too fun to play in either. Many modern games support a 'Borderless Windowed' mode specifically for this purpose; Company of Heroes, however, is from a simpler time. That just means we have to do a little extra tweaking to get the look we want.
NOTE: Running Company of Heroes in windowed mode means you must play the game at your monitor's current resolution. If that is a problem for you, or if it introduces performance issues, you may want to upgrade your hardware before attempting to stream.
First, let's get the game to run in a window. As it turns out, this is rather simple; just open the Properties window on your Company of Heroes shortcut and add the following launch arguments to the Target box:
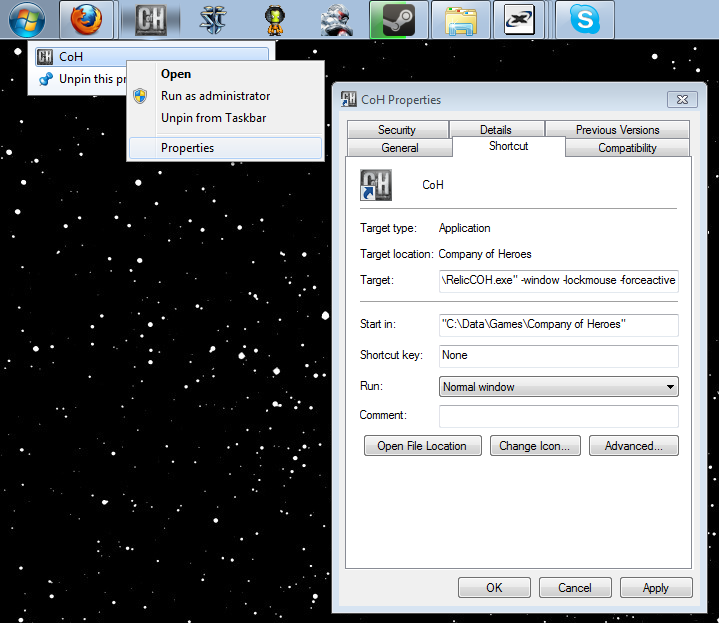
This forces the game to launch in a window and locks the mouse to the game window, allowing you to scroll by mousing to the edges of the screen. This makes the game playable and stream-able in a window, but it still doesn't look all that pretty. Note as well the third argument in the screenshot above:
This argument forces Company of Heroes to remain an active window even if it isn't currently in focus. This allows you to alt-tab and do other things without having to tab back into the game to check if you've gotten an automatch game. It does, however, consume additional resources on your computer; if you can stream at 720p smoothly, you should be able to handle this feature easily, but if you experience performance issues it might be something to disable.
Now that we're all set to play in a window, it's time to make things pretty. To do this, we'll be using AutoHotkey from www.autohotkey.com. All you have to do is install AutoHotkey onto your machine and run the following script (props to pingtoft for this enhanced version):
Simply copy the above code and paste it into a Notepad file, then save the file as an AutoHotkey script (something like Broadcast.ahk or PrettyWindow.ahk). When saved, double-click on the .ahk file in order to load the script (to make things easier, I copied mine to the Startup folder so it loads automatically every time I start my computer).
Once you've loaded the script, all you have to do is run Company of Heroes and hit CTRL+ALT+Z; the window should fill the screen. Keep in mind that you'll have to activate the script using that key combination every time you load Company of Heroes, since the window settings are lost once the game is closed.
For those of you who want a simpler solution, I've compiled the AHK script above into an .EXE file that you can run without having to install AutoHotkey at all. Just download the cohbroadcast.rar file, unrar it, run it, and use the script as described above.
At this point, you have successfully configured Company of Heroes for streaming. Next up, we'll look at setting up our streaming software.
NOTE: Running Company of Heroes in windowed mode means you must play the game at your monitor's current resolution. If that is a problem for you, or if it introduces performance issues, you may want to upgrade your hardware before attempting to stream.
First, let's get the game to run in a window. As it turns out, this is rather simple; just open the Properties window on your Company of Heroes shortcut and add the following launch arguments to the Target box:
Code
-window -lockmouse
This forces the game to launch in a window and locks the mouse to the game window, allowing you to scroll by mousing to the edges of the screen. This makes the game playable and stream-able in a window, but it still doesn't look all that pretty. Note as well the third argument in the screenshot above:
Code
-forceactive
This argument forces Company of Heroes to remain an active window even if it isn't currently in focus. This allows you to alt-tab and do other things without having to tab back into the game to check if you've gotten an automatch game. It does, however, consume additional resources on your computer; if you can stream at 720p smoothly, you should be able to handle this feature easily, but if you experience performance issues it might be something to disable.
Now that we're all set to play in a window, it's time to make things pretty. To do this, we'll be using AutoHotkey from www.autohotkey.com. All you have to do is install AutoHotkey onto your machine and run the following script (props to pingtoft for this enhanced version):
Code
^!z::
WinSet, Style, -0xC40000, a
WinMove, a, , 0, 0, % A_ScreenWidth, % A_ScreenHeight
return
Simply copy the above code and paste it into a Notepad file, then save the file as an AutoHotkey script (something like Broadcast.ahk or PrettyWindow.ahk). When saved, double-click on the .ahk file in order to load the script (to make things easier, I copied mine to the Startup folder so it loads automatically every time I start my computer).
Once you've loaded the script, all you have to do is run Company of Heroes and hit CTRL+ALT+Z; the window should fill the screen. Keep in mind that you'll have to activate the script using that key combination every time you load Company of Heroes, since the window settings are lost once the game is closed.
For those of you who want a simpler solution, I've compiled the AHK script above into an .EXE file that you can run without having to install AutoHotkey at all. Just download the cohbroadcast.rar file, unrar it, run it, and use the script as described above.
At this point, you have successfully configured Company of Heroes for streaming. Next up, we'll look at setting up our streaming software.
Screen capturing software
Now that we've got our game set up, we need to decide how we're going to stream our gameplay. First of all, we need to sign up for a Twitch.tv account, which will give us a channel to stream from. Next we need to pick our streaming client. Over the years, a number of streaming programs have been released. The most popular are:
XSplit is the most robust and widely used of the three, but is limited to 720p with subpar audio unless a license is purchased. The alternatives are free to use but lack some of the features and ease of use of XSplit. For the purposes of this guide, we'll focus on setting up XSplit for streaming; if you're interested in the alternatives, you'll find that many of the ideas transfer easily.
If you find yourself experiencing performance issues, I recommend you take a look at OBS, which according to many accounts is much less resource-intensive than XSplit and other broadcasters. It is also an alternative for people who prefer open-source software to stream in Full HD 1080p resolution. I will give a short introduction to OBS in the Appendix, highlighting the few differences in setup.
Setting up the stream using XSplit
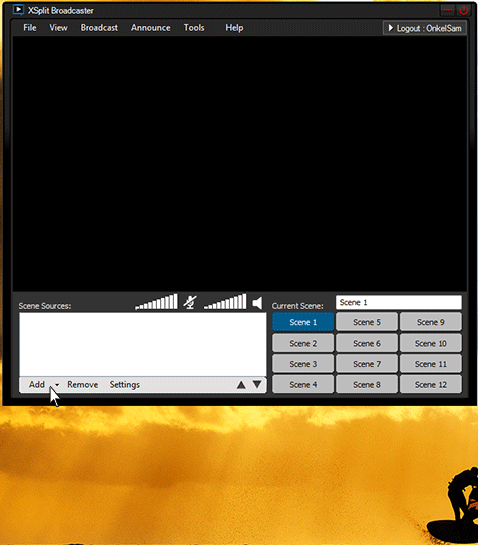
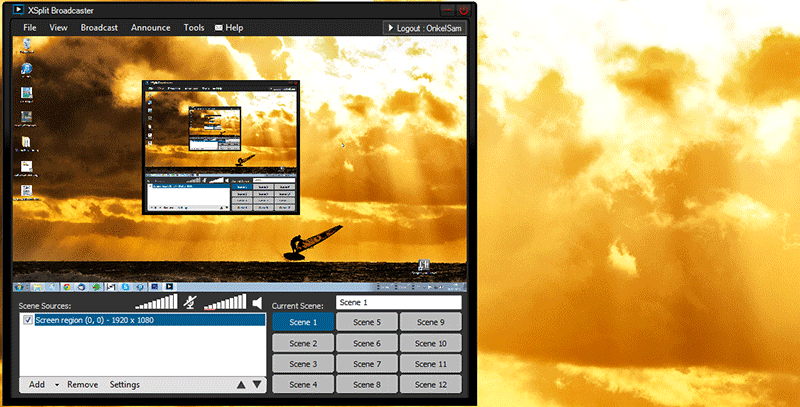
Once you've registered for an XSplit account, downloaded the software, and installed it, we first want to start capturing our screen. Locate the Add button at the bottom of the interface and select "Add screen region..." from the dropdown menu. Drag a box across your screen, then resize the image of your desktop that appears in the XSplit preview window so that it fills the whole area.
Don't worry about framerate or resolution just yet; we'll get to that in a minute. Right now we need to link our Twitch.tv account to our XSplit account and tweak some settings. Navigate to Tools, then select General Settings from the dropdown menu. In the window that appears, select the Channels tab and hit "Add..." to add a new channel. Select Justin.tv/Twitch from the menu that appears and enter your Twitch.tv username and password into the correct boxes.
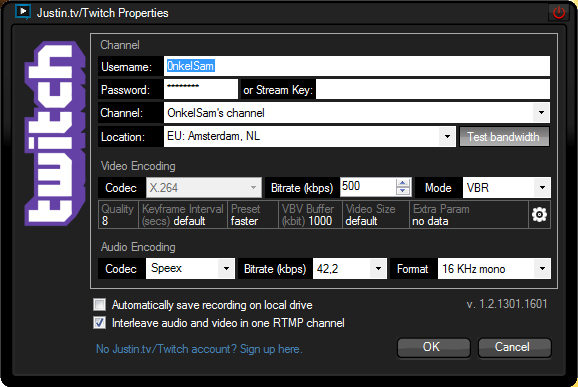
Above is one example of the window you should be looking at. Now that you've entered your account information, it's time to set up the stream. First off, select the server location that has the lowest ping to you (ping is shown under the Last column in the dropdown menu).
The settings that follow are highly reliant on your computer hardware and internet connection. Head over to SpeedTest for a ballpark figure on your upload bandwidth (we're sending data, not receiving it, so upload speed is what we need to be worried about but don't take that number as gospel; there is no guarantee that you can maintain that kind of upload speed to Twitch.tv's servers. It is, however, a good place to start.
Your upload speed is going to dictate the bandwidth you can stream at, and to a certain extent, the resolution and quality of your stream. There are ways to get around that requirement, but we'll get to that later. For starters, set your video bitrate to an acceptable value. If you have excellent upload speeds, 2000kbps is a good place to start. If you aren't quite so lucky, leave yourself a 200kbps buffer between your upload speed and your bitrate. Whatever you settle on, I recommend setting your buffer (the box to the right of bitrate) equal to twice your stream bitrate. This somewhat prevents blurriness when rapid camera movement occurs. Once you have everything set up, hit "Test bandwidth" and let it run.
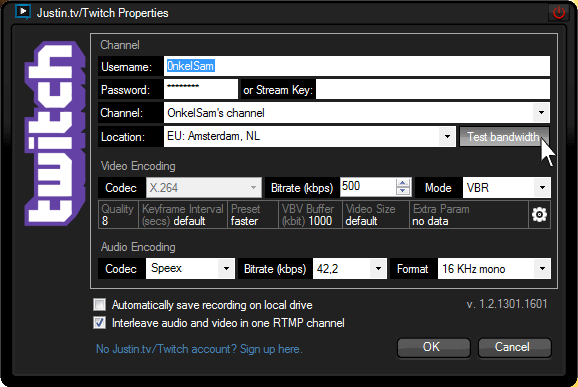
What XSplit's bandwidth tester does is attempt to stream data to your selected Twitch.tv server at the bitrate you specified in your settings. Your connection to Twitch may not be as consistent as your connection to the SpeedTest servers, and this test lets you know if your settings are going to work. If you get a green light, congrats! You can almost certainly stream that bitrate consistently, and you might even be able to bump it up a little bit and try again. If you get yellow or red lights, it's time to drop that bitrate until you find a value that gives you green lights consistently. It's a delicate balance, and it may take some time to get exactly right.
NOTE: A few things to keep in mind about bitrate. First of all, your audio has a separate bitrate, which you can see at the bottom of the window. For the purposes of this guide I've elected to ignore it, but it's important to understand that it gets added on top of your video bitrate. Secondly, be sure to give yourself a large enough buffer between your bitrate and your upload bandwidth in order to allow for unexpected spikes in traffic and game data transfer. XSplit encodes video using a variable bitrate, which means the bitrate you give it is only a recommended maximum value; sometimes you'll be sending more data, sometimes less. Finally, keep your viewers in mind when deciding on a bitrate. Sure, you might be able to handle streaming at 10000kbps, and sure, the stream will probably look amazing, but there aren't many people who will be able to watch your stream because they won't be able to download all that data quickly enough to keep up.
Now that we have our connection details in order, we have to decide on quality settings. These are influenced primarily by your CPU, and instead of presenting a step-by-step guide, I'm going to encourage you to experiment with different combinations until you find something that works well for you.
There are four settings we need to worry about when it comes to stream quality: resolution, framerate, encoder preset, and quality. The latter two are present in the Video Encoding section of the channel settings window.
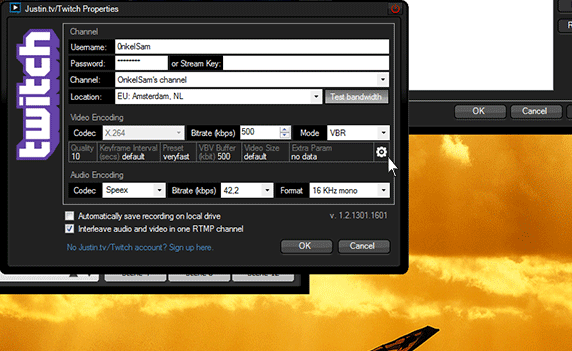
The Quality dropdown menu presents a numeric scale of values corresponding to general stream quality; depending on your CPU, you're going to want this set anywhere from 4 to 10. Try a few until you find a setting that balances performance and appearance well for your machine.
The Preset option is next, and it's one of the most important as far as optimizing your stream is concerned. For most people, the standard XSplit Default preset should work just fine. However, if you have a powerful CPU but a poor upload speed, switching the preset to something slower could improve quality drastically. Alternatively, you can set a faster preset if you have a weaker CPU but more upload bandwidth to spare. For reference purposes, the XSplit Default preset is essentially equivalent to Very Fast. Slower presets introduce greater compression, which means you are able to squeeze more data through the same connection. This can improve the quality of your stream at the cost of taxing your CPU a little bit more.
Resolution and framerate are the final two items to consider when optimizing your stream for quality and performance. In order to change these settings, we're going to jump out of the channel settings window and use the View dropdown.
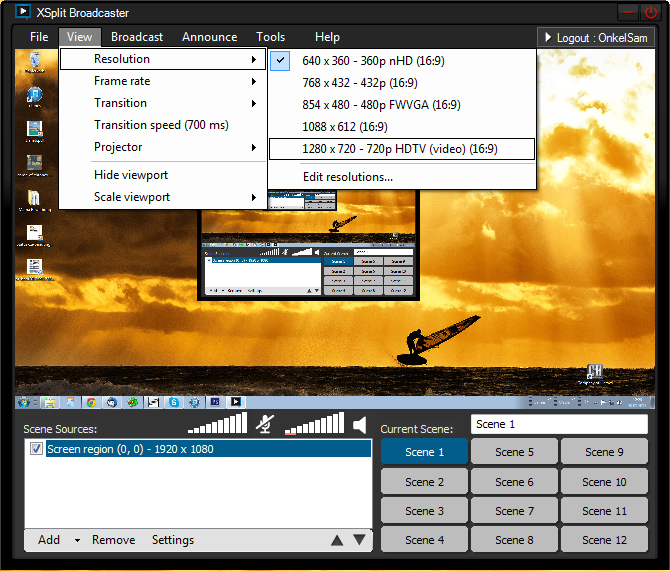
If you don't see the resolution you are looking for in the existing options, adding custom resolutions is a fairly painless process. Just open the Resolutions tab in General Settings and add your own.
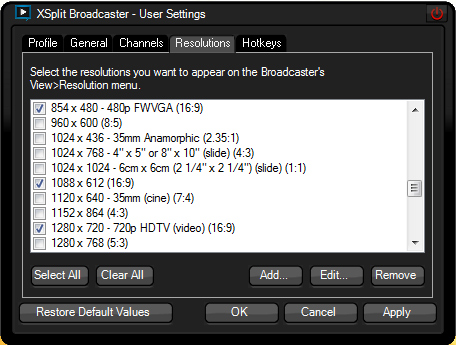
Keep in mind your bitrate and your CPU power when selecting these options; for 1080p (1920x1080), I recommend at least 2000-2500kbps bitrate. For 720p (1280x720), 1500-2000kbps is ideal. However, as you can see from my settings window above, it is absolutely possible to squeeze higher resolutions into lower bitrates. As a rule of thumb, maintain your monitor's aspect ratio when selecting a resolution, and lower your framerate to increase performance if you're struggling with choppy gameplay. Ultimately, tinker with these settings until you find a combination that works for you.
As you can see, setting up a stream is not a cut-and-dry procedure. In fact, it involves a great deal of trial and error, and is a constantly evolving process. Ask around and see what others are doing. Read other guides. You have my settings above to build off as a base, but I don't pretend to possess the most effective way of doing things, and I encourage you to seek out alternatives and post your observations in the comments below.
Don't worry about framerate or resolution just yet; we'll get to that in a minute. Right now we need to link our Twitch.tv account to our XSplit account and tweak some settings. Navigate to Tools, then select General Settings from the dropdown menu. In the window that appears, select the Channels tab and hit "Add..." to add a new channel. Select Justin.tv/Twitch from the menu that appears and enter your Twitch.tv username and password into the correct boxes.
Above is one example of the window you should be looking at. Now that you've entered your account information, it's time to set up the stream. First off, select the server location that has the lowest ping to you (ping is shown under the Last column in the dropdown menu).
The settings that follow are highly reliant on your computer hardware and internet connection. Head over to SpeedTest for a ballpark figure on your upload bandwidth (we're sending data, not receiving it, so upload speed is what we need to be worried about but don't take that number as gospel; there is no guarantee that you can maintain that kind of upload speed to Twitch.tv's servers. It is, however, a good place to start.
Your upload speed is going to dictate the bandwidth you can stream at, and to a certain extent, the resolution and quality of your stream. There are ways to get around that requirement, but we'll get to that later. For starters, set your video bitrate to an acceptable value. If you have excellent upload speeds, 2000kbps is a good place to start. If you aren't quite so lucky, leave yourself a 200kbps buffer between your upload speed and your bitrate. Whatever you settle on, I recommend setting your buffer (the box to the right of bitrate) equal to twice your stream bitrate. This somewhat prevents blurriness when rapid camera movement occurs. Once you have everything set up, hit "Test bandwidth" and let it run.
What XSplit's bandwidth tester does is attempt to stream data to your selected Twitch.tv server at the bitrate you specified in your settings. Your connection to Twitch may not be as consistent as your connection to the SpeedTest servers, and this test lets you know if your settings are going to work. If you get a green light, congrats! You can almost certainly stream that bitrate consistently, and you might even be able to bump it up a little bit and try again. If you get yellow or red lights, it's time to drop that bitrate until you find a value that gives you green lights consistently. It's a delicate balance, and it may take some time to get exactly right.
NOTE: A few things to keep in mind about bitrate. First of all, your audio has a separate bitrate, which you can see at the bottom of the window. For the purposes of this guide I've elected to ignore it, but it's important to understand that it gets added on top of your video bitrate. Secondly, be sure to give yourself a large enough buffer between your bitrate and your upload bandwidth in order to allow for unexpected spikes in traffic and game data transfer. XSplit encodes video using a variable bitrate, which means the bitrate you give it is only a recommended maximum value; sometimes you'll be sending more data, sometimes less. Finally, keep your viewers in mind when deciding on a bitrate. Sure, you might be able to handle streaming at 10000kbps, and sure, the stream will probably look amazing, but there aren't many people who will be able to watch your stream because they won't be able to download all that data quickly enough to keep up.
Now that we have our connection details in order, we have to decide on quality settings. These are influenced primarily by your CPU, and instead of presenting a step-by-step guide, I'm going to encourage you to experiment with different combinations until you find something that works well for you.
There are four settings we need to worry about when it comes to stream quality: resolution, framerate, encoder preset, and quality. The latter two are present in the Video Encoding section of the channel settings window.
The Quality dropdown menu presents a numeric scale of values corresponding to general stream quality; depending on your CPU, you're going to want this set anywhere from 4 to 10. Try a few until you find a setting that balances performance and appearance well for your machine.
The Preset option is next, and it's one of the most important as far as optimizing your stream is concerned. For most people, the standard XSplit Default preset should work just fine. However, if you have a powerful CPU but a poor upload speed, switching the preset to something slower could improve quality drastically. Alternatively, you can set a faster preset if you have a weaker CPU but more upload bandwidth to spare. For reference purposes, the XSplit Default preset is essentially equivalent to Very Fast. Slower presets introduce greater compression, which means you are able to squeeze more data through the same connection. This can improve the quality of your stream at the cost of taxing your CPU a little bit more.
Resolution and framerate are the final two items to consider when optimizing your stream for quality and performance. In order to change these settings, we're going to jump out of the channel settings window and use the View dropdown.
If you don't see the resolution you are looking for in the existing options, adding custom resolutions is a fairly painless process. Just open the Resolutions tab in General Settings and add your own.
Keep in mind your bitrate and your CPU power when selecting these options; for 1080p (1920x1080), I recommend at least 2000-2500kbps bitrate. For 720p (1280x720), 1500-2000kbps is ideal. However, as you can see from my settings window above, it is absolutely possible to squeeze higher resolutions into lower bitrates. As a rule of thumb, maintain your monitor's aspect ratio when selecting a resolution, and lower your framerate to increase performance if you're struggling with choppy gameplay. Ultimately, tinker with these settings until you find a combination that works for you.
As you can see, setting up a stream is not a cut-and-dry procedure. In fact, it involves a great deal of trial and error, and is a constantly evolving process. Ask around and see what others are doing. Read other guides. You have my settings above to build off as a base, but I don't pretend to possess the most effective way of doing things, and I encourage you to seek out alternatives and post your observations in the comments below.
Alternative: Open Broadcast Software (OBS)
For people who prefer open source software and for those who want to stream in Full HD 1080p resolution + high quality sound, without having to buy a license, I want to introduce you to Open Broadcast Software (OBS), an alternative to XSplit. However, as said earlier, most principles transfer cleanly, so I will only highlight the differences and refer to the main body of this guide for further details.
The first difference you'll encounter, is that you won't have to register an account to use OBS. Simply download, install and fire up the OBS client. Make sure to use the 64bit client, if you have a 64bit operating system. Actually, there is one important restriction! OBS makes use of DirectX 10 features for screen capturing, so you won't be able to use OBS with operating systems that don't support DX10, such as Windows XP.
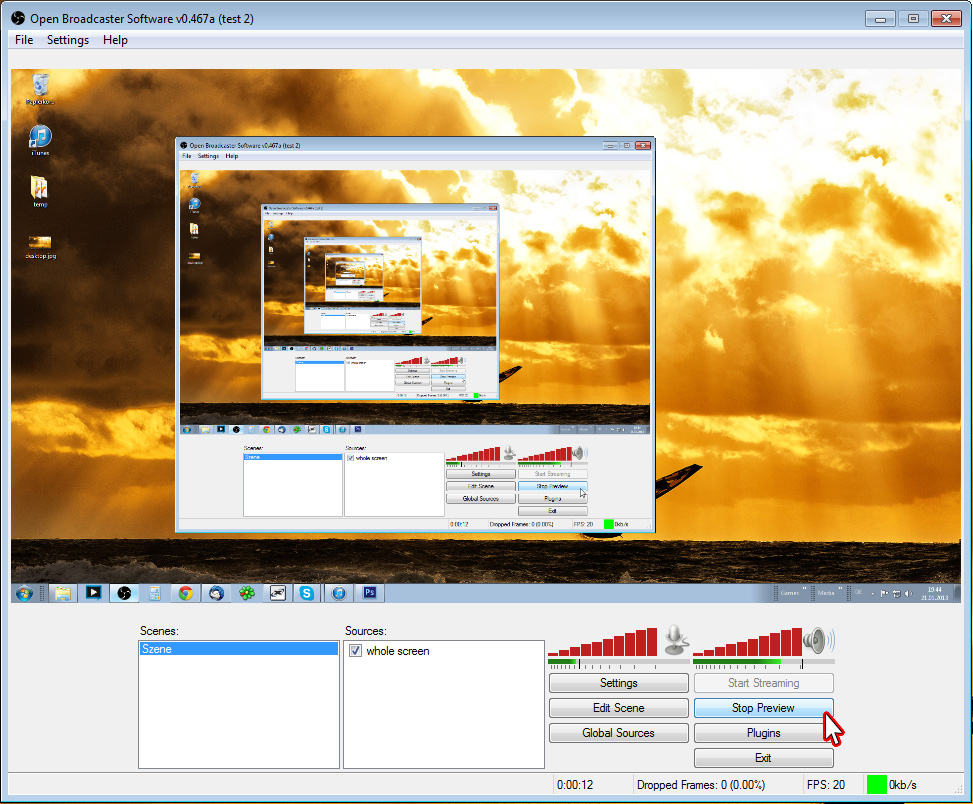
Once you've opened the client, you'll have to add a source for screen capturing, as shown in the following animated figure. Unlike with XSplit, you have the option to simply choose a Monitor you want to capture, without giving fullscreen coordinates.
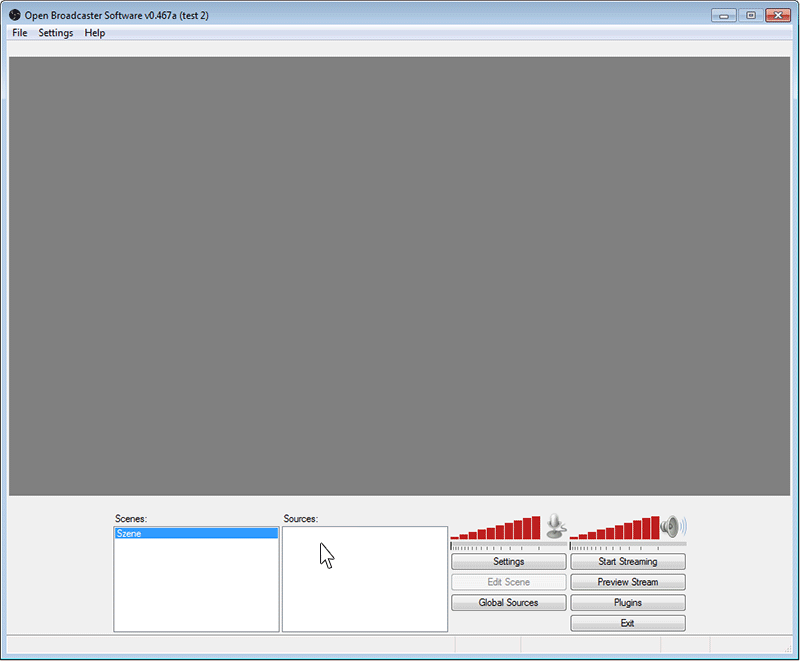
The capturing source should now appear in your "Sources" panel. What remains, is to set up the settings, by highlighting the source and hit "settings". The settings menu will pop up, as shown in the following figure, which also skips through the different tabs that are important to set up.

Video encoding settings follow the same rules as mentioned in the main body of this guide. For audio encoding however you can now use the AAC codec, which is the preferred choice.
The broadcast settings are the thing that differs the most compared to setting up XSplit.
You have to select the server you want to stream to from the "FMS URL" dropdown menu. The servers are identical to those you have available using XSplit, but the OBS client doesn't give you information about your connection speed. Usually it is a safe bet to choose the server with the shortest distance to your location. If you want full information about the connection details, you need to rely on 3rd party software, like JTVPing.
Furthermore, you don't connect to twitch.tv with your login details, but have to use your Stream Key. If you don't know this key, you can find it on twitch.tv/broadcast while you are logged in.
Other settings are either self explanatory, or they are covered in the main body of the guide. Once you've finished setting up the source, you have the option to preview your screen capturing by hitting "start preview" in the main client window. Or you may just start streaming straight away.
The first difference you'll encounter, is that you won't have to register an account to use OBS. Simply download, install and fire up the OBS client. Make sure to use the 64bit client, if you have a 64bit operating system. Actually, there is one important restriction! OBS makes use of DirectX 10 features for screen capturing, so you won't be able to use OBS with operating systems that don't support DX10, such as Windows XP.
Once you've opened the client, you'll have to add a source for screen capturing, as shown in the following animated figure. Unlike with XSplit, you have the option to simply choose a Monitor you want to capture, without giving fullscreen coordinates.
The capturing source should now appear in your "Sources" panel. What remains, is to set up the settings, by highlighting the source and hit "settings". The settings menu will pop up, as shown in the following figure, which also skips through the different tabs that are important to set up.
Video encoding settings follow the same rules as mentioned in the main body of this guide. For audio encoding however you can now use the AAC codec, which is the preferred choice.
The broadcast settings are the thing that differs the most compared to setting up XSplit.
You have to select the server you want to stream to from the "FMS URL" dropdown menu. The servers are identical to those you have available using XSplit, but the OBS client doesn't give you information about your connection speed. Usually it is a safe bet to choose the server with the shortest distance to your location. If you want full information about the connection details, you need to rely on 3rd party software, like JTVPing.
Furthermore, you don't connect to twitch.tv with your login details, but have to use your Stream Key. If you don't know this key, you can find it on twitch.tv/broadcast while you are logged in.
Other settings are either self explanatory, or they are covered in the main body of the guide. Once you've finished setting up the source, you have the option to preview your screen capturing by hitting "start preview" in the main client window. Or you may just start streaming straight away.
Putting it all together
If you've gotten this far, you've managed to configure Company of Heroes for streaming and also set up XSplit and Twitch.tv according to your hardware and internet connection. Congrats! You're officially ready to stream. Start your game, run your script, load up XSplit, hit Broadcast, and see how things look. Don't be afraid to mess around with your settings; optimizing a stream is an art, not a science! Once you find a mix that works for you, you can finally start sharing your gameplay with the world. There is one tiny wrinkle, however; what good is a stream with nobody to watch it? Well, that's where COH2.ORG comes in.
Do you want your stream listed on the LIVESTREAMS widget featured on almost every page of COH2.ORG? Well, it's a relatively simple process. All you have to do is register for an account on COH2.ORG. Navigate to your profile by clicking your name on the top right of the site. On your User CP page, at the bottom in the OPERATIONS box, hit Add Livestream. Enter your details and you're good to go! The flag that will be shown on COH2.ORG is configured by setting your Nationality, and making sure that your Nationality Visibility is set to Public. Both of the flag options are set in Update Profile.
This ends the COH2.ORG Guide to streaming Company of Heroes on Twitch.tv. Thank you for reading, I hope you found it helpful. If you have any questions or comments regarding this article, please do not hesitate to leave them in the comments section below. We will do our best to respond to each and every one of them. Now go forth, and stream!
 Inverse
  OnkelSam
  AmiPolizeiFunk
  12azor